Ads.txt (Authorized Digital Sellers) is a protocol that helps publishers to declare which advertisers are authorized to sell digital ads on their domain. As a publisher, you need to upload a file called ads.txt in root of your domain which contains a list of sellers / advertisers. This ads.txt file is mandatorily required for using any advertising programs like Google AdSense, Mediavine, Raptive, Freestar, etc. However, many ad networks request publishers to redirect ads.txt URL to their CDN URL. If your ad network is asking for this redirect, here’s how you can set it up.
Using Dynamic Ads.txt File
Advertising programs like AdSense require only a single line in the ads.txt file, as Google will be the sole seller. In this case, you simply need to upload the ads.txt file to your domain without setting up a redirect. However, the situation is different when using ad exchange through a network company. The network company may receive demand from hundreds of sellers and all those sellers’ identifications need to be included in the ads.txt file.
Since demand partners frequently change, a static ads.txt file on your domain can quickly become outdated. This could lead to lost revenue if new demand partners are not included in your ads.txt file. To prevent this, ad network companies maintain their own ads.txt file and request that you redirect your domain’s ads.txt file URL to theirs.
This method is acceptable according to the Interactive Advertising Bureau (IAB), which sets the standards for ads.txt, so you don’t need to worry about the setup.
Step 1 – Check Dynamic Ads.txt File of Your Ad Network
When using multiple ad networks, you must ensure that all your sellers are included in a single ads.txt file. Let’s take an example that you plan to display advertisements on your domain from both your Google AdSense account and BuySellAds network. In this case, you should edit the ads.txt file provided by BuySellAds and add your AdSense entry.
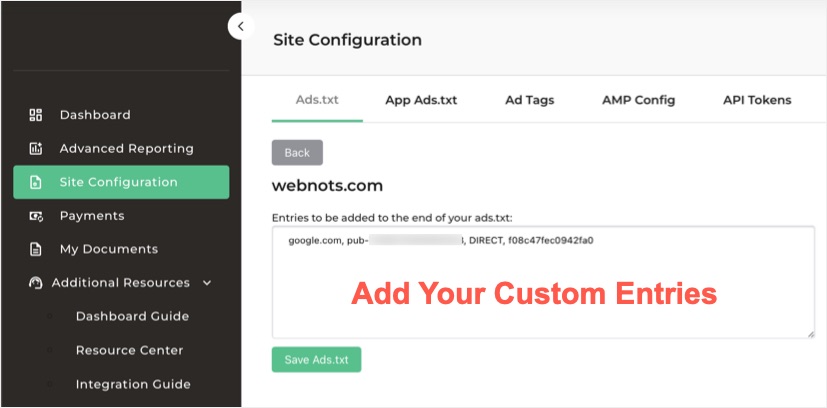
This step is not necessary if you are using only one ad network.
Step 2 – Delete Existing Static File on Your Domain
If you already have an ads.txt file on your domain, be sure to delete it. Any redirect you set up will not work as long as the same file exists on your domain.
- Login to your hosting account.
- Find and open File Manager app.
- Locate ads.txt file in root directory of your domain or app installation.
- Select the file and click the delete icon.
- Confirm your action if prompted.
Step 3 – Setup Redirect from Static to Dynamic File
There are multiple ways to setup 301 redirect and using .htaccess directive is the simplest option for Apache server.
- Login to your hosting account and find the .htaccess file available in root directory of your domain.
- Edit the file and add the following entry at the bottom. Make sure to replace new_path_URL with the ads.txt file URL provided by your ad network.
- Save your changes.
Redirect 301 /ads.txt new_path_URLSometimes you will not have .htaccess file on your domain. In this case, simply create a plain text file using Notepad or TextEdit, add the above entry and save the file with the name as .htaccess. Upload the text file in your root directory to setup the redirect.
If you are using Nginx server, then edit the .conf file located in /etc/nginx/ directory. Add the below lines and save your changes.
location /ads.txt {
return 301 new_path_URL;
}
Step 4 – Delete Your Cache and Test Redirection
Open https://www.yourdomain.com/ads.txt file in a browser window. It should redirect and opens your ad network’s ads.txt file. If the redirect is not working, then make sure to delete the cached files of your domain. Since ads.txt is a static file, it might have been cached at different levels.
- Delete the cached files on your hosting server.
- Check and purge the cached files on your CDN setup.
- If you are using an additional plugin (like in WordPress site), you should also delete that cache.
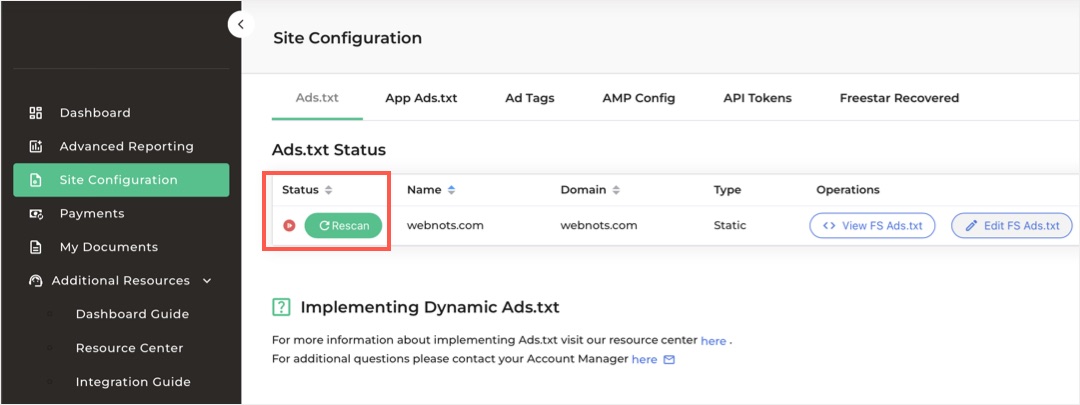
Some ad networks also validate your redirect and show the status in dashboard which you can check. For example, below is an example from Freestar ad network which allows to rescan and test the redirect is setup properly.