Setting up a proper domain-to-domain redirect is important when you change your site address for rebranding or consolidate multiple domains. Done right, visitors land on the correct site automatically, and search engines transfer your rankings from the old domain to the new one instead of treating the new domain as a fresh site. Here’s how to set it up based on your hosting situation.
Using 301 Redirects
The internet works on the HyperText Transfer Protocol (HTTP). When a URL changes, HTTP provides a redirection option to control visitor behavior (visitors include both humans and bots). A 301 permanent redirect tells browsers and search engines that a domain or page has moved permanently to another domain or page. This redirect passes traffic to the new URL, preserving SEO value.
You also have 302 or 307 temporary redirects, which are used for temporarily pointing a URL to another location. In this article, we will explain permanent 301 redirects, not temporary ones.
1. Using Your Hosting Control Panel
All popular hosting panels like cPanel and Plesk offer built-in domain redirect features. If you are using the same hosting account for your old and new sites, this is the best option to redirect all pages from your old domain to the same URLs on your new domain.
Setting Redirect in cPanel:
- Log into your hosting account and access cPanel.
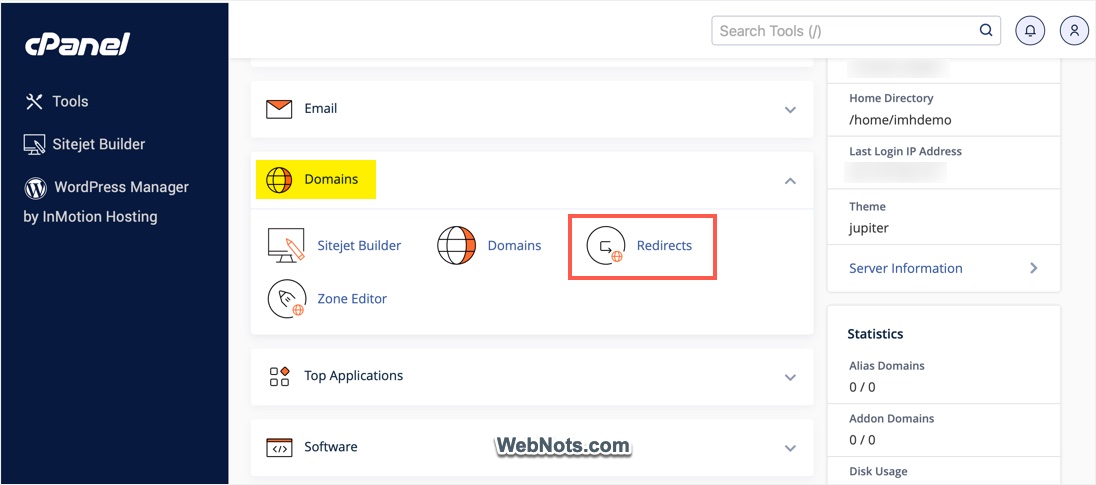
- Expand the “Domains” section and click the “Redirects” option.
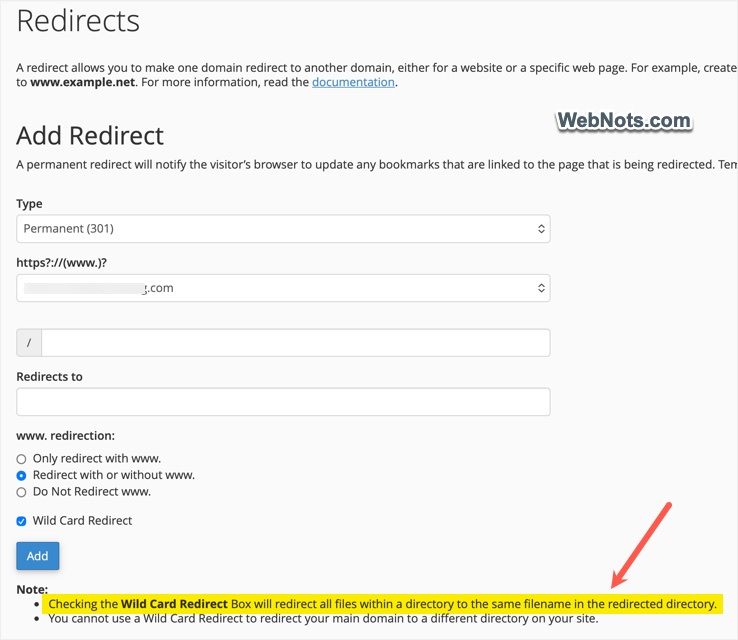
- Select “Permanent 301” as the “Type” and choose your current domain.
- Leave the / field empty to redirect all pages from the current domain to the same URLs on your new domain.
- Enter the destination domain in the “Redirects to” field.
- Select the “Redirect with or without www” option for “www. Redirection”.
- Check “Wild Card Redirect” and click the “Save” button.
Setting Redirect in a Custom Hosting Panel:
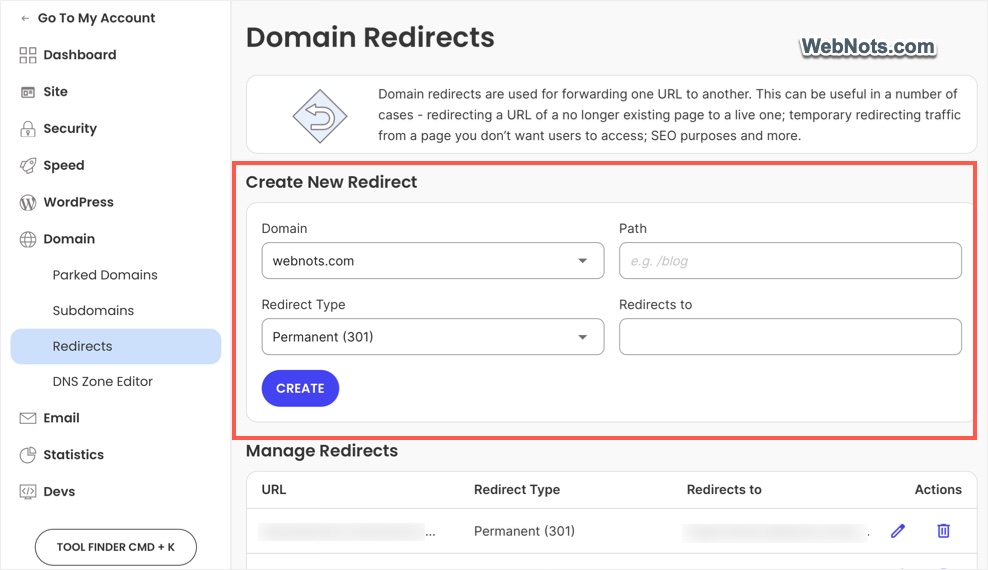
The process may vary if you are not using a standard cPanel setup. Below is how it looks on SiteGround’s Site Tools, which only allows page-level redirects between domains on the same hosting account.
- After logging into your hosting account, select the site and go to the “Site Tools” section.
- Go to “Domain > Redirects”.
- Select your domain or subdomain and type the relative path of the page URL (for example, /about-us/).
- Select “301” as the “Redirect Type” and enter the full URL of the new page (for example, https://www.new-domain.com/about-us/) in the “Redirects to” field.
- Click the “Create” button to add the redirect.
2. Adding Directives in Server Configuration Files
This is the best option if your hosting panel does not provide a redirect option and you prefer to use FTP. Simply edit your server configuration file using FTP (or directly from the hosting panel) and add the following lines at the beginning of the file.
Apache Server (.htaccess file):
Add the lines below to the .htaccess file located in your old domain’s root folder:
RewriteEngine on
RewriteCond %{HTTP_HOST} ^old-domain.com [NC,OR]
RewriteCond %{HTTP_HOST} ^www.old-domain.com [NC]
RewriteRule ^(.*)$ https://www.new-domain.com/$1 [L,R=301,NC]
This preserves the exact path like old-domain.com/about goes to new-domain.com/about. Remove the $1 part if you want everything to hit the new domain’s homepage instead.
Nginx Servers:
Add this to the server block for the old domain:
server {
    listen 80;
    server_name old-domain.com www.old-domain.com;
    return 301 https://new-domain.com$request_uri;
}
If you are using HTTPS, add a similar block for port 443.
3. Using DNS Forwarding
Many domain registrars like GoDaddy and Namecheap offer DNS forwarding. If you manage a large number of domains, this is a suitable option to handle redirects. However, DNS forwarding often strips path information, meaning a URL like https://old-domain.com/products/shoes may go to the new homepage (https://new-domain.com/) instead of the corresponding page. Therefore, use DNS forwarding only for simple, whole-domain moves.
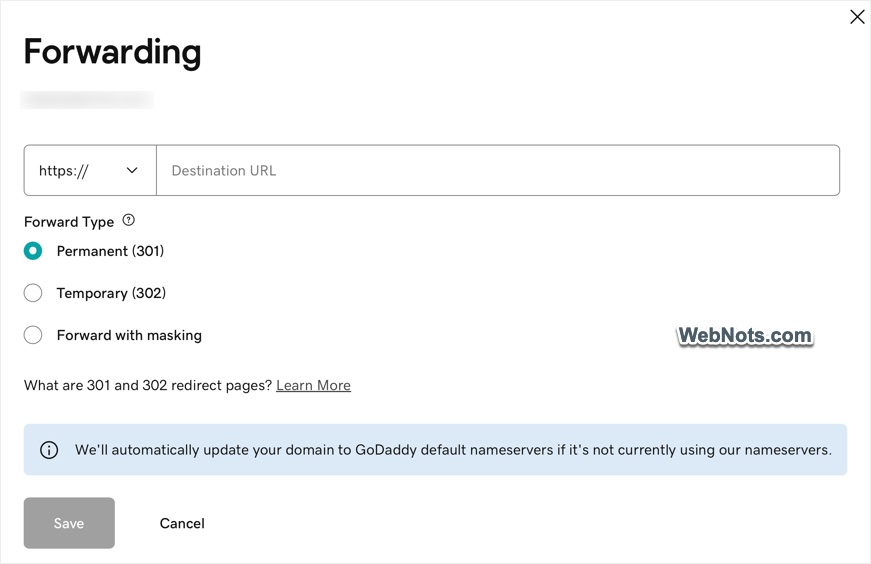
Here’s how to use the DNS domain forwarding feature in GoDaddy (the process may vary with other registrars):
- Log in to your account and go to the DNS settings of the old domain.
- Go to the “Forwarding” tab and click the “Add Forwarding” button for the domain (you can also set up forwarding for subdomains).
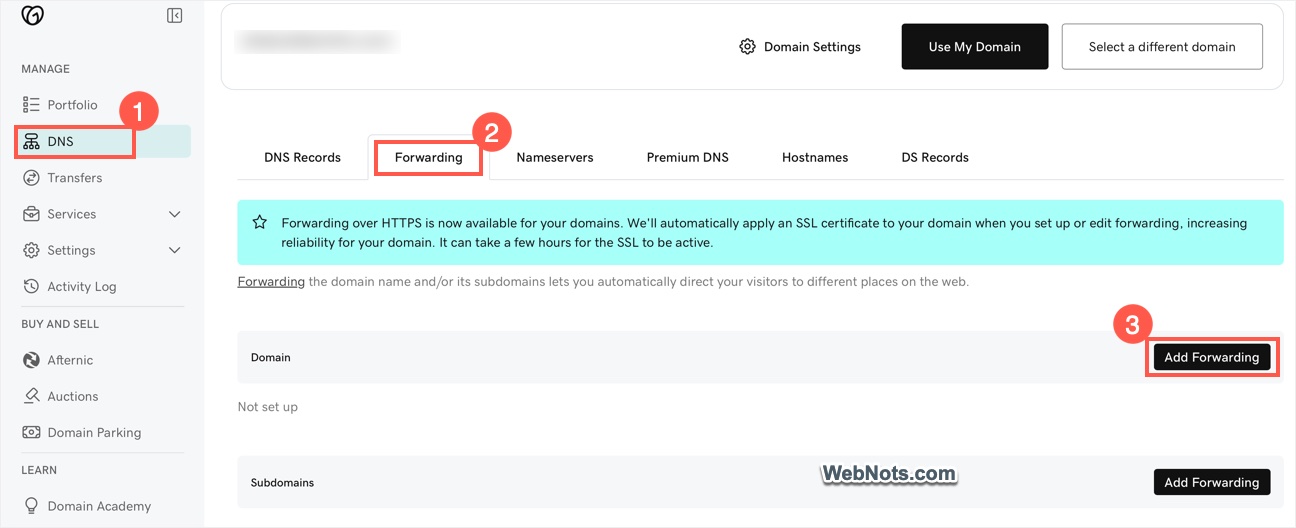
- Enter the new domain in the destination URL and choose 301 as “Forward Type”.
- Click the “Save” button.
Important Points to Consider
Here are some key points to keep in mind while setting up and testing your redirect:
- Test both www and non-www versions of your old domain to ensure they redirect to the correct version of the new domain. Many free online tools (like Redirect Checker or HTTP Status Checker) can verify that your redirect works properly.
- If the old domain uses HTTPS, you need a valid SSL certificate even for redirects; otherwise, browsers will show security warnings.
- 301 domain redirects affect only web traffic (URLs). Other services like email, subdomains, or API endpoints will stop working if you redirect the entire domain. For email, you can set up forwarding separately through your email hosting provider.
- Content management systems like WordPress offer free plugins (like Redirection or Rank Math) for setting up redirects. However, these work at the domain level and cannot be used for domain-to-domain redirects.
- While hosting panel and server-level redirects (.htaccess and Nginx) work instantly, DNS forwarding may take up to 48 hours for DNS propagation to complete.
Redirecting All Pages of Old Domain to a Singe Page of New Domain
Sometimes you may want every URL on domain 1 to redirect to a single page on domain 2. In this case, uncheck “Wild Card Redirect” option in the hosting panel redirect setup or use DNS domain forwarding option. Otherwise, use the following code in your the server configuration file.
For Apache:
RewriteEngine On
RewriteCond %{HTTP_HOST} ^(www\.)?domain1\.com$ [NC]
RewriteRule ^.*$ https://domain2.com/target-page/ [R=301,L]
For Nginx:
server {
    listen 80;
    server_name domain1.com www.domain1.com;
    return 301 https://domain2.com/target-page/;
}