OneDrive is a cloud storage platform from Microsoft which is integrated in Windows 11. You can sync the files in OneDrive and access them across all your devices. However, OneDrive is not free and part of Microsoft 365 yearly subscription plan. You will get 1 TB free with the subscription of Personal plan along with other Office apps. If OneDrive was preinstalled on your computer by PC manufacturer/retailer and you do not want to use it, here is how you can remove OneDrive from Windows 11.
OneDrive Integration in Windows 11
Microsoft is trying to make OneDrive something like iCloud for Apple devices. But it will be annoying to see OneDrive everywhere in the system especially when you are using another service. You will see a OneDrive icon appear in Taskbar system tray section trying to sync files all the time.

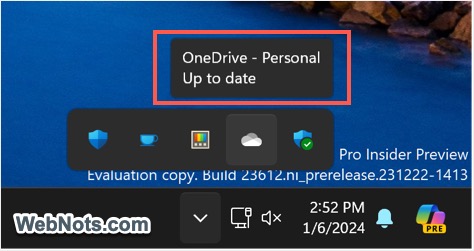
Also, OneDrive location in File Explorer allowing you to browse through the files. You can disable these stuffs if it slows down your system or distracts your work.

1. Remove OneDrive from Automatic Startup
The system tray icon appears automatically as OneDrive is added to the startup apps in Windows 11. This means that Windows will try to sync the files whenever you boot the system and OneDrive app will be always running in background thus impacting the system performance.
- Press “Win + I” shortcut keys to open Settings app. Otherwise, right-click on the Start icon in Taskbar and select “Settings” option from the power user menu that appears.
- When you are in the “Settings” app, go to “Apps” section from the left sidebar.
- Scroll down to the bottom on right pane and click on “Startup” option.

- Find “Microsoft OneDrive” app in the list and turn the button off.

Restart your computer and you will NOT see the OneDrive system tray icon anymore.
2. Completely Get Rid of OneDrive App
The above option will only remove the app from Startup and system tray. However, you will still see OneDrive location in File Explorer and can continue to use the cloud storage. For completely removing the app, you need to uninstall it from your computer.
- Press “Win + I” keys to open Settings app.
- Go to “Apps” section and then select “Installed Apps” option.

- Type “onedrive” in the search box to filter the app.
- Click the three horizontal dots icon showing at the end of Microsoft OneDrive app.
- Select “Uninstall” from the menu.

- Confirm your action by clicking the “Uninstall” button again.
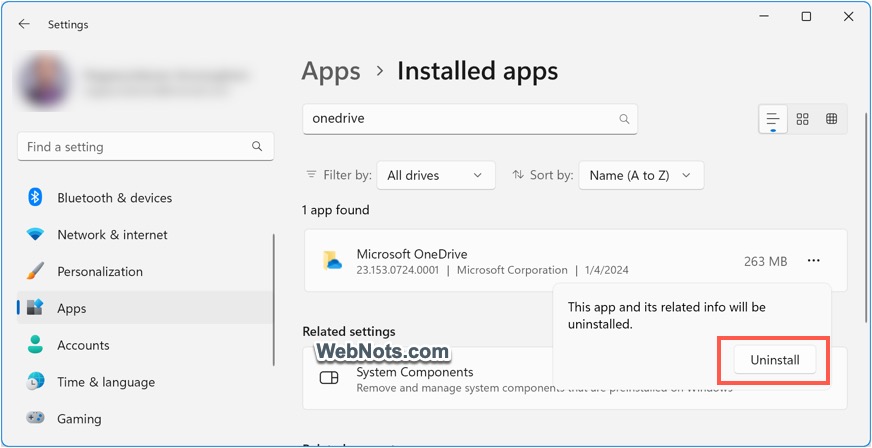
Now check system tray where you will not find the icon and File Explorer also will not show OneDrive location in the sidebar.
Note: You can also unlink the device by clicking on the OneDrive icon in system tray and then navigating to “Settings > Account” section. However, this will only log out from your account and will NOT remove taskbar icon and File Explorer link. Another point is that, uninstalling the app will NOT delete OneDrive folder and installation file from your system. You can go to “C:\Program Files\Microsoft OneDrive\” folder and open the latest version to find the installation file. Double-click on it to reinstall the app if you need.

If you do not need OneDrive, then delete “Microsoft OneDrive” folder.
2.1. Remove Folders from OneDrive File Explorer
There is also an option available to customize OneDrive folders what you see in File Explorer. This is useful if you want to use OneDrive but hide some folders in File Explorer view.
- Click the OneDrive icon showing in Taskbar system tray section.
- Click the gear icon and then select “Settings” menu.

- Go to “Account” tab and click “Choose folders” button.
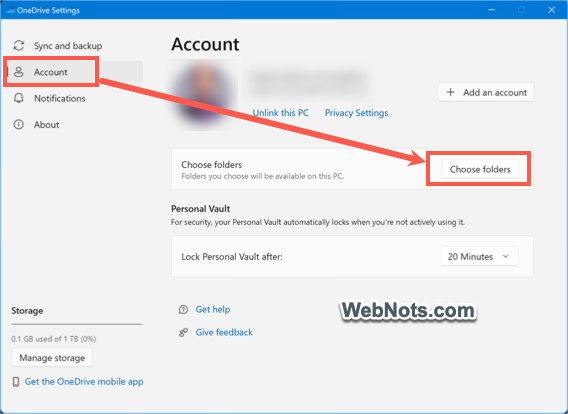
- Select the folder names to show in File Explorer which will automatically uncheck “Make all files available” option.

- Click “OK” button to hide unwanted folders from OneDrive section.
Final Words
If you notice slow startup, then disabling OneDrive from startup apps can help to improve the speed. You will also not see system tray icon and related notifications. To remove the location from File Explorer and get rid of OneDrive, you can simply uninstall the app from your system. This will not delete your existing files and you can access them online using OneDrive website. You can also install the app anytime later by downloading it from Microsoft website. After installing the app, simply login with your account to sync the files and start using the app again.