Windows 11 is built to balance performance across multiple apps and background processes. But sometimes, you need more control – especially when one app needs to run faster, smoother, and with fewer interruptions. Whether you’re gaming, video editing, or running resource-heavy software, manually prioritizing apps can make a noticeable difference. Here’s how to prioritize apps in Windows 11 for the best performance.
What Does “Prioritizing Apps” Mean?
When you prioritize an app, you’re telling Windows to give it more system resources – like CPU time, memory access, or GPU usage – over other running programs. This doesn’t mean it’ll run perfectly, but it does mean it’ll get more attention from your hardware, improving speed and responsiveness where it counts.
1. Use Task Manager to Set Process Priority
The quickest way to give an app more CPU attention is through Task Manager.
- Press “Control + Shift + Esc” to open Task Manager app alternatively, right-click on the taskbar and select “Task Manager” option.
- Go to the “Details” tab and find the app or process you want to prioritize.
- Right-click on it and hover over “Set priority” menu.
- Choose “Above normal” or “High” option.
- You will see a warning that changing priority of certain processes may affect system stability. Click “Change priority” button to confirm the action.
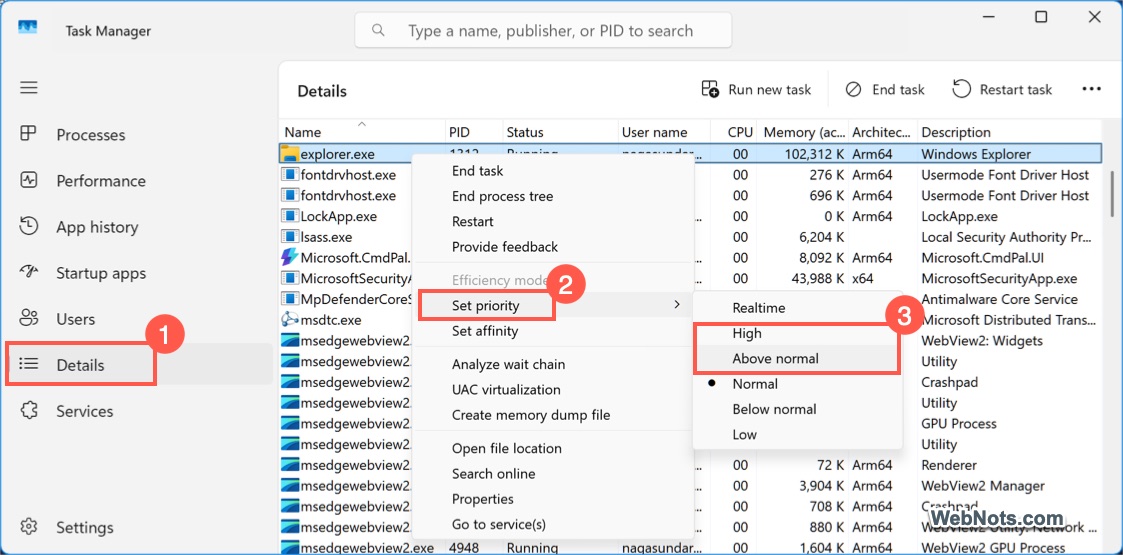

Don’t choose “Realtime” unless you absolutely know what you’re doing as it can cause system instability. This change is temporary and the priority resets after a restart (generally to a normal level).
2. Use Command Prompt to Set Priority
To make priority changes stick or automate them, you can use scripts. Open Command Prompt app in admin mode and run the following command.
wmic process where name="appname.exe" CALL setpriority "128"- 128 = High Priority
- 32768 = Above Normal
Replace appname.exe with the actual process name (you can see in Task Manager). The command will show a message “Method execution successful” indicating the priority is changed successfully. You can also go to Task Manager and confirm the priority is changed as explained above).

3. Adjust Graphics Preferences for GPU-Intensive Apps
Windows lets you choose the GPU preference for apps to boost the performance.
- Right-click on the Start icon and select “Settings” menu.
- Go to “System” section and select “Display” option.
- Scroll down to “Related settings” section and click “Graphics” option.
- Find the app you want to configure and expand it.
- Click the dropdown against “GPU preference” option and choose “High Performance…” to assign the dedicated GPU. You may see a notification that it might cause unexpected result.
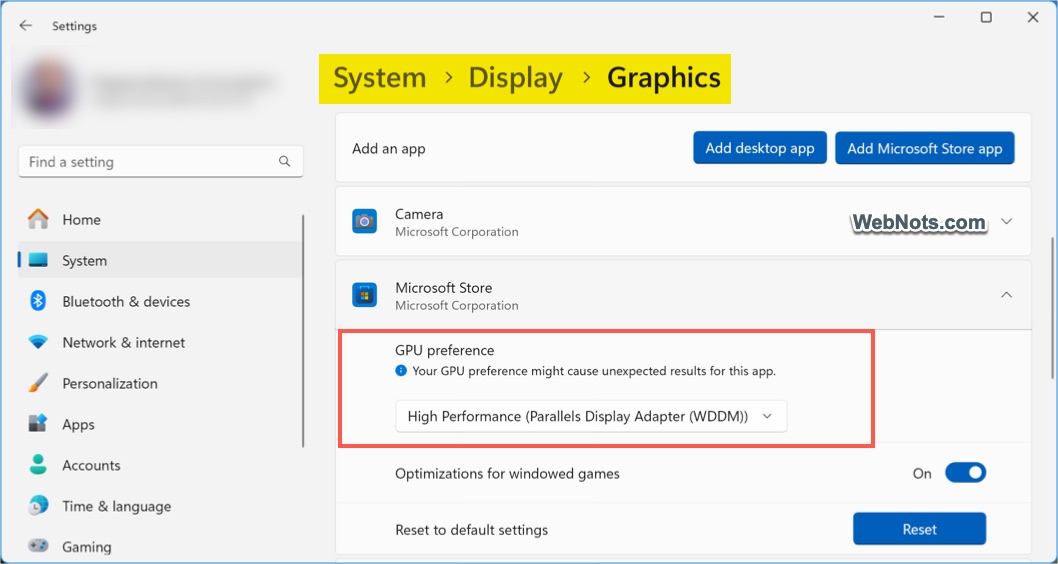
This is especially useful for gaming, video rendering, and 3D modeling software. If you don’t find an app in the list, click “Add desktop app” button to manually browse and add it.
4. Allow System to Work for Best Performance
It is possible to setup the entire system to work for best performance which will eventually allocate more resources for individual running apps.
- Open Settings app and navigate to “System > About” section.
- Expand “Device Specification” section and click on the “Advanced system settings” link showing in “Related links” section.
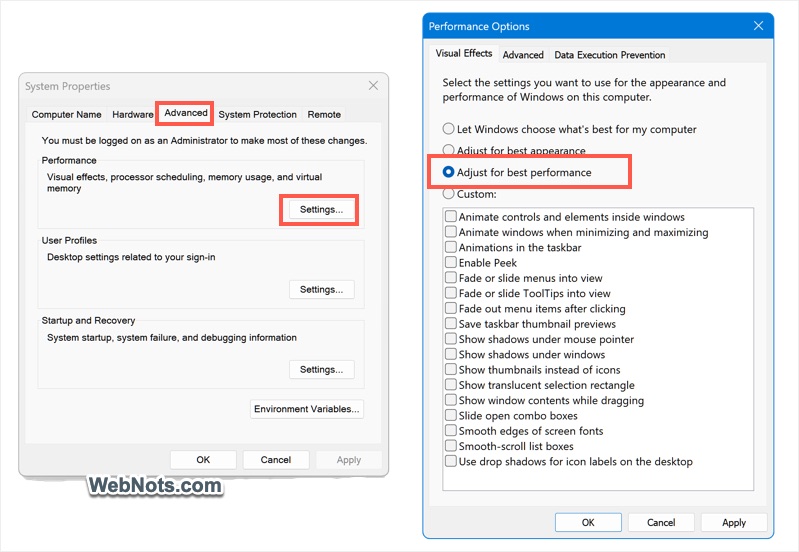
- This will open “System Properties” dialog and go to “Advanced” tab.
- Click on the “Settings…” button under “Performance” section to open “Performance Options” dialog.
- Go to “Visual Effects” tab and select “Adjust for best performance” option.
- Click “Apply” and then “OK” buttons.
5. Use Power Mode for Performance
You can also configure the power mode and allow Windows to work best for performance (on laptops with battery).
- Go to “Settings > System > Power & battery” section.
- Expand “Power Mode” option and select “Best performance” for both “Plugged in” and “On battery” options.
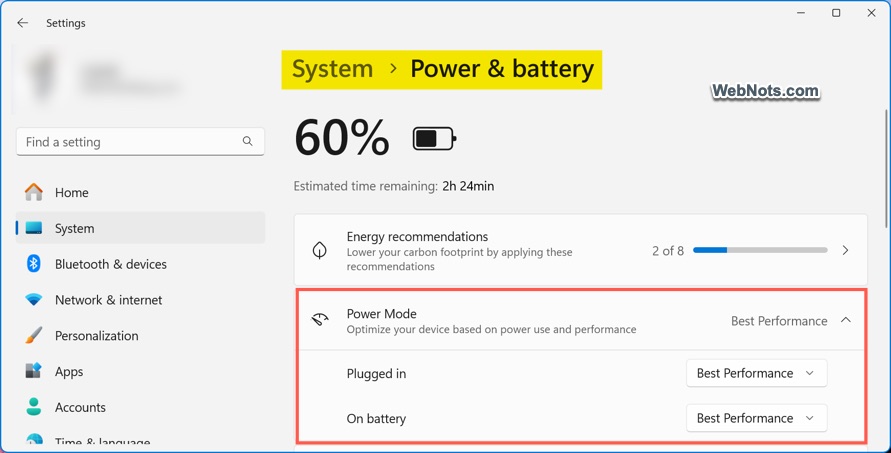
This keeps your CPU and GPU running at higher speeds, at the cost of battery life (if on a laptop).
6. Limit Background Apps
If you do not want to manually prioritize an app, freeing up system resources helps app run better. One option is to disable the background activities of unnecessary apps so that resources can be allocated to other useful apps.
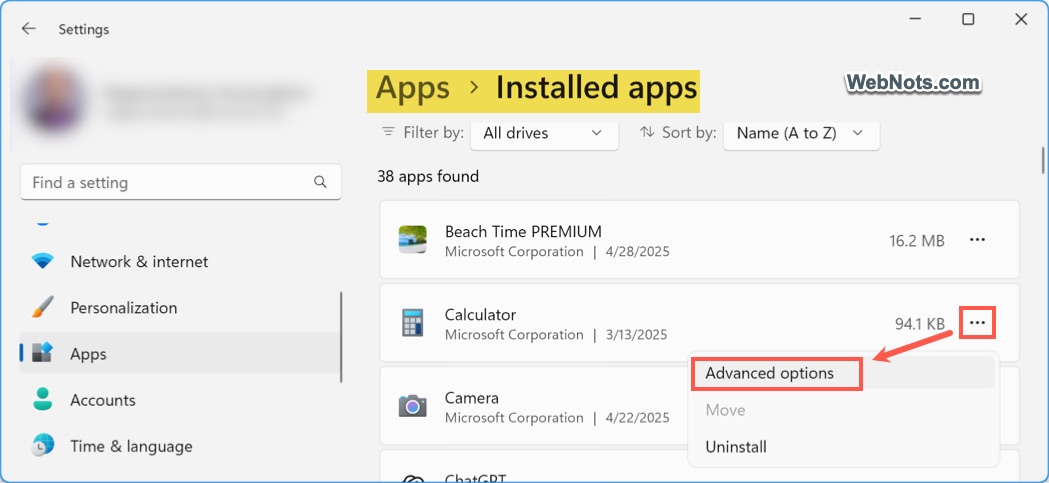
- Go to “Settings > Apps > Installed apps” section.
- Click the three dots next to an app and choose “Advanced options”.
- Click the dropdown under “Background apps permissions” heading and select “Never”.

7. Enable Sleep Mode in Edge
If you are looking for prioritizing active tabs on Microsoft Edge browser, it is possible to freeze other inactive tabs. It will help Edge to reallocate the RAM / CPU used by those inactive tabs in the background to the active tabs thus speed up your browsing.
- Open Edge and go to edge://settings/system/managePerformance page.
- Turn on “Save resources with sleeping tabs” option.
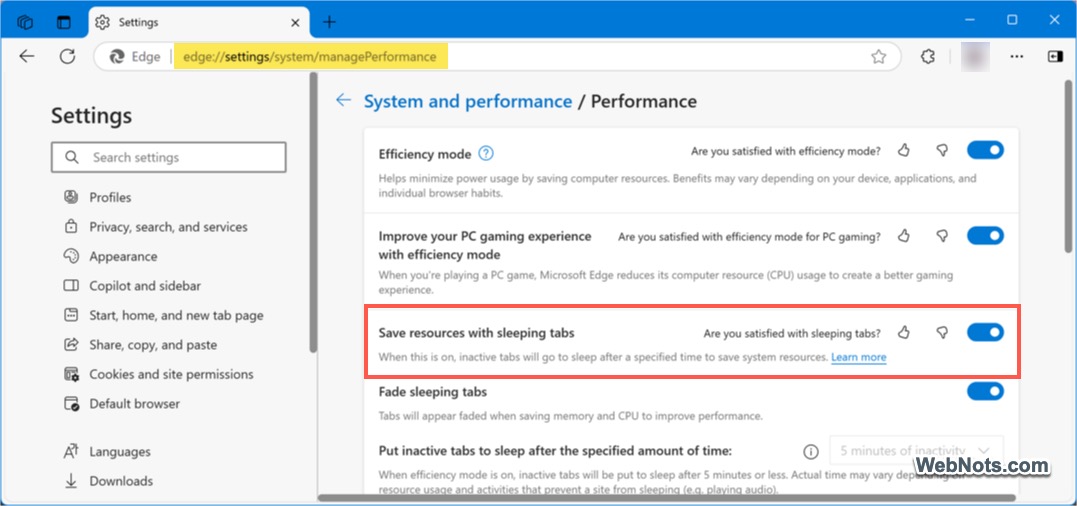
You can also allocate specific RAM for Edge on the same settings page under “Resource controls” section.
Tips for Prioritizing Apps
- Don’t prioritize too many apps at once as it defeats the purpose.
- Always monitor your system’s temperature and usage when tweaking performance settings.
- Keep your system clean from unnecessary software and bloatware.
Final Words
Prioritizing apps in Windows 11 is simple once you know where to look. With just a few adjustments in Task Manager, Settings, or GPU preferences, you can make sure the apps that matter most get the power they need to perform their best. Otherwise, you can adjust the system to work for best performance from System Properties and Power Mode settings.