
In our earlier article, we have explained how to simultaneously edit multiple sections of a Microsoft Word document. Sometimes all you need is to move an entire section to another position to properly structure your content. Whether you’re reorganizing content for better readability, structuring a report, or shifting sections in a lengthy document, knowing how to move sections efficiently can save you time and effort. In this article, we’ll explore different methods on how you can do that.
Understanding Sections in Microsoft Word
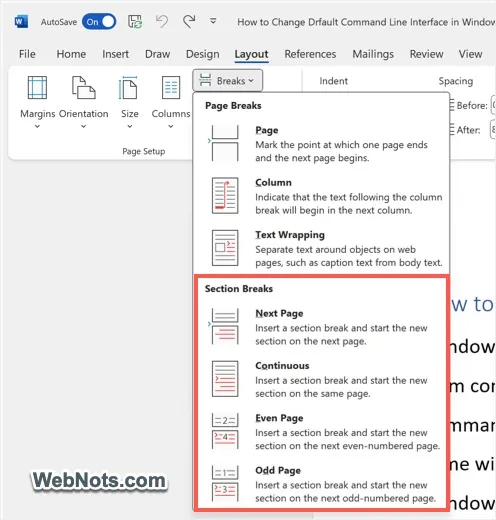
Before diving into moving sections, it’s important to understand what a section is in Word. A section is a portion of a document that can have its own formatting, headers, footers, page orientation, or numbering. Sections are separated by Section Breaks and you can insert a section break in Word by going to “Layout > Breaks > Section Breaks” menu and selecting one of the available options.
- Next Page – Starts a new section on the next page.
- Continuous – Keeps the section on the same page.
- Even Page – Starts a new section on the next even-numbered page.
- Odd Page – Starts a new section on the next odd-numbered page.
Though Word offers this feature, most of us structure the content with headings rather than formal sections (i.e., sections without section breaks).
Method 1: Moving Sections Using the Navigation Pane (For Headings)
If your document is structured with Headings (Heading 1, Heading 2, etc.), you can use the Navigation Pane to move sections easily:
- Open your Word document and go to “View” tab in the Ribbon.
- Check the box for “Navigation Pane” under the “Show” group.
- The Navigation Pane will appear on the left side of the screen.

- Click on “Headings” in the pane to view the document structure.
- Drag and drop a heading to a new position. The entire section under that heading will move with it. You can see a divider line while moving to find the possible positions and Word will highlight the entire section after moving to a new position.

This method is quick and effective if your document is well-organized with headings but does not move formal section breaks.
Method 2: Moving Sections with Cut, Copy, and Paste (For Any Section Type)
If your document includes section breaks or are not defined by headings, you’ll need to manually move them using cut and paste.
- Go to “Home” tab and click “Show/Hide ¶” icon in the “Paragraph” group. Alternatively, press “Control + Shift + 8” or “Control + *” shortcut keys. This will reveal all formatting symbols, including section breaks.
- Click at the beginning of the section. Drag down to highlight everything in that section, including the section break at the end.

- Press “Control + X” in Windows or “Command + X” in Mac to cut the section.
- Scroll to where you want to place the section and click there. Press “Control + V” in Windows or “Command + V” in Mac to paste the section in the new position.
Since section breaks carry formatting settings (e.g., margins, columns, headers), review the formatting to ensure everything remains correct.
Method 3: Using Outline View for Easy Reordering
The Outline View provides another efficient way to move sections if your document uses headings.
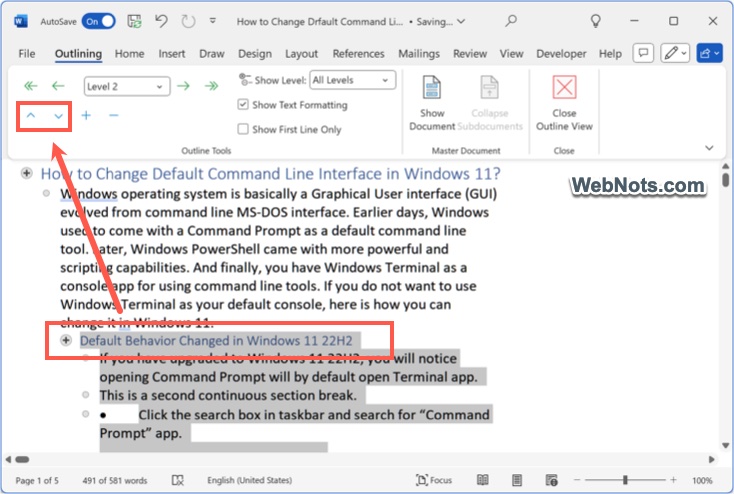
- Go to “View” tab and select “Outline” from the “Views” group.

- Your document will appear in an outline format with collapsible headings.
- Click on a heading, then use the Move Up or Move Down buttons in the “Outline Tools” group.
- Close the Outline View once done to return to the normal document view.
This method is best for structured documents but won’t work well if sections aren’t based on headings.
Method 4: Collapse Heading and Move (Only on Windows)
Word app comes as part of Microsoft 365 package in Windows version has an option to collapse or expand the headings in a document. You can use this feature to move sections easily.
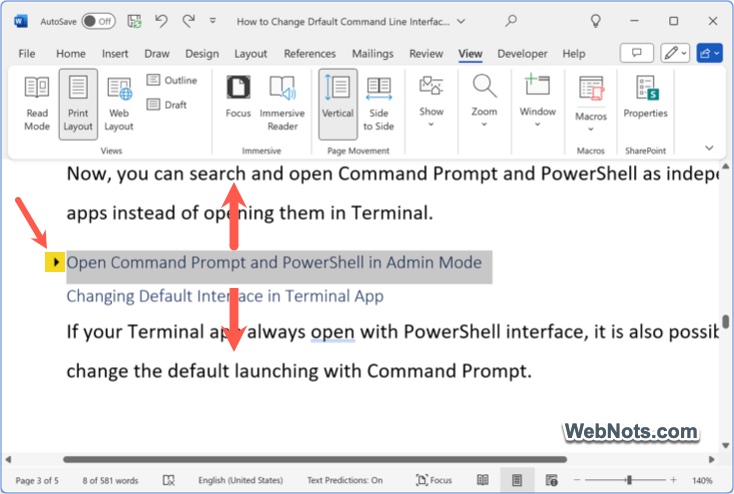
- Click on any heading that you want to move.
- You will see a small arrow appears in front of the heading.
- Click on the arrow to collapse the entire section under that heading.
- Now, you can cut the heading and paste anywhere to move that section.
This method is useful for large documents where repetitive section movements are needed. However, this works only in Windows and this feature is not available in Word for Mac version.
Final Thoughts
Moving sections in a Word document can be done in several ways, depending on how your document is structured.
- If you use headings, the Navigation Pane or Outline View is the easiest method.
- If your document has section breaks, manually cutting and pasting is required.
- On Windows, you can use collapsible heading to move sections.


