Apple introduces new Mac models frequently with upgraded features. Though MacBook laptops are resilient and can hold for a decade without breakage, you may need to purchase a new one to improve your productivity and time with the latest macOS and apps. When you have a new Mac, migrating data from your old Mac to new one is the first and important step you should do. Fortunately, Apple provides a powerful tool called Migration Assistant for this purpose. This guide will walk you through the entire process, from preparation to completion, ensuring nothing important is left behind.
What is Migration Assistant?
Migration Assistant is a built-in application on macOS devices designed to help users transfer data between two Macs, or from a Time Machine backup or external drive. It supports the migration of user accounts, documents, apps, music, photos, email, and system settings. This tool is invaluable because it ensures your new Mac feels just like your old one, minimizing setup time and disruption.
Preparation: Before You Begin
- Ensure both Macs are updated to the latest compatible version of macOS. This minimizes compatibility issues.
- Connect both Macs to a power source, as the migration process can take some time and you don’t want either computer to shut down.
- Always back up your data using Time Machine or another backup method before starting migration, in case something goes wrong.
- Connect both Macs to the same Wi-Fi network, or use a direct cable connection (Thunderbolt or USB-C) for a faster and more reliable transfer.
- Temporarily turn off any firewall or security software, which might interfere with the data transfer.
Using Migration Assistant
The process is somewhat similar to Quick Start Transfer between iPhones. All you need is to simply connect your old and new Macs on the same network and follow the below steps.
1. Open Migration Assistant
- Migration Assistant is a system app that comes preinstalled on macOS.
- Navigate to “Applications > Utilities” folder in Finder and open the Migration Assistant app on both Macs.
- You might be prompted to enter your administrator password.
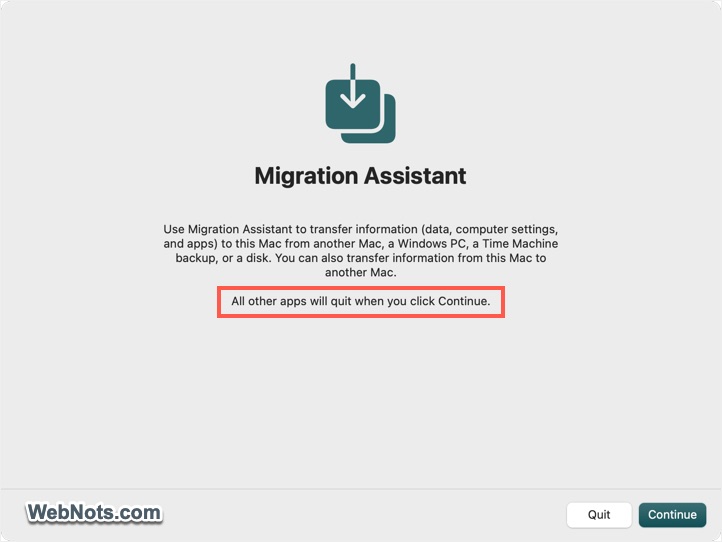
- Close all other applications before proceeding. Otherwise, click on “Continue” button and the Migration Assistant will force close all other apps and logout. If the Macs are running on battery, you will be prompted to connect to power source as the process may take longer time.
2. Select the Transfer Method
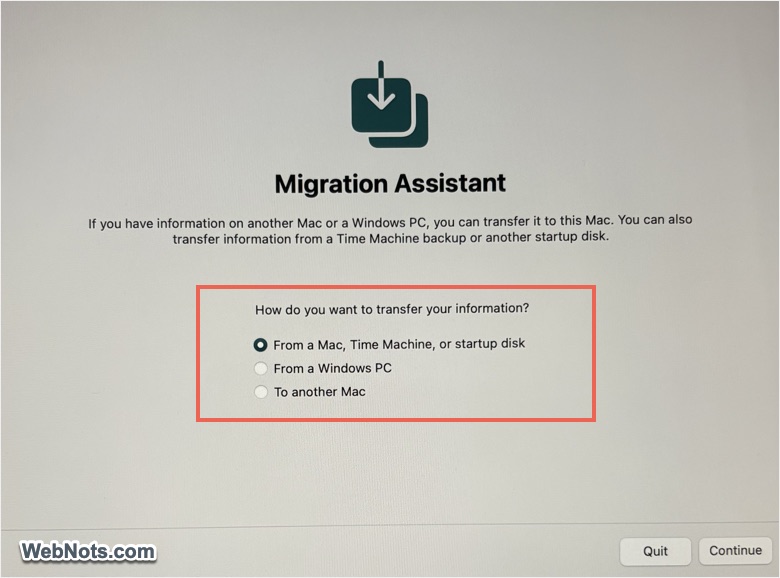
- On your new Mac, select “From a Mac, Time Machine, or startup disk” option when prompted, then click “Continue”.
- On your old Mac, select “To another Mac” option and then click “Continue”.
3. Connect the Macs
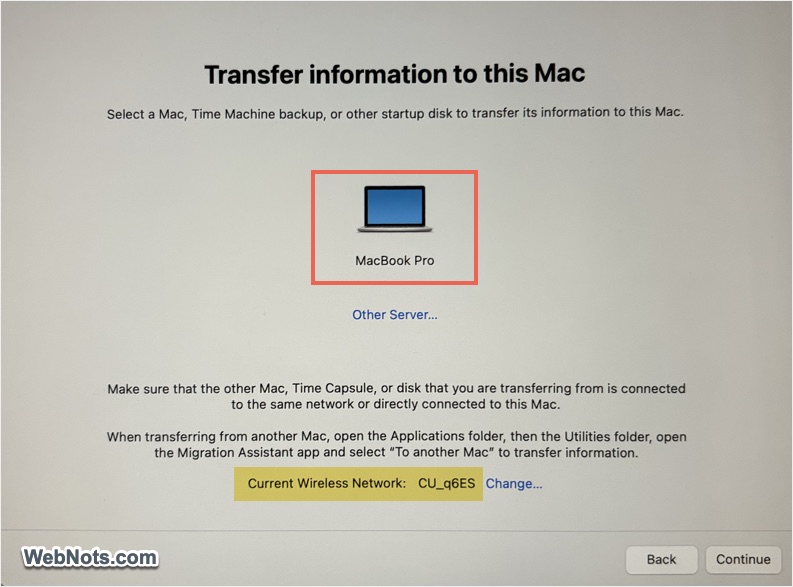
- Ensure that both Macs are on the same network.
- The Migration Assistant will search for the other Mac. When it appears, select it and click “Continue”.
4. Verify the Connection
- A passcode will be displayed on both Macs. Verify the code matches on both screens, then confirm to continue.
5. Choose What to Transfer
- The Migration Assistant on your new Mac will scan your old Mac and display a list of available information to transfer such as user accounts, applications, files, and system settings.
- Select the data you want to move. For most users, transferring all data is recommended to retain the familiar setup.
6. Transferring User Account
If the user account is selected for transfer, click the “Set Password” button and add a password for administrator account. This is the same password you need to use for login later. For a standard user account, Migration Assistant will display the password on screen and note down that. Later when you login with this password, you will be prompted to reset it.
If the username is already existing on a new Mac, you can either overwrite it or change the account name on old Mac and retain both accounts. You can do these stuffs directly on the Migration Assistant screen (no need to quit and do it manually).
7. Begin the Migration
- After making your selections, click “Continue” to start the transfer process.
- The migration can take anywhere from a few minutes to several hours, depending on the data size and connection speed.
- Do not interrupt the process; both Macs should remain powered on and connected.
8. Complete the Migration
- Once Migration Assistant finishes, your new Mac will restart. Log in to your user account (using the same credentials as explained in step #6, if you transferred user accounts).
- Check that your files, email, applications, and settings appear as expected.
- Some apps may require reactivation or updates due to system changes or licensing requirements.
Frequently Asked Questions
No, Migration Assistant will add data to your new Mac without erasing existing files. However, if you want a completely clean start, you can erase your Mac before migration.
Yes, you can run Migration Assistant at any time, not just during your Mac’s setup. Open the app and follow the instructions.
Migration Assistant moves most files, applications, and settings. However, some system files, apps from the Mac App Store, or data tied to specific hardware may need to be re-downloaded or set up manually.
Yes. Instead of selecting “From a Mac,” choose “From a Time Machine backup” when prompted.
It works in most cases and the app will automatically create necessary runtime files when you first launch it on new Mac. This is also an option especially when you sync file in iCloud and have only few apps to move to new Mac. For example, you can copy paste Word app and access all your documents already synced in iCloud. However, if the app has a device-based license, you need to deactivate the license on old Mac and activate again on new Mac.
That depends on the amount of data you have on the old Mac. Wired connections are generally faster than Wi-Fi. So, you can use that if available.
Conclusion
In general, Migration Assistant works perfectly when both Macs are running on the same macOS version. However, Migration Assistant may not work or some of the migrated apps will not work when the new Mac is running on higher macOS version than the old Mac (or vice versa). Also, if you are using iCloud, all your files will be automatically synced and available on a new Mac. So, in such a case, simply installing and activating the required apps on your new Mac will be faster than using Migration Assistant.