It does not make sense to compare an apple with an orange. However, most users consider the free Pages app as a replacement for Microsoft Word when thinking of switching to a Mac. Since Microsoft 365 package needs a monthly / yearly subscription, it will be a decent saving when you go for a free Pages app with the high-end MacBook laptop. Unfortunately, the differences between Pages and Word can easily frustrate you. Though Pages looks simpler, you will miss familiar Word features, which will hinder your productivity. Good thing is that Pages can be adjusted to behave like Word for Mac (to certain extent) once you know where to look.
Word Processing Vs Page Layout Document
This is the first thing you should understand when using Pages app. You have two document types:
- Word Processing – suitable for text-based standard document.
- Page Layout – suitable for custom designs like a newsletter.
All topics explained in this article are applicable for word processing document type. You can confirm what type of document you are using by going to “View > Inspector > Document” or clicking the “Document” icon on the toolbar. Word processing documents will have a “Bookmark” tab and “Document Body” is checked under “Document” tab.
1. Create a Default Word-Like Template
Pages will show Template Chooser (called Backstage on Word) every time when you want to create a new document. If you want Pages to always open like Word, then the best option is to create a custom template and set it as your default. This is something like updating the default Normal.dotm template in Word. The difference is that Pages does not allow to edit the default “Blank” template so you need a custom blank template.
- Create a blank document and customize your styles for each element using the “Format” sidebar. Make sure to click the “Update” button for each element to save the changes.
- Once you are done, go to “File > Save as Template” menu. Add the template to “Template Chooser” and save it with a custom file name.
- Now, go to “Pages > Settings… > General” and set your custom template for the new documents. You can also adjust the default zoom, font size, and font family to make it similar to your Word template.
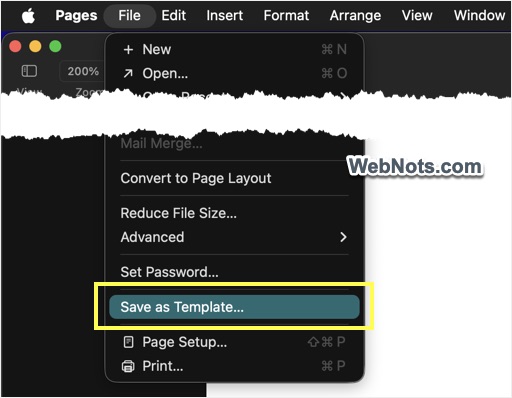
Next time, start with that template instead of customizing the styles from scratch.
2. Use TOC as Navigation Pane
The Navigation Pane in Word for Mac is a productivity booster for quickly jumping through pages and sections in your document. This is very much needed when working with a long document. You don’t have an exact pane on Pages, though there are similar options.
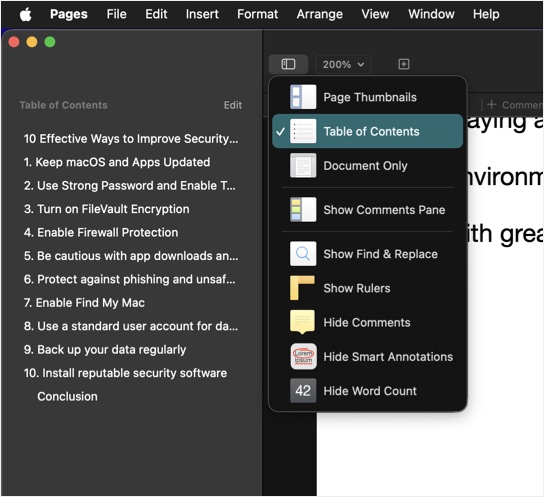
- Click the “View” button on top left corner and select “Page Thumbnails” or “Table of Content” option. Alternatively, you can go to “View” menu and select the option.
- Right-click on ay page thumbnail to delete, copy, or duplicate it.
- When using “Table of Contents” (TOC), click the “Edit” link and select the items you wanted to show in the TOC. Though it is not possible to drag and drop sections (like “Document Map” in Word), you can quickly jump to different headings.
3. Show Word Count
Status bar is another thing that will surprise you on Pages – because it does not have one. If you are primarily using Word’s status bar to find number of words in your document, then that is possible with Pages.
- Select “Show Word Count” option from “View” menu.
- This will show a floating bar on the bottom center and dynamically updates the word count. Click on that and change to paragraph or pages, if that’s what you want to count.

Use “Command + Shift + W” keyboard shortcuts to toggle the word count bar in Pages.
4. Customize Top Toolbar
While Word is stuffed with ribbon icons, Pages offers a minimalist view with very few icons on the ribbon. Even the formatting tools are shown in the sidebar (View > Inspector > Format) without distracting the main content area. However, you can add or remove icons from the top toolbar (we can’t call that as ribbon) to keep your favorite ones for quicker access.
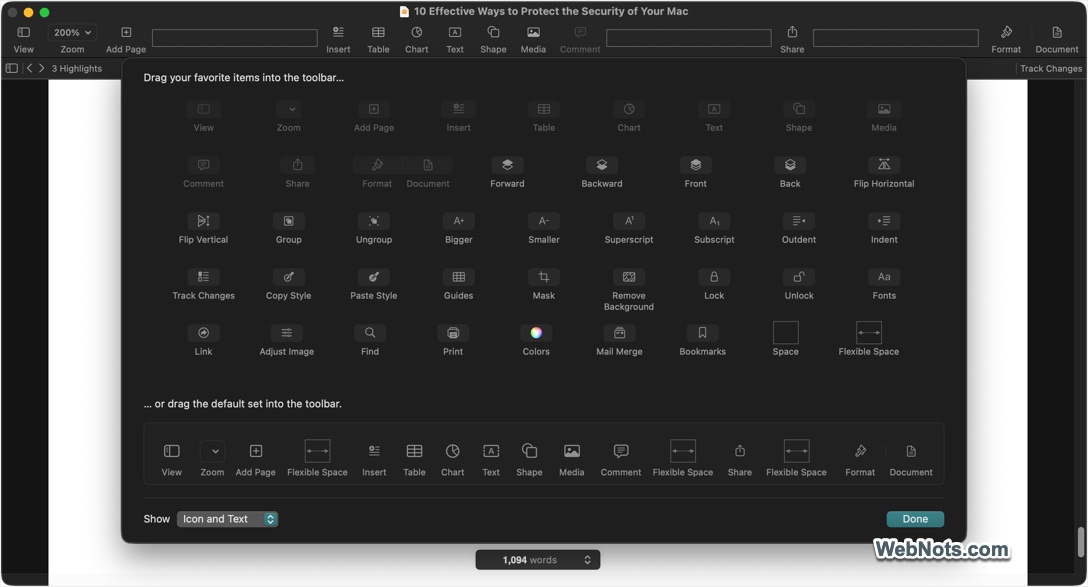
- Right-click on the empty toolbar area and select “Customize toolbar” option.
- You have two options. Drag individual icons to / from the toolbar to add / remove them. Otherwise, drag the default toolbar to replace the current tool icons.
- For example, you can keep Lock / Unlock, Remove Background, and Mail Merge icons if you use these features frequently.
5. Enable Rulers
If you relied on Word rulers for adjusting margins and indents, you can do that on Pages as well.
- Go to “View > Show Rulers” to enable the horizontal ruler on top.
- For viewing vertical ruler, go to “Pages > Settings… > Rulers” and select “Show vertical rulers when rulers are shown” option. From here, you can change the ruler’s unit (inches, centimeters, or points) and show the unit as percentage.
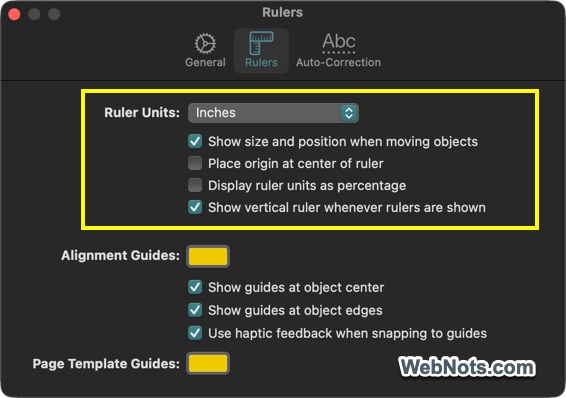
You can also use “Command + R” keyboard shortcuts to show or hide rulers quickly. This instantly makes Pages feel more like Word when formatting text-heavy documents.
6. Create Custom Keyboard Shortcuts
Most Word for Mac shortcuts already work on Pages, but the problem is that Pages does not have shortcuts assigned for all menu items. For example, for toggling Table of Contents, you should use the toolbar icon or go to “View” menu using mouse as the menu item does not have a default shortcut. Though this is a pain, you can overcome it by manually assigning shortcut keys for the required menu items.
- Go to “Apple Menu > System Settings…” to open the Settings app.
- Navigate to “Keyboard” section and click the “Keyboard Shortcuts” button.
- On the pop-up, go to “App Shortcuts” and add shortcuts specifically for Pages app.
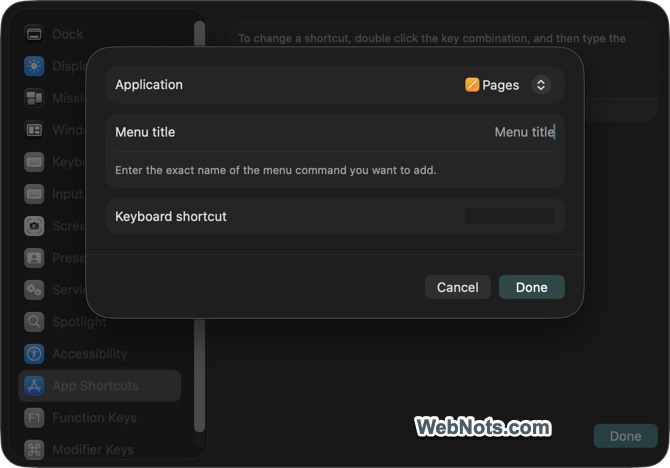
This is a default macOS function and can be used for any apps including Pages. Learn more about creating custom shortcuts in macOS.
7. Save Documents as Word Files
Compatibility is another problem as Pages is a platform dependent app that saves documents with .pages extension by default. You can open .docx files with Pages but not .pages files with Word. If you exchange documents with Word users, make sure to manually save the file with .docx extension.
- Go to “File > Export To > Word”.
- Pages will convert your document as a Word file.
- Click “Save” button to duplicate the document.
Stick to common fonts and avoid complex text boxes for best results.
Final Thoughts
The above tips can make Pages app feel close enough like Word. Customizing template and toolbar are the best options for working on multiple documents with the same look and styles. Other options like TOC and word count will work on a document level and you need to toggle the feature on each document. This may not be perfect but that’s what you will get for free 😀