Windows operating system needs lot of system files to work properly. You can find most of them under C:\Windows\System32 folder while there are also system files hidden all over the drives. Missing or corrupted system files will make Windows to behave unpredictably. You may find the system frequently crashes, performs slow, shows errors and some apps stop working suddenly. If you have wrongly deleted any system files (for example – files with .dll extension) or suspect system files are corrupted, here are various option to fix the issue and recover corrupted files in Windows 11.
Why Files are Corrupted?
Before trying to recover of fix the corrupted file, it is important to understand why the issue happened in first place. If you have not deleted ay files, here are some of the common reasons for file corruption:
- Abrupt Shutdown – abruptly shutting down PC due to power loss, pressing the power button or system crash can easily damage the files in use. If it happens while updating an app or operating system, it can lead to incomplete system files.
- Viruses and Malware – malicious software, viruses, and malware attack system files and tamper them, leading to file corruption.
- Hard Drive Problems – faulty hard drive or a storage device with bad sectors will affect the stored data and cause corruption when you try to read them.
- Installing Apps – certain performance improvement and system cleanup apps tweak and modify system files. Uninstalling these apps will leave the modified files in your system thus affecting the system.
Recovering Corrupted Files in Windows 11
Based on your situation select one of the troubleshooting methods explained in the following sections. Note that in most situation, you will not know which file is corrupted and it is not possible to exactly recover one or two system files. Since system files have tight integration and dependency, you need to carry out high level activities to check all the files and fix the issue. Make sure to take a backup before trying any of the suggestions to avoid data loss.
1. Use System File Checker Command
Using System File Checker (or shortly SFC) is the most common way to search, repair and recover any missing or corrupted files in Windows operating system.
- Type “cmd” in Windows Search box in Taskbar to find Command Prompt app. Right-click on the “Command Prompt” and select “Run as administrator” option.
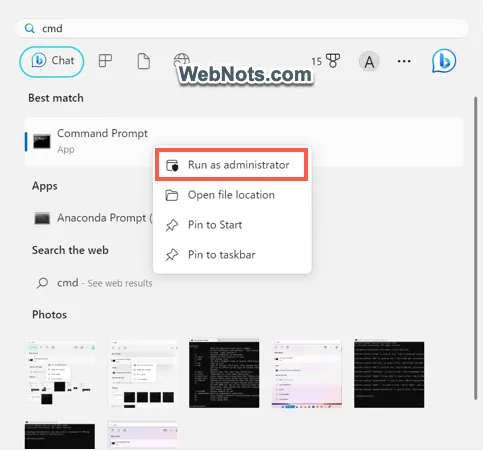
- Now type the SFC command
sfc /scannowin the prompt and press enter key.

This will initiate the scanning process for checking system integrity and fixing the corrupted files. Wait sometime for the scan to complete 100% and you will see the result showing the action taken.
2. Use DISM Tool
DISM (Deployment Image Servicing and Management) is another option for repairing corrupted Windows image files. You can run DISM after running SFC scan.
- Open Command Prompt with administrator mode as explained earlier.
- Type the following command and press enter.
DISM/Online/Cleanup-Image/RestoreHealth- This will help to restore Windows image and wait for a while till the process gets completed.

After finishing the operation, restart your system and check if the problem is resolved.
3. CHKDSK Utility
This is the third option you can try to fix corrupted system files in Windows 11 from Command Prompt. Unlike SFC and DISM, you can use CHKDSK command for checking and fixing bad sectors on hard disk. It will try to recover data from bad sectors and move to healthy areas.
Open Command Prompt in admin mode, type chkdsk D: /f /r /x and press enter.
- D – drive letter that you want to check.
- /f – fixing the errors.
- /r – locate the bad sectors.
- /x – dismount the drive before using CHKDSK command.

This will take some time depending upon the disk. If it finds any corrupted files, you can run SFC command to restore these files. Remember that there is a chance of losing some data while using the CHKDSK command specifically the /f option.
4. Revert to Previous Restore Point
When you face the corrupted files issue, you can go back to the point when your system was functioning properly to solve this problem. However, you should have enabled and created System Restore point beforehand.
- Use Windows Search to find and open “Create a restore point” Control Panel item.

- This will open “System Properties” dialog and click on “System Restore” button under “System Protection” tab.

- Select the restore point from the list and click on “Next” button.

- Click the “Finish” button to confirm the restore point.

- Finally, click on “Yes” to begin the process.

5. Advanced System Startup Repair
Windows 11 comes with advanced startup options to analyze and repair the system file before booting.
- Open Settings app and scroll down to find the “Recovery” option under “System” section, click on it.

- Click “Restart now” button showing against “Advanced startup” option.

- You will see a list of options and click on “Troubleshoot”.

- Select “Advanced Options” from next screen.

- Select “Startup repair” option from the list of items.

- This will start diagnosing your PC for errors and try to repair the issues.

- You can find the results after finishing the diagnosis. If Startup Repair couldn’t help to fix the issue, you can find the tracing log file under “C:\Windows\System32\Logfiles\Srt\SrtTrial.txt”. You can provide this file to your IT support or administrator and ask for further help.
As you can see, “Advanced options” has other options for uninstalling Windows updates, system restore and system image recovery (click “See more recovery options” link to find this option). you can make use of any of these options to recover and restore corrupted system files in Windows 11.
6. Reset Your System
If nothing works, the last option left to try is resetting your Windows 11. This is one of the quickest ways to recover corrupted files. Note that resetting your system will remove all custom settings and installed apps to set your computer to factory defaults.
- Open Settings app and go to “System > Recovery” section.
- Go to the “Recovery options” section, click on the “Reset PC” button.

- Select the “Keep my files” option.

- In the next window, choose the “Local reinstall” option.

- You can change the settings here, or simply click on “Next”.

- System will show a list of affected items and click on “Reset” button. This will reset your PC to the factory settings preserving all your personal files.

7. Restore Previous File Version
If you understand a system file is corrupted due to modification, using “Restore previous versions” option is one of the quickest ways to restore the file. But this option is not available to all types of files and you should have enabled File History or created System Restore Point beforehand.
- Right-click on the file you wish to restore and select “Show more options”.
- Now click on the “Restore previous versions” menu.

- You will get a list of file versions showing from File History or Restore Points. Then select file version from the list and click “Restore”. And then, select “Copy” to replace the current version.

8. Use Third-Party Application
If all the above methods fail to recover your corrupted files, you can try a third-party data recovery software. Disk drill is one of data recovery apps you can use for recovering deleted files and fixing corrupted drive files. This app will help you to scan the drive and show the recovery options to preview and choose the relevant files.
- First, download and install the free version of Disk Drill app from cleverfiles website. The free version supports up to 500MB data recovery.
- After installation, open the app and select the drive that you want to fix under “Storage Devices” section.
- Click on “Search for lost data” button to start scanning your drive.

- After the successful completion of scanning process, click on the “Review found items” button.

- Tick the files you want to recover and click on “Recover” button.

- The next step is to choose the destination for the recovered files and click on “Next”. Make sure to select different drive (or use external drive) to save the recovered files.

- If everything goes fine, the app will show the “Data recovery complete” message. Click on the “Show recovered data in Explorer” button to view your files.

Now, you can backup original corrupted files and replace them with the recovered files. Restart your system and check if that helps to fix the issue.
Final Words
Unlike recovering a corrupted document, restoring corrupted system files is a tricky task. As mentioned, you need to check entire system, or drive to find and take necessary actions. Unfortunately, you may not be able to use the system productively without fixing corrupted system files. Since all explained options are advanced in nature, they will affect the data in your system. Therefore, make sure to understand what you are doing and take a system backup before trying to recover corrupted system files in Windows 11.