Duplicate files can accumulate on your Mac over period, leading to reduced storage, performance lagging and unnecessary headaches when managing your files. Whether it’s accidental downloads, duplicate photos, or redundant copies of documents, these duplicates can take up valuable space. In this article, we’ll walk you through how to efficiently find and delete duplicate files on your Mac to keep your system running smoothly and your storage in check.
Why Should You Remove Duplicate Files?
Before diving into the methods, let’s explore why removing duplicate files is important:
- Free Up Storage Space: Duplicate files can take up gigabytes of your storage (video files for example), leaving less room for important data or new applications.
- Improve System Performance: A cluttered drive can slow down your Mac’s performance, making it less responsive.
- Streamline Organization: Consolidating and removing unnecessary duplicates helps you stay organized and eliminates confusion when searching for files.
Listing all duplicate files on a Mac does not have a single-step solution. It requires using various methods if you prefer not to use third-party applications. Here is an efficient approach to address the issue.
1. Finding Duplicate Photos, Videos, and Screenshots
In most cases, photos will be the biggest problems creating lot of duplicates. Good thing is that Mac allows you to compare and merge the duplicates with few clicks.
- Open Photos app and navigate to “View > Collections” menu.
- Select “Duplicates” and “Utilities”.
- This will instantly list down the duplicate photos side by side date wise. Use the filter option to select photos, videos, or screenshots.
- You can also find the size on both the photos to make sure they are the same (sometimes you might have compressed the original).
- Click “Merge x Items” to keep the original and delete the duplicate(s).
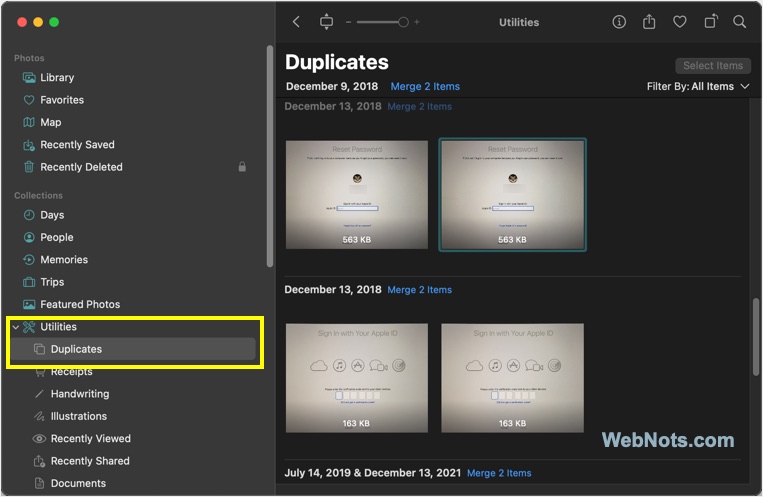
This function works based on picture’s similarity, meta data, file format, resolution, etc. to identify duplicates. After deleting, you can go to “View > Photos > Recently Deleted” to find the items. They will be automatically deleted after 30 days, otherwise, you can manually delete them immediately.
2. Find Duplicate Music
If you listen to audio or download movies, then there are possibilities of accumulated duplicates occupying large amount of storage.
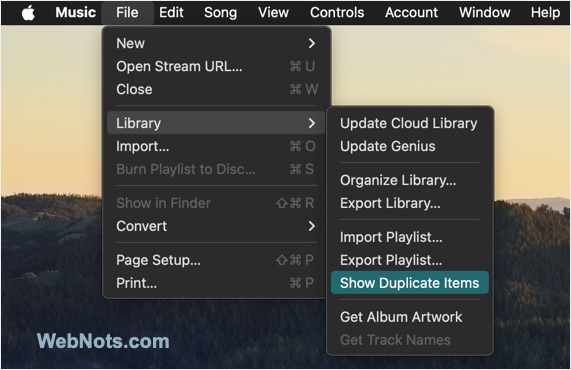
- Open Music app.
- Go to “File > Library > Show Duplicate Items”.
- Select the duplicate and delete.
3. Use Finder to Manually Delete Duplicate Files
The Finder app on your Mac is a powerful tool that allows you to manually search for duplicate files. This is useful especially if you want to cleanup a single folder containing lot of documents (like a project folder you manage for years).
- Open Finder and navigate to the folder where you suspect duplicate files might exist.
- change to list view to see the file attributes in columns.
- Sort the files by Name, Date Modified, Size, or Kind by clicking on the relevant column header.
- Manually review the files to identify duplicates. Duplicate files often have similar names with slight variations or identical file sizes.
- Right-click on the duplicate file and select Move to Trash. Don’t forget to empty the Trash afterward to reclaim the storage space.
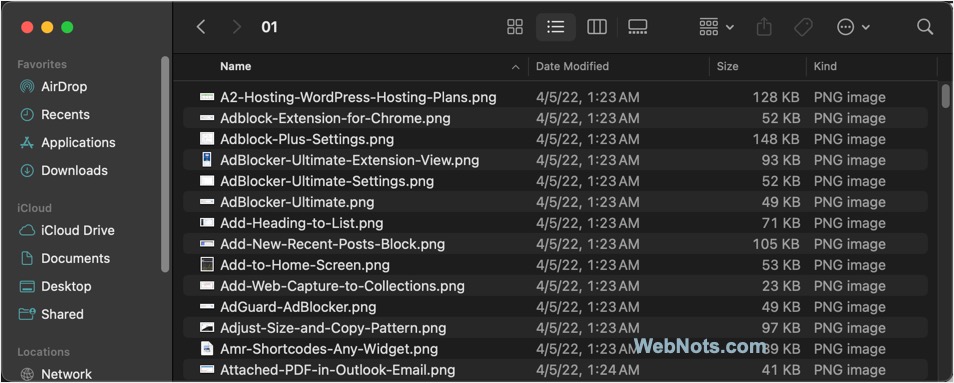
While this method works, it’s time-consuming and not ideal for large volumes of data.
4. Use Smart Folders in Finder
Smart Folders in macOS allow you to filter files based on specific criteria, making it easier to locate duplicates. So, this will kind of upgraded option compared to the previous method.
- Open Finder and go to “File > New Smart Folder”.
- Click “This Mac” tab and then click the + icon in the upper-right corner to add search criteria.
- Select “Kind” in the first dropdown and then select “PDF” in the second dropdown to filter all PDF files on your Mac.
- Review the results to spot and delete duplicate files.
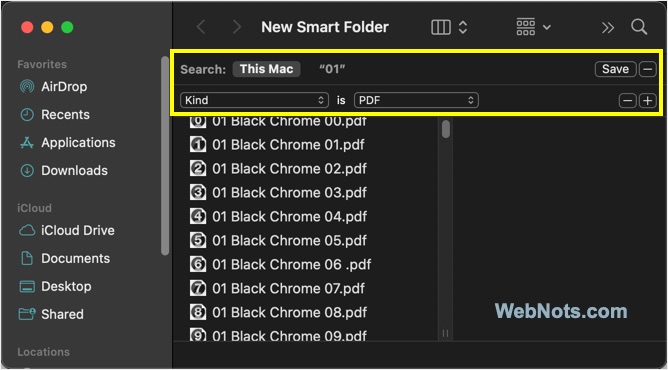
You can use criteria like file name, last opened / modified date, created date, contents, and kind to filter the results. It is also possible to use operators like contains, begins with, ends with, etc. to reduce the results. While this method adds some automation, it still requires manual review.
5. Use Terminal Commands
If you’re tech-savvy, you can use macOS’s built-in Terminal to locate duplicate files.
- Open Terminal from “Finder > Applications > Utilities” folder.
- Type the following command to find duplicate files by name. Replace ~/FolderName with the directory you want to search.
find ~/FolderName -type f -exec md5 {} \; | sort | uniq -dAlternatively, use the following command to search the entire Mac.
find . -type f -exec md5 {} \; | sort | uniq -d- You’ll be prompted to provide permission for Terminal app and allow the access.
- Manually review and delete the duplicate files identified by the command.
This method requires caution, as Terminal commands can delete files permanently without confirmation.
6. Use iCloud Drive Optimization
If you use iCloud for file storage, enabling optimization can help organize and remove duplicates.
- Go to “Apple Menu > System Settings… > Apple Account > iCloud”.
- Enable “Optimize Storage” option.
- iCloud will automatically delete already watched movies and TV shows.
While not a direct solution for duplicates, iCloud optimization can prevent redundant movies and TV shows files from accumulating on your Mac.
7. Use Third-Party Duplicate File Finder Apps
For a more efficient solution, consider using third-party apps designed to find and delete duplicate files. Some popular options include:
- Gemini 2: The Duplicate Finder: This app is user-friendly and scans your Mac for duplicate and similar files. It provides a preview of the duplicates and lets you select which ones to delete. The app is available for free on the App Store with in-app purchases.
- CCleaner: While primarily a system cleaner, CCleaner includes features to detect duplicates. You can download the free version from the developer’s website and upgrade to pro if needed.
- Duplicate File Finder Remover: Another powerful tool, this app offers customizable scanning options and detailed reports on detected duplicates. You can download the free version from App Store and upgrade if needed.
Third-party apps save a lot of time and effort, especially for users dealing with a large volume of data. The free version is sufficient for finding and merging / deleting duplicate files in all these apps.
Best Practices to Avoid Duplicate Files
Preventing duplicate files from appearing in the first place can save you a lot of time and effort. Here are some tips:
- Regularly clean up your folders and maintain a consistent naming convention.
- Refrain from downloading the same files multiple times. Check your Downloads folder before proceeding.
- Use Time Machine or other backup solutions to keep your files safe without creating unnecessary copies.
- When collaborating, make sure team members are aware of file versions to avoid duplicate uploads.
Conclusion
Unfortunately, there are no easy option to find and delete duplicate files on Mac. However, you can use Photos, Music, and Finder apps to find duplicate pictures/videos, music, and files respectively. Finding and deleting duplicate files on your Mac doesn’t have to be a daunting task. With these options, you can streamline your storage and improve your system’s performance in just a few steps. For a quicker solution, you can go for any of the free apps mentioned above.