Safari comes as a default browser app with all Apple devices like iPhone and Mac. Private or incognito browsing was first introduced in Safari in 2005. This helps to browse anonymously without storing the history of webpages visited. Though this is useful, you may want to disable the private mode. Perhaps your children also using your iPhone and you do want to know the history of sites they are visiting. Whatsoever is the reason, in this article we will explain how to disable private mode in Safari and enable it back whenever you needed.
Private Browsing Mode in Safari
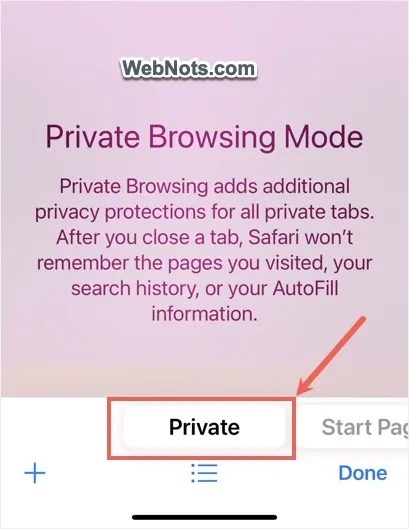
Open Safari on your iPhone and tap on the tabs icon showing at the bottom right corner. Swipe the “Private” button (right side of the normal Start Page) and start using the Private mode.
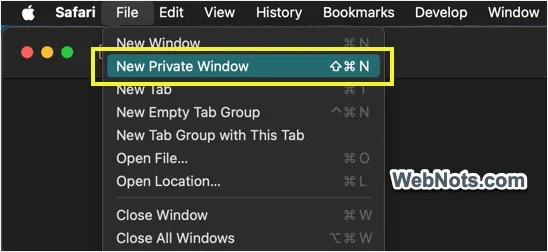
On Mac, go to “File > New Private Window” menu or press “Command + Shift + N” shortcut keys to open a private tab.
The menu and the Private mode will be completely disabled when you or someone set restrictions in accessing websites.
Disable Safari Private Mode in iPhone
- Tap on the Settings app on your iPhone’s home screen.

- Go to “Screen Time” option from the settings page.

- Scroll down and open “Content & Privacy Restrictions” option showing under “Restrictions” heading.

- On the next screen, you should see the “Content & Privacy Restrictions” option is enabled. If not, tap the button and turn it on.
- Go to “Store, Web, Siri & Game Center Content” option.
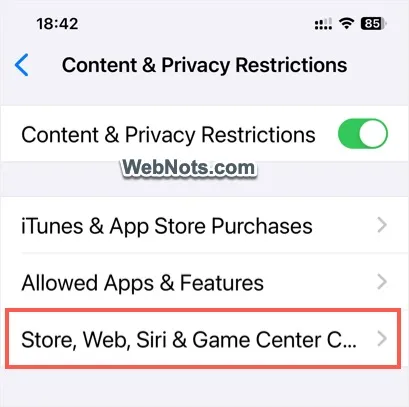
- Tap on “Web Content” option showing under “Web Content” heading. This is set as “Unrestricted” by default.

- Select “Limit Adult Websites” or “Only Approved Websites” option.

- If prompted, enter your Screen Time passcode to unlock the screen.

- Tap back arrow showing on top left corner and close the Screen Time settings.
If Safari is already opened, open App Switcher and swipe Safari app up to close it. Reopen the app again and you will no longer find the private mode available for browsing.

Note: Selecting “Only Approved Sites” will show the shortcuts to list of websites approved by Apple. Regardless of whether you limit adult sites or allow only approved sites, you have an option to add exception list to allow accessing specific websites.

Disable Safari Private Mode in Mac
If you are sharing the Screen Time settings across all your devices, then Private mode will be automatically disabled when you restrict websites in iPhone. You can do this under “Settings > Screen Time” and turn on “Share across devices” option. However, if you are only using Mac or logged in with different Apple accounts, then follow the below steps to disable Private mode in Mac Safari.
- Click the Apple logo on top left corner of the screen and select “System Settings…” menu.

- Go to “Screen Time” settings and open “Content & Privacy” restrictions option.

- On the next screen, turn on “Content & Privacy” option and open “Store, Web, Siri & Game Center Content” option.

- Click the dropdown against “Access to Web Content” option under “Safari” section. By default, “Unrestricted” option is set for the access.
- Select “Limit Adult Websites” or “Allowed Websites Only” option.

- Enter your Screen Time passcode and click “Done” button.

Close Safari and relaunch to see the “New Private Window” option is disabled under “File” menu.

Note: You can keep the Private mode available and lock Private tabs with Face ID so that no one can access them without your knowledge.
Enabling Private Mode Back
Follow the same steps and select “Unrestricted” option for “Web Content” in Screen Time settings to enable Private mode back in Safari. You can also follow the same steps in iPad or Apple Watch to enable or disable Private mode as you need. It is also possible to remove Safari app from iPhone / iPad using Screen Time restrictions though it is not possible to do that in Mac.