Sometimes a document is very long and you need to work on different sections at the same time. The problem is that you can’t open two instances of the same Word document by double-clicking on the file. However, Microsoft Word provides other tools and features that make it easier to navigate, edit, and review various parts of your document without losing track. In this article, we’ll explain effective methods to edit different sections of a Word document at the same time.
Use Word Microsoft 365
This article explains with the Word app comes as part of Microsoft 365 version. Though the screenshots are from Windows version, you can use all these features in both Word Windows and Mac versions.
1. Use Split View Feature
One of the easiest ways to edit different sections of a Word document simultaneously is by using the Split View feature. This allows you to divide the screen into two panes, enabling you to view and edit two parts of the same document at once.
- Open your Word document and go to “View” tab in the ribbon.
- Click on the “Split” option in “Window” group.
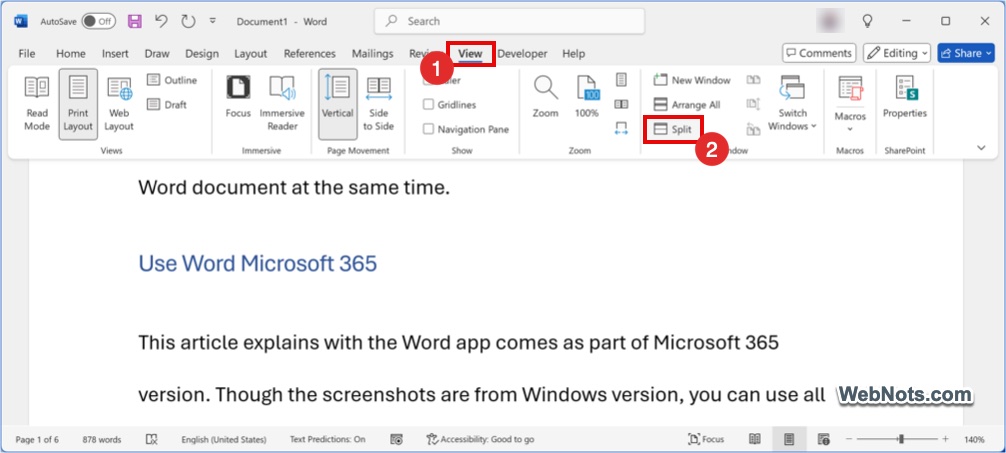
- A horizontal divider will appear splitting your document into two sections. Drag the divider to adjust the size of each pane, if needed.
- Navigate to different sections in each pane and start editing your document.

You can scroll through each pane independently, which is useful for comparing and editing text or referencing content in another section. once done, go back to “View” tab and click “Remove Split” option to remove the panes.
2. Open Same Document in a New Window
Another option is to open the same document in multiple windows. This method is ideal if you’re working on a large screen or multiple monitors, as it allows you to edit and view different sections side by side.
- Open your Word document and go to “View” tab in the ribbon.
- Click on “New Window” option in “Window” group.

- Arrange the windows side by side by selecting “View Side by Side” from the same tab. Also, disable “Synchronous scrolling” option so that you can scroll on both windows independently.

Changes made in one window will be reflected in the other because they are linked to the same file. The advantage with this method is that you can open multiple windows of a same document (unlike Split View, which allows only two panes) and use “Side by Side” feature with any of the two windows.
3. Use Collaboration Tools for Team Editing
If you’re working with a team, Word’s collaboration tools allow multiple users to edit different parts of a document simultaneously. This feature is particularly useful in shared documents stored on OneDrive or SharePoint.
- First, save your document to OneDrive or SharePoint.
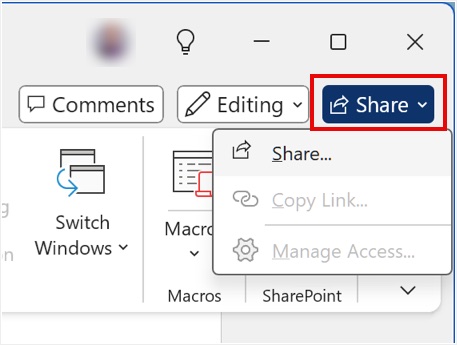
- Share the document with your team by clicking “Share” button on the top-right corner and then selecting “Share” option.
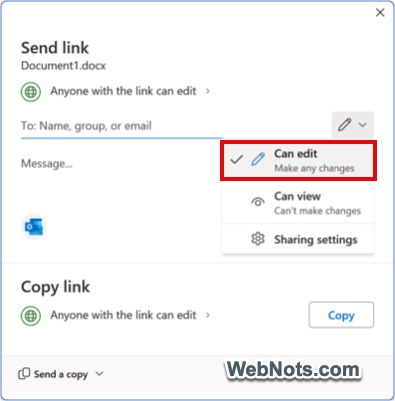
- Grant editing permission and share the link with the recipients.
Each collaborator can navigate to and edit different sections in real time. You can go to “Review > Track Changes > For Everyone” to view the changes made by others, along with their names, ensuring transparency.
4. Use the Navigation Pane for Quick Access
The Navigation Pane is a powerful tool for jumping between sections of your document quickly. While it doesn’t allow you to view multiple sections at once, it facilitates efficient navigation and editing.
- Open your Word document and go to “View” tab in ribbon.
- Check the box for “Navigation Pane” option under “Show” group.
- The pane will appear on the left, displaying headings, pages, or search results.
- Click on a heading or search a term to jump to the corresponding section. You can also collapse, expand, promote or demote a section easily.

Combine this with the Split View or New Window to edit multiple sections efficiently.
5. Leverage the Outline View
If your document has a structured outline, the Outline View can help you focus on specific sections for editing.
- Open your Word document and go to the “View” tab.
- Click on “Outline” under “Views” group.
- The document will display its headings and subheadings in a collapsible format.
- Expand or collapse sections (by double-clicking on the ⨁ icon in front of the headings or use + and – icons on ribbon) to focus on the content you want to edit.
- It is also possible to move the section up or down to adjust the content.
- Once you are done, click on the “Close Outline View” button to return to normal print layout view.

6. Use Hyperlinks for Easy Section Navigation
For large documents, you can add hyperlinks to specific sections, making it easier to jump between different parts while editing.
- Highlight the text or section you want to link to.
- Right-click and select “Link” option or press “Control + K” shortcut keys to open “Insert Hyperlink” pop-up.
- Select “Place in This Document” under “Link to” section from the left menu.
- Select the heading or bookmark you want to link to and click “OK” button. You can also set the “Target Frame…” to open in a new window, same page, etc.

This is a simple way to streamline navigation, especially when working on documents with many sections.
Conclusion
Split View or New Window options are ideal for editing different sections of a Word document at the same by a single user and sharing the link is ideal for collaborating with multiple users. Though other three options (Navigation Pane, Outline & linking) will not directly help to edit multiple section, it can save you valuable time and effort when working on a long report or manuscript.