The new Gutenberg editor has a beautiful table block to insert tables on your WordPress site. The table will look beautiful on your site, you have also options to provide alternate colors (stripes) to rows and change the settings to shrink the columns to fit mode. Good thing is that the tables are responsive on mobile devices by automatically adding a horizontal scrollbar. However, you can’t create complex data tables and use features like paginations or sorting with Gutenberg tables. So, you need a plugin for creating larger responsive tables and allow the users to read the content on mobile devices without distractions. In this article, we will explain Gutenberg table as well as show how to use TablePress plugin for creating responsive tables in WordPress.
Using Gutenberg Table Block
By default, width of the mobile devices can fit maximum of three or four columns depending upon the table’s content. When you have more columns, then the browser will truncate the display to the container width. It will lead to the situation that users have no way to view the hidden content of your tables. So, make sure to enable responsiveness option in Gutenberg table block.
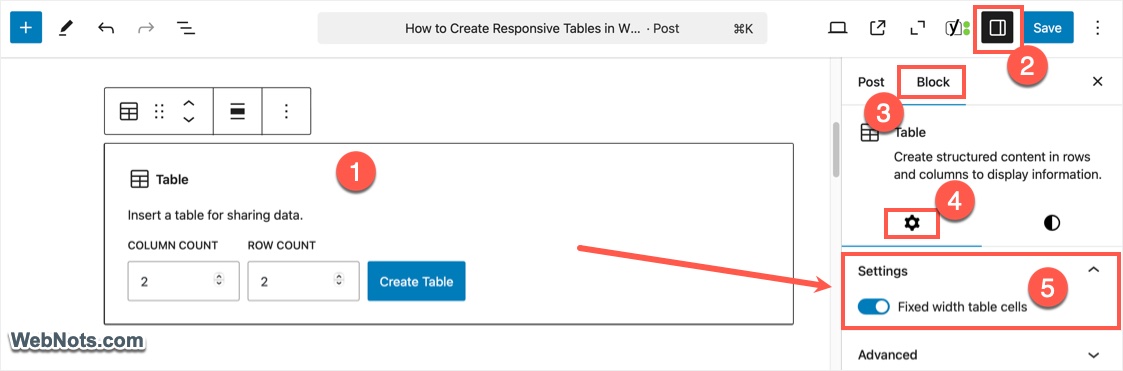
- Search and insert Table block in your content.
- Select number of columns / rows and click on “Create Table” button.
- Go to “Sidebar” and select “Blocks” tab.
- Under the gear icon (Settings tab), turn off “Fixed width table cells” option.
- After adding your table content, click the device “View” icon and change to mobile view to see the live preview.
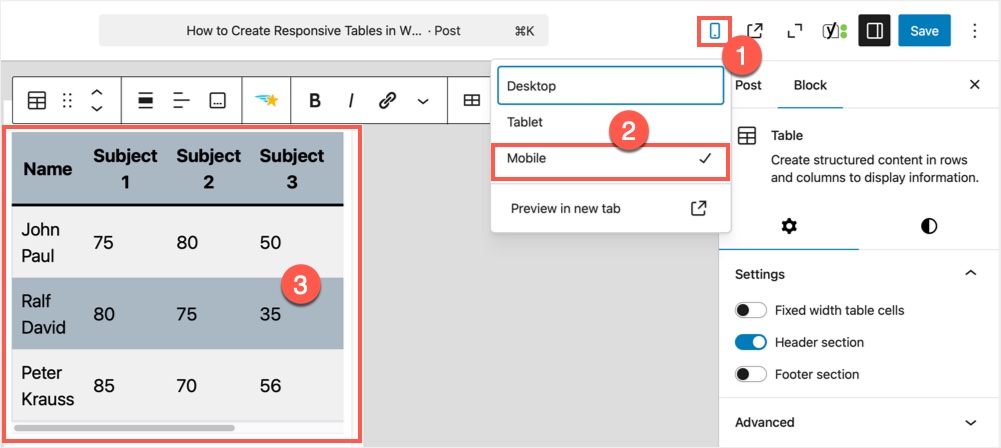
This will make the inserted table responsive on mobile devices by adding a horizontal scrollbar. Below is an example table created with Gutenberg Table block using colors and header row.
| Name | Subject 1 | Subject 2 | Subject 3 | Subject 4 | Subject 5 |
|---|---|---|---|---|---|
| John Paul | 75 | 80 | 50 | 76 | 76 |
| Ralf David | 80 | 75 | 35 | 37 | 65 |
| Peter Krauss | 85 | 70 | 56 | 86 | 74 |
Using TablePress Responsive Tables in WordPress
There are many free and paid plugins available for creating responsive tables in WordPress site. Our favorite plugin is TablePress as it offers various options.
- TablesPress is one of the most popular plugins for creating tables in WordPress.
- The developer offers Excel like user-friendly interface and maintains the table continuously.
- You can find a good documentation for using the plugin.
- Most importantly, the plugin is free, though you need the premium plan for creating responsive tables.
Installing TablePress and Add-ons
You can install and activate the TablePress plugin from your WordPress admin dashboard similar to any other plugin. However, the default TablePress tables are not responsive similar to Gutenberg tables. You need to install an extension to make the responsive tables.
- Go to TablePress responsive extension page.
- Download the Responsive Tables Extension zip file
- As mentioned, developer requests $9 as donation for this extension. We do strongly recommend donating $9 if you are planning to use the plugin as a primary resource on your site.
- Go back to your WordPress admin panel and navigate to “Plugins > Add New” section.
- Click on the “Upload Plugin” button. Click on the “Choose File” button and select the “tablepress-responsive-tables.zip” file that you have downloaded before.
- Finally, click on the “Install Now” button to start installing the extension on your site.
- Activate the extension, after successful installation. Remember to first install and activate the TablesPress plugin before you try to install the responsive tables extension.

From version 2.0, the author made this feature as part of premium plugin and hence you will not be able to download the extension any more. With version 3.0, the extension is no more available and you need to purchase the premium plan to get the features explained below.
Creating a Table
TablePress offers different ways of creating a table; you can refer the plugin feature in our earlier article on how to create a table with TablePress. Below are the summary of the steps for creating a table in TablePress:
- Go to “Tools > TablePress > Add New” menu and start creating a table and customize the options.
- Alternatively, go to “Import” tab and import a table from external data source. For example, you can simply upload your Excel sheet data to create table.

After creating your table, save your changes and note down the table id shortcode.
Inserting Table Shortcode
The classic editor interface had a TablePress icon that helps you to choose the table in the post editor. However, you have no TablePress block in the Gutenberg editor. Therefore, you need to manually embed table shortcode in your post or page using shortcode block.
TablePress tables will have the table id shortcode in the format table id=xxx / inside square brackets . Add a shortcode block and insert your table id shortcode as you have noted down before.
Making the Tables Responsive
TablePress offer three different ways to create responsive tables.
- Scroll
- Flip
- Collapse
Since we use TablePress plugin, let us discuss each option with an example table.
Responsive Scroll Table
This is the best option to make your table responsive when the table has many columns. It will simply add a horizontal scroll bar so that users can swipe and view the content outside the screen. Here is an example of how a responsive scroll table will look like.
| Name | Subject 1 | Subject 2 | Subject 3 | Subject 4 | Subject 5 | Subject 6 | Subject 7 | Subject 8 | Subject 9 | Subject 10 | Subject 11 | Subject 12 | Subject 13 |
|---|---|---|---|---|---|---|---|---|---|---|---|---|---|
| John | 50 | 60 | 70 | 45 | 68 | 98 | 78 | 54 | 21 | 23 | 43 | 76 | 87 |
| Paul | 89 | 65 | 45 | 12 | 32 | 56 | 78 | 89 | 14 | 56 | 98 | 56 | 45 |
| David | 98 | 84 | 65 | 89 | 12 | 45 | 98 | 65 | 32 | 12 | 45 | 43 | 75 |
| Ralf | 65 | 56 | 23 | 45 | 78 | 54 | 65 | 21 | 35 | 64 | 90 | 78 | 34 |
| Krauss | 15 | 56 | 48 | 98 | 65 | 45 | 78 | 23 | 56 | 45 | 87 | 56 | 98 |
| Peter | 45 | 89 | 98 | 51 | 65 | 65 | 67 | 43 | 23 | 76 | 45 | 34 | 87 |
| Bing | 67 | 54 | 89 | 76 | 90 | 56 | 76 | 80 | 98 | 56 | 98 | 76 | 54 |
Responsive Collapse Table
The second option is to have responsive collapse table. As the name indicates, it will add a + icon on the rows so that users can tap/click to view more details. The plugin extension will move the hidden table content under the show / hide icon. This is very useful to show important few columns and hide remaining data under the + button.
| Name | Subject 1 | Subject 2 | Subject 3 | Subject 4 | Subject 5 | Subject 6 | Subject 7 | Subject 8 | Subject 9 | Subject 10 | Subject 11 | Subject 12 | Subject 13 |
|---|---|---|---|---|---|---|---|---|---|---|---|---|---|
| John | 50 | 60 | 70 | 45 | 68 | 98 | 78 | 54 | 21 | 23 | 43 | 76 | 87 |
| Paul | 89 | 65 | 45 | 12 | 32 | 56 | 78 | 89 | 14 | 56 | 98 | 56 | 45 |
| David | 98 | 84 | 65 | 89 | 12 | 45 | 98 | 65 | 32 | 12 | 45 | 43 | 75 |
| Ralf | 65 | 56 | 23 | 45 | 78 | 54 | 65 | 21 | 35 | 64 | 90 | 78 | 34 |
| Krauss | 15 | 56 | 48 | 98 | 65 | 45 | 78 | 23 | 56 | 45 | 87 | 56 | 98 |
| Peter | 45 | 89 | 98 | 51 | 65 | 65 | 67 | 43 | 23 | 76 | 45 | 34 | 87 |
| Bing | 67 | 54 | 89 | 76 | 90 | 56 | 76 | 80 | 98 | 56 | 98 | 76 | 54 |
Responsive Flip Table
The last option is flip, similar to transpose in Microsoft Excel. This will convert the row into columns and columns into rows. You can use flip table, if it suits your table content. Below is an example of responsive flip table created with TablePress plugin.
| Name | Subject 1 | Subject 2 | Subject 3 | Subject 4 | Subject 5 | Subject 6 | Subject 7 | Subject 8 | Subject 9 | Subject 10 | Subject 11 | Subject 12 | Subject 13 |
|---|---|---|---|---|---|---|---|---|---|---|---|---|---|
| John | 50 | 60 | 70 | 45 | 68 | 98 | 78 | 54 | 21 | 23 | 43 | 76 | 87 |
| Paul | 89 | 65 | 45 | 12 | 32 | 56 | 78 | 89 | 14 | 56 | 98 | 56 | 45 |
| David | 98 | 84 | 65 | 89 | 12 | 45 | 98 | 65 | 32 | 12 | 45 | 43 | 75 |
| Ralf | 65 | 56 | 23 | 45 | 78 | 54 | 65 | 21 | 35 | 64 | 90 | 78 | 34 |
| Krauss | 15 | 56 | 48 | 98 | 65 | 45 | 78 | 23 | 56 | 45 | 87 | 56 | 98 |
| Peter | 45 | 89 | 98 | 51 | 65 | 65 | 67 | 43 | 23 | 76 | 45 | 34 | 87 |
| Bing | 67 | 54 | 89 | 76 | 90 | 56 | 76 | 80 | 98 | 56 | 98 | 76 | 54 |
Related: Responsive flipbook WordPress plugin review.
Enabling Flip Responsive Tables on Specific Devices
Normally, you can use responsive table targeting the mobile users. In this case, it is sufficient to change the table shortcode to include the responsive mode. In order to test the tables, you need to view the tables in a mobile or use device-toggling option in developer tools section on your Chrome / Firefox / Edge browsers. If you use Safari on Mac, enable the develop menu to enter into a responsive mode.
However, when you have larger tables with many columns, you may need to have responsive table even on a desktop or tablets. The plugin extension makes this task simple by adding a breaking point for responsive table. Scroll and collapse modes will work on all devices without adding any breakpoint. For flip mode, change the shortcode like below to make the table responsive on different devices. (ensure to enclose the shortcodes within square brackets [ ]).
- table id=123 responisve= flip responsive_breakpoint=desktop /
- table id=123 responisve=flip responsive_breakpoint=tablet /
- table id=123 responisve= flip responsive_breakpoint=mobile /
- table id=123 responisve= flip responsive_breakpoint=all /
Here are the exact dimensions for the breakpoints:
- Desktop – devices with width smaller than 1200px
- Tablet – devices with width smaller than 980px
- Phone – devices with width smaller than 768px
- All – add responsiveness on all devices regardless of the device’s dimension.
Caution on Page Speed
As you can see, it is easy to insert different types of responsive tables on all the devices. The problem we have noticed with the extension is that it will add additional CSS file for flip mode. Most of the caching plugins exclude this stylesheet without combining with other CSS files thus create a warning on Google PageSpeed Insights. In addition, the plugin will also load the styles and scripts on all the pages of your site regardless of whether the page has table or not. If you have only few tables then we do not recommend using TablePress plugin to improve your page speed.