WordPress Gutenberg editor offers a Table block for creating responsive tables without additional plugins. However, the default block does not support data tables with advanced features. In this case, you can either manually create a custom table for your needs or use a plugin to make things easier.
What is a Data Table?
Unlike a plain HTML table, data tables have the following additional features:
- Sorting – you can sort the columns based on the header.
- Pagination – restrict the default visible rows and break the table data to multiple pages using a pagination. This is suitable for showing larger table in a smaller content area.
- Search – add a search box for filtering dynamically when user enters the keyword.
- Table Info – show information like total number of rows.
1. Using a Plugin to Create Data Table
WordPress has handful of plugins for creating data tables. Here we will explain with the popular TablePress plugin, which offers file upload and Excel-like interface for editing.
1.1. Creating a Data Table
- Install and activate TablePress plugin on your site.
- Go to “Tools > TablePress” menu.
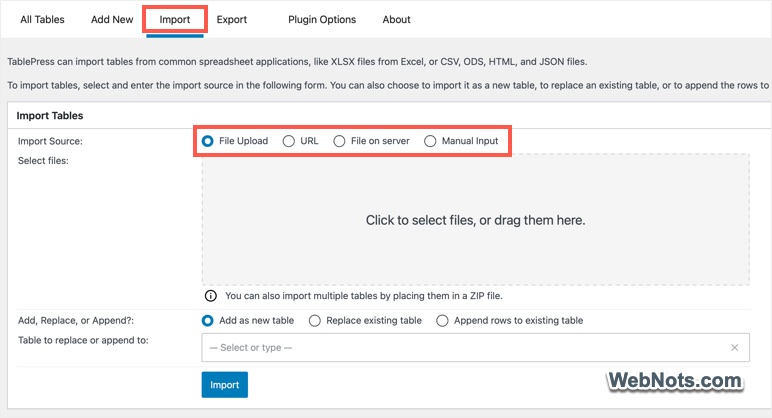
- If you want to upload your data from an Excel or CSV file, go to “Import” tab and choose the appropriate option.
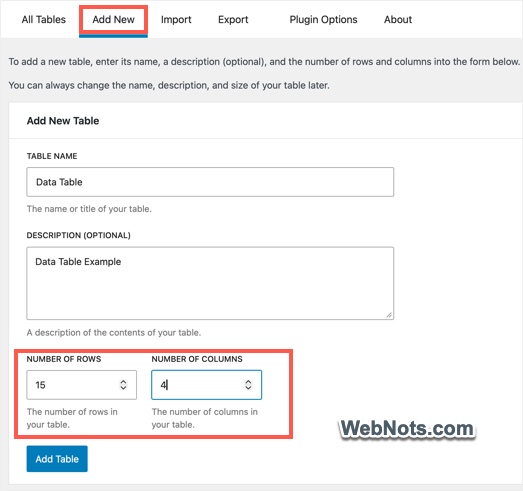
- To manually create a table, go to “Add New” tab, provide table’s name, description, number of rows and columns and click “Add Table” button.
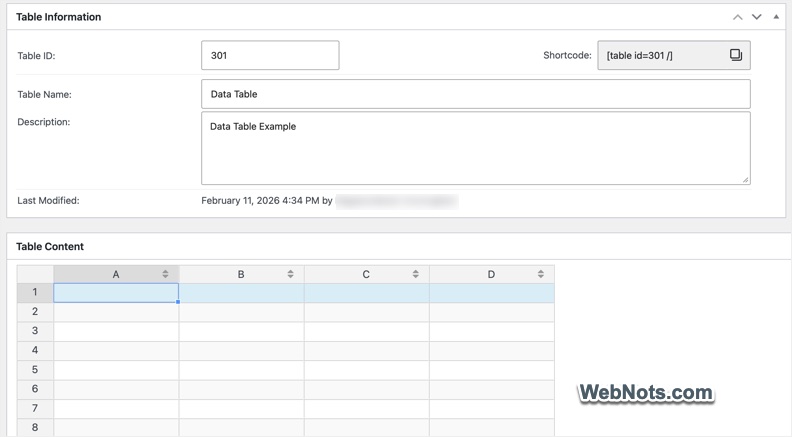
- You can find the imported data or create new data using an Excel-like interface.
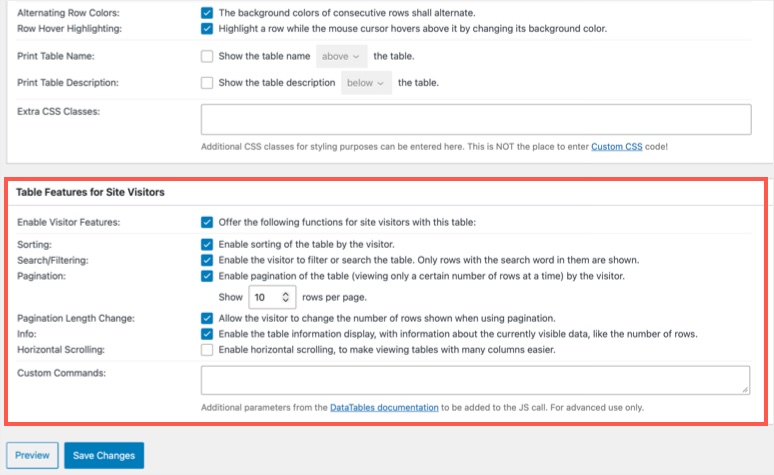
- Scroll down to the bottom and turn on the required options for “Table Features for Site Visitors” section. Make sure to check “Enable horizontal scrolling…” option if your table has many columns.
- Preview your table and save the changes.
1.2. Inserting the Table
There are two options to insert the created table:
- Shortcode – Copy the shortcode after creating your table and insert it using the “Shortcode” block (or simply paste it in Classic Editor)
- TablePress Block – Insert the TablePress block in Gutenberg editor and select the table name from the block’s settings sidebar.
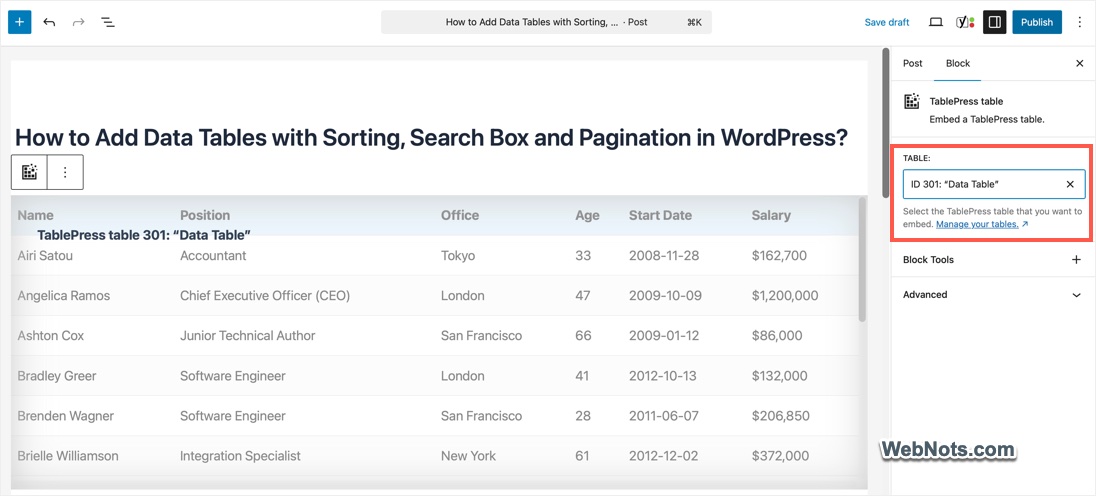
The block option is recommended as you can see the preview before publishing the content, which is not possible with the shortcode.
1.3. Example Data Table Created With TablePress
The data table created with TablePress will look something like below allowing you to filter and search. Though the table is not fully responsive, you will see a horizontal scroller on smaller screens (if that option is enabled).
| Name | Position | Office | Age | Start Date | Salary |
|---|---|---|---|---|---|
| Airi Satou | Accountant | Tokyo | 33 | 2008-11-28 | $162,700 |
| Angelica Ramos | Chief Executive Officer (CEO) | London | 47 | 2009-10-09 | $1,200,000 |
| Ashton Cox | Junior Technical Author | San Francisco | 66 | 2009-01-12 | $86,000 |
| Bradley Greer | Software Engineer | London | 41 | 2012-10-13 | $132,000 |
| Brenden Wagner | Software Engineer | San Francisco | 28 | 2011-06-07 | $206,850 |
| Brielle Williamson | Integration Specialist | New York | 61 | 2012-12-02 | $372,000 |
| Bruno Nash | Software Engineer | London | 38 | 2011-05-03 | $163,500 |
| Caesar Vance | Pre-Sales Support | New York | 21 | 2011-12-12 | $106,450 |
| Cara Stevens | Sales Assistant | New York | 46 | 2011-12-06 | $145,600 |
| Cedric Kelly | Senior JavaScript Developer | Edinburgh | 22 | 2012-03-29 | $433,060 |
| Charde Marshall | Regional Director | San Francisco | 36 | 2008-10-16 | $470,600 |
| Colleen Hurst | JavaScript Developer | San Francisco | 39 | 2009-09-15 | $205,500 |
| Dai Rios | Personnel Lead | Edinburgh | 35 | 2012-09-26 | $217,500 |
| Donna Snider | Customer Support | New York | 27 | 2011-01-25 | $112,000 |
| Doris Wilder | Sales Assistant | Sydney | 23 | 2010-09-20 | $85,600 |
2. Manually Creating a Data Table
This is a good option if you just want to create one or two tables and don’t want to use a plugin.
2.1. Preparing Your Data in HTML Table Format
Unlike TablePress, you must prepare your data manually in a standard HTML table format using a text editor such as Notepad, TextEdit, or VS Code. The table should include header, body, and footer sections. In this example, only three rows of data are shown between the <tbody>…</tbody> tags, but you can add as many rows as needed. Make sure the table ID (mytable) matches the one used in the initialization script.
<table id="mytable" class="display">
        <thead>
            <tr>
                <th>Name</th>
                <th>Position</th>
                <th>Office</th>
                <th>Age</th>
                <th>Start date</th>
                <th>Salary</th>
            </tr>
        </thead>
        <tbody>
            <tr>
                <td>Tiger Nixon</td>
                <td>System Architect</td>
                <td>Edinburgh</td>
                <td>61</td>
                <td>2011-04-25</td>
                <td>$320,800</td>
            </tr>
            <tr>
                <td>Garrett Winters</td>
                <td>Accountant</td>
                <td>Tokyo</td>
                <td>63</td>
                <td>2011-07-25</td>
                <td>$170,750</td>
            </tr>
            <tr>
                <td>Ashton Cox</td>
                <td>Junior Technical Author</td>
                <td>San Francisco</td>
                <td>66</td>
                <td>2009-01-12</td>
                <td>$86,000</td>
            </tr>
        </tbody>
        <tfoot>
            <tr>
                <th>Name</th>
                <th>Position</th>
                <th>Office</th>
                <th>Age</th>
                <th>Start date</th>
                <th>Salary</th>
            </tr>
        </tfoot>
    </table>
2.2. CSS for the Table
For the CSS part, all you need is to use the following CDN link from official Data Tables website.
<link rel="stylesheet" href="https://cdn.datatables.net/2.3.7/css/dataTables.dataTables.css">2.3. JS for the Data Table
JavaScript has two parts:
- Initialization Script – Make sure the table name is correct in the script and HTML for initializing the table (mytable in our example).
- CDN Scripts – use the jQuery and official Data Table scripts from the CDN links as given below (jQuery is optional as WordPress already comes with jQuery).
<script>
new DataTable('#mytable');
</script>
<script src="https://code.jquery.com/jquery-3.7.1.js"></script>
<script src="https://cdn.datatables.net/2.3.7/js/dataTables.js"></script>
The initialization script new DataTable('#mytable'); is for plain JavaScript. If it is not working with jQuery, try $('#mytable').DataTable(); or jQuery('#mytable').DataTable(); codes instead.
2.4. Example Data Table with Manual Option
Simply insert a Custom HTML block and paste the combined CSS, HTML and JS codes inside the block. The complete code should be like below:
<link rel="stylesheet" href="https://cdn.datatables.net/2.3.7/css/dataTables.dataTables.css">
<table id="mytable" class="display">
        <thead>
            <tr>
                <th>Name</th>
                <th>Position</th>
                <th>Office</th>
                <th>Age</th>
                <th>Start date</th>
                <th>Salary</th>
            </tr>
        </thead>
        <tbody>
            <tr>
                <td>Tiger Nixon</td>
                <td>System Architect</td>
                <td>Edinburgh</td>
                <td>61</td>
                <td>2011-04-25</td>
                <td>$320,800</td>
            </tr>
            <tr>
                <td>Garrett Winters</td>
                <td>Accountant</td>
                <td>Tokyo</td>
                <td>63</td>
                <td>2011-07-25</td>
                <td>$170,750</td>
            </tr>
            <tr>
                <td>Ashton Cox</td>
                <td>Junior Technical Author</td>
                <td>San Francisco</td>
                <td>66</td>
                <td>2009-01-12</td>
                <td>$86,000</td>
            </tr>
        </tbody>
        <tfoot>
            <tr>
                <th>Name</th>
                <th>Position</th>
                <th>Office</th>
                <th>Age</th>
                <th>Start date</th>
                <th>Salary</th>
            </tr>
        </tfoot>
    </table>
<script>
new DataTable('#mytable');
</script>
<script src="https://code.jquery.com/jquery-3.7.1.js"></script>
<script src="https://cdn.datatables.net/2.3.7/js/dataTables.js"></script>
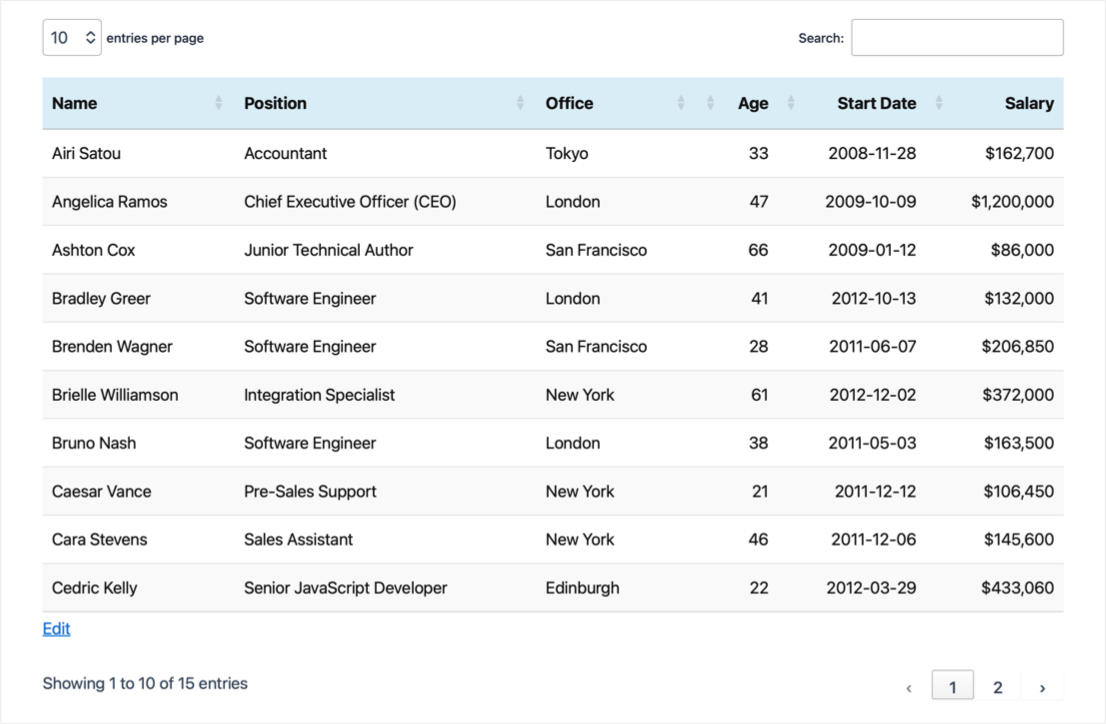
Below is how the data table will look with column sorting, search filtering, pagination and table information showing at the bottom.
2.5. Customizing Table’s Appearance
The table’s appearance may change based on your theme’s styles. However, there are some basic styles you can apply by changing the CSS class used in the HTML.
| CSS Class | Data Table Type |
|---|---|
| class=”display” | Standard display with stripes |
| class=”stripe” | Plain with no stripe |
| class=”cell-border” class=”row-border” | Table with borders |
Use the following initialization script to disable all advanced features:
<script>
new DataTable('#mytable', {
info: false,
ordering: false,
paging: false,
searching: false
});
</script>
You can check the official Data Tables documentation for more customization options.
Plugin Vs Manual Option
If you are unsure whether to use a plugin or a manual method, here are the pros and cons of both methods. In summary, use a plugin when you need to create multiple tables and go for the manual method when you only need a few tables.
| Feature | TablePress | Manual |
|---|---|---|
| Data preparation | Online Excel like interface | Manual offline preparation |
| File upload or copy / paste | Yes | No |
| Responsive | Horizontal Scrolling | Horizontal Scrolling |
| CSS & JS | Loaded on all pages | Loaded only on the page where table is inserted |
| Centrally Editing | Yes, without editing the post | Need to edit the post |