Windows 11 offers multiple ways to create a backup of your data. You can create a system restore point, enable File History, use the default backup app, or use cloud service (OneDrive) for this purpose. However, all these methods allow you to backup the entire system and not a specific folder. You need to restore a folder from the entire backup and there is no straightforward method to automatically backup only a single folder. In this guide, we’ll cover different ways to backup folders in Windows 11 and restore them.
Why to Backup Folders?
Backing up important folders in is important:
- To prevent data loss due to hardware failure.
- Recover data if you or someone accidentally deleted a folder (like a project folder)
- Restore due to virus infection or malware attacks.
Method 1: Using File History
File History is a built-in Windows backup tool that automatically saves versions of your files and folders to an external drive or a network location. Though it is recommended to use an external drive, problem is the drive needs to be connected all the time (or when the backup runs). So, you can use a network location which may need an internet connection.
- Open Control Panel app and change the “View by” option to “Category”.
- Click the “Save backup copies of your files with File History” link showing below “System and Security” heading.
- Select an external drive or a network location and click “Turn on” button.
- To reduce backup time and size, click “Exclude folders” link from sidebar and remove unnecessary folders. Click “Advanced settings” link to adjust backup frequency. You also have an option to setup how long you want to keep the copy of backed up versions.
- Click “Run now” to start the backup immediately.
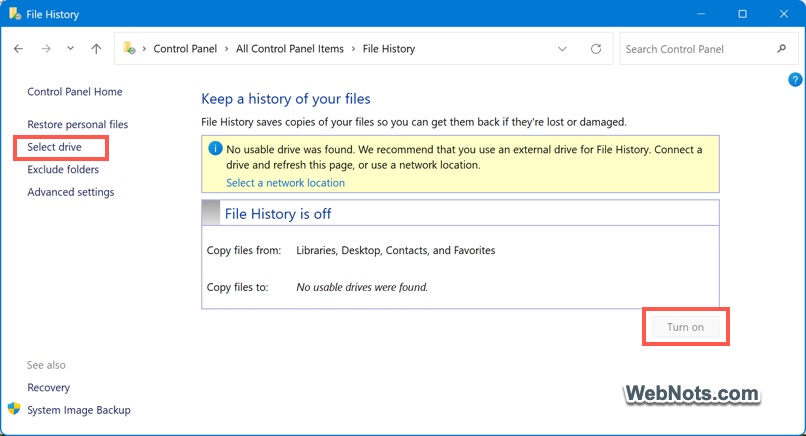
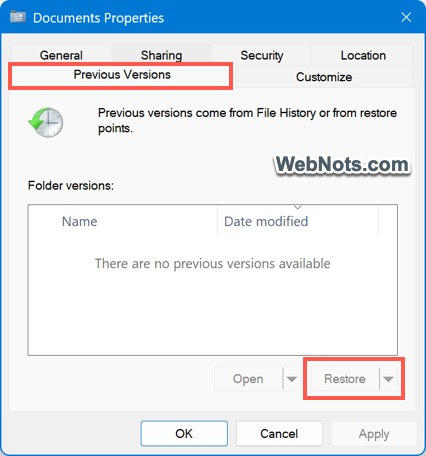
File History will now automatically backup your selected folders at regular intervals. For restoring a folder, right-click on it, select “Show more options” and then select “Restore previous version” menu. Alternatively, select a folder, press “Alt + Enter” keys to open its “Properties” and go to “Previous Versions” tab. Select a backup version from File History or system restore points and click on “Restore” button.
Method 2: Using OneDrive Folder Backup
Windows 11 integrates with OneDrive, allowing seamless cloud backups. If you have a OneDrive account with sufficient storage, then this is the best option for synchronizing and backing up folders.
- Make sure you have OneDrive app installed and signed in with your Microsoft account.
- Right-click on the OneDrive icon in the system tray and click the gear “Help & Settings” icon.
- Select “Settings” menu and go to “Sync and backup” section.
- Click on the “Manage backup” button.
- Now, select the folders to be backed up automatically. Available items for backup include Documents, Desktop, Pictures, Music, and Videos.
- All you need is to make sure the folder you want to backup is located inside one of these locations.


Using OneDrive will add a quick access shortcut in File Explorer sidebar. If you just want to keep a copy of a folder not in one of the backed up locations (for example – in Downloads folder), you can simply drag and drop the folder into the OneDrive location in sidebar. Your files will now be backed up to OneDrive and accessible from any device. However, this will not sync the content if you update it in original Downloads folder.
Method 3: Using Windows Backup App
Windows 11 comes with a Windows Backup app which is meant for moving your entire system data to a new PC. Though the folder backup uses OneDrive as explained above you can also backup apps, settings, and passwords.
- Search and open Windows Backup app.
- Expand “Folders” tab and select the items you want to backup. It includes Documents, Desktop, Music, Pictures, and Videos.
- Also, expand Apps, Settings, and Credentials tabs and enable the backup of those items.
- Click “Continue” and wait for the content to be backed up.
- When you’re setting up a new PC, make sure to login with the same Microsoft account and select the backup when prompted.
- You can login to the OneDrive app to find all your folders and files.
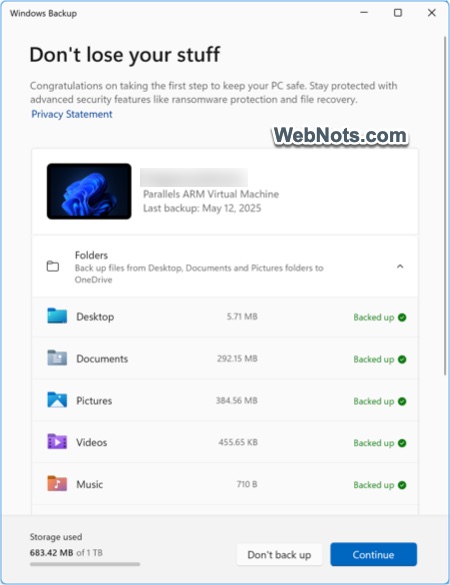
This method is also useful if you clean install Windows by deleting old folders / files due to virus or malware infection.
Method 4: Manual Copy to an External Drive
For a quick, one-time backup, manually copying files to an external drive is the simple solution.
- Insert a USB drive or external HDD.
- Open File Explorer by pressing “Windows Logo + E” keys and locate the folder you want to back up.
- Right-click the folder and select “Copy”.
- Navigate to your external drive, right-click, and select “Paste”.
- Open the external drive to ensure files are copied correctly.
Conclusion
Backing up folders in Windows 11 is easy with built-in tools like File History, OneDrive, and manual copying. Use multiple backup methods for safeguarding your mission critical folders. For example, you can combine File History and OneDrive options along with periodic manual backups for redundancy.