By default, Microsoft Excel will open with a fixed cell width and will NOT adjust the cell’s width to fit its content. This will be annoying to extend the columns manually one-by-one to avoid overlapping and make the content visible. If you are frustrated with this, here is how to automatically fit cell’s width to content in Microsoft Excel app.

Auto Align Excel Cells Width in Excel
- Open Excel app and create a new blank workbook.
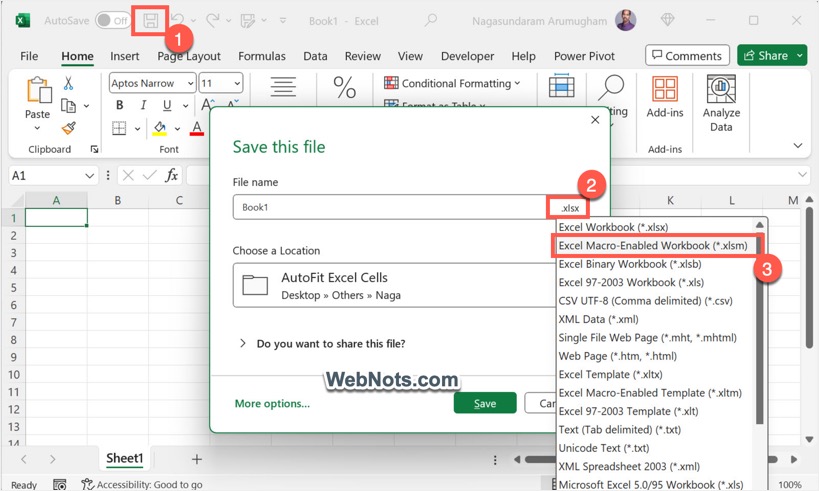
- Click “Control + S” to open “Save this file” dialog box.
- Click on the .xlsx file extension showing at the end of file name box and select “Excel Macro-Enabled Workbook (*.xlsm)) option.
- Click “Save” button and save the file to desired location.
- Now, right-click on the “Sheet1” tab at the bottom and select “View Code” option.
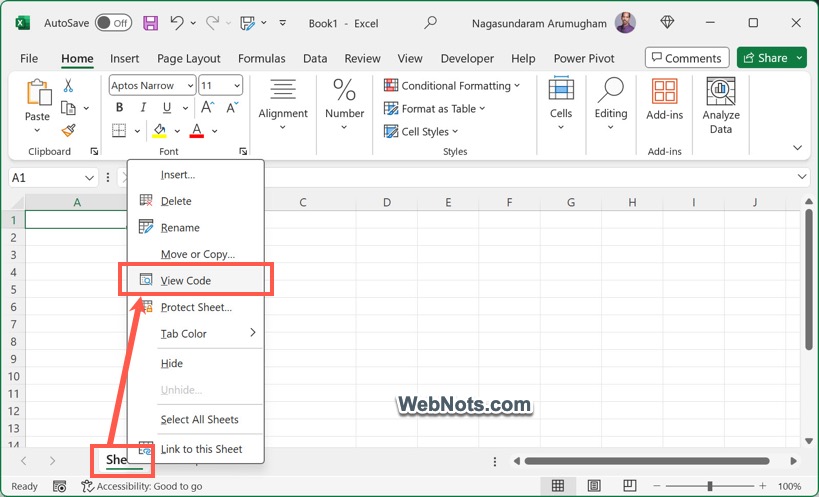
- This will open “Microsoft Visual Basic for Applications” editor (called VBA editor).
- Click the “General” dropdown in the editor and select “Worksheet” option.
- You will see two lines are added automatically and insert the AutoFit code between those two lines.
Private Sub Worksheet SelectionChange (ByVal Target As Range)
Cell.EntireColumn.AutoFit
End Sub- It should look like below in the editor:

- Click save icon to close the VBA editor.
- Now, start type in any column and when you press enter key Excel will automatically adjust the width as per the content’s length.

Points to Remember
- It works only when you save the files as macro enabled Excel workbook with .xlsm extension. If you save the file as normal Excel workbook (with .xlsx), then the Visual Basic code can’t be saved. You will see a warning to save the file properly.
- Unfortunately, it works only in Windows version and not on Mac Excel.
Alternate Option for XLSX Files
If you do not want to save the file in .xlsm format, then there is alternate option available for you which works on both Windows and Mac Excel versions.
- After filling up your content, press “Control + A” shortcut keys to select all cells. Alternatively, click the cell left to column A and above the row 1. It will show as a half triangle in grey color and when you click, it will select all content and change to green color half triangle.
- Now, move the cursor between any two columns to see the cursor changes as a separator with crosshair +. Double click when the cursor shows as a crosshair and all the cells in the sheet will be adjusted to fit their content’s length.

- Alternatively, go to “Home” menu, click “Cells” icon in the ribbon and select Format > AutoFit Column Width” option.

Though this is a one click option, you can only do this after preparing your content or do multiple times to adjust the cells. So, this is inconvenient and adding VBA code is more convenient option.