It is important to monitor the traffic and other statistical data of your WordPress site. This helps in monitoring the progress and taking corrective actions when something is going wrong. There are many tools like Jetpack traffic monitoring and other readymade plugins to see the status and reports right from the admin dashboard. But Google Analytics is one of the free tools with exhaustive tracking and reporting features required to be integrated with each WordPress site. For example, if you are looking for selling your website, then data from Google Analytics is the first traffic proof to be shown to buyers. Similarly, you also need Analytics data for getting approval from any advertising programs like Mediavine, Raptive, Freestar, etc. In this article, we will explore how to add Google Analytics in WordPress site.
How to Get Google Analytics Code?
You need to have a Google account in order to get the Analytics measurement or tracking code from Google. Earlier, Google used to offer Universal Analytics (also called GA3 or UA) and now you need to use Google Analytics (or GA4). Below is the summary of lengthy process and check our article on how to create a new GA4 property to get the complete details.
- Go to Google Analytics website and login with your Gmail account, if you don’t have a one then signup for a new account. Once you are logged inside Analytics account then click on the “Admin” tab and create new account for your website.

- Follow the setup wizard and fill all the required details for account creation, property creation, business details, business objectives and data collection.

- After that, go to “Data Streams > Web” section of your property and setup the data collection streams. This will create a measurement ID for your property and click on the “View tag instructions” option.

- Google will automatically scan and detect that site is built with WordPress and show plugin options to integrate the tracking code under “Install with a website builder or CMS” tab. You can also scan your site’s URL or click the “Choose another” link to view all available integrations.

- Go to “Install manually” tab and copy the Google Analytics tracking code.

Manually Adding Google Analytics in WordPress Site
The easy option is to integrate Analytics code on your site manually without any plugin. Login to your WordPress dashboard and navigate to “Appearance > Theme File Editor” section. If you are using blocke-based themes, then go to “Appearance > Editor” section. Choose header PHP template “header.php” and paste the Google Analytics code just before the closure of head tag. This will add the Analytics code on the header area of all the pages on your site.

Save your changes and go back to your Analytics account. Check the status and ensure it shows “Receiving traffic in past 48 hours” under “Data Streams” section.

Adding Analytics Code Using Plugin
As mentioned above, Google will show possible plugins to integrate the code in your Analytics account. However, you can also first install the plugin and link your Analytics account from WordPress dashboard. Google Analytics by Yoast was one of the popular plugins used to add Analytics code on your WordPress site. The plugin was bought by Syed Balki, founder of wpbeginnner.com, and renamed as Google Analytics by MonsterInsights.
Go to “Plugins > Add New Plugin” section on your admin dashboard to find and install the plugin. Activating the plugin will create a menu named “Insights” on the sidebar navigation. The plugin offers two ways to add the Analytics code:
- Manually add the Google Analytics GA4 code.
- Authenticating with Google account login.
The authentication allows you to see the Analytics dashboard right from your WordPress admin dashboard and the manual code addition will just add the code without dashboard access.
In order to add the code manually, go to “Insights > Settings” and navigate to “General” tab. Click on the “Manually enter your GA4 code” and add your Google Analytics code.

If you want to integrate Analytics dashboard then click on the “Authenticate with your Google account” button.
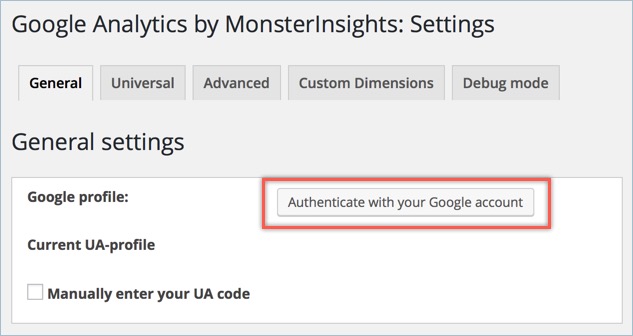
You will be promoted to login with your Google account and confirm the access to your details. Click on the “Allow” button to provide access.

Once you have successfully authenticated the account, navigate to “Insights > Dashboard” to view your Analytics dashboard.
Conclusion
Though there are many traffic monitoring options available for a WordPress site, we highly recommend adding Google Analytics to get maximum benefit out of free resources from Google. Manually adding code in header file will reduce installing one more plugin while Google Analytics by MonsterInsights plugin will enable the Analytics dashboard right in your WordPress admin dashboard. Also, we recommend checking whether any of your existing plugins support Analytics integration to avoid installing one more plugin only for this purpose. Some themes like GeneratePress and Astra also offer hook function to insert the Analytics code in header. Whether you use theme, plugin or add the code manually, ensure to verify the Analytics account that the status is showing as receiving data and the reports are showing all required details.