
Alternative text or shortly alt text Alt text is primarily used for images on webpages for search engine optimization purposes. However, do you know that it is also important to add alt text to visual elements in Microsoft Word documents? Alt text is a short description of an element that conveys the meaning of to users who may not be able to see that element. Therefore, if accessibility is a priority, it is essential to include alt text in your documents. In this article, we will explain how you can add alt text to elements in Microsoft Word document. You can also follow similar steps for Excel spreadsheets and PowerPoint slides.
Why is Alt Text Important?
- Accessibility: Alt text ensures that people with visual impairments or reading difficulties can understand the content and purpose of images in your document. This aligns with inclusive design principles and legal requirements, such as the Americans with Disabilities Act (ADA) and Section 508 of the Rehabilitation Act.
- Search Engine Optimization (SEO): As mentioned, though SEO is less relevant for Word documents than web pages, alt text can still be beneficial if your documents are published online or converted into accessible PDFs.
- Professionalism: Demonstrating a commitment to accessibility reflects well on you or your organization and ensures your documents reach a wider audience.
So, any time you include a visual element like photos, charts, graphs, diagrams or illustrations in your Word document, make sure to add a descriptive alt text. However, purely decorative images that serve no informative purpose (like a divider or background texture) can be marked as “decorative” instead of adding a description.
Add Alt Text to Images in Microsoft Word
- Go to “Insert” tab, click “Pictures” icon in the ribbon and select the source (This Device, Stock Images or Online Pictures).
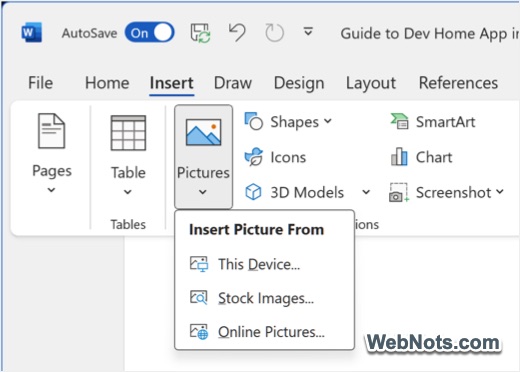
- Locate and insert your image.
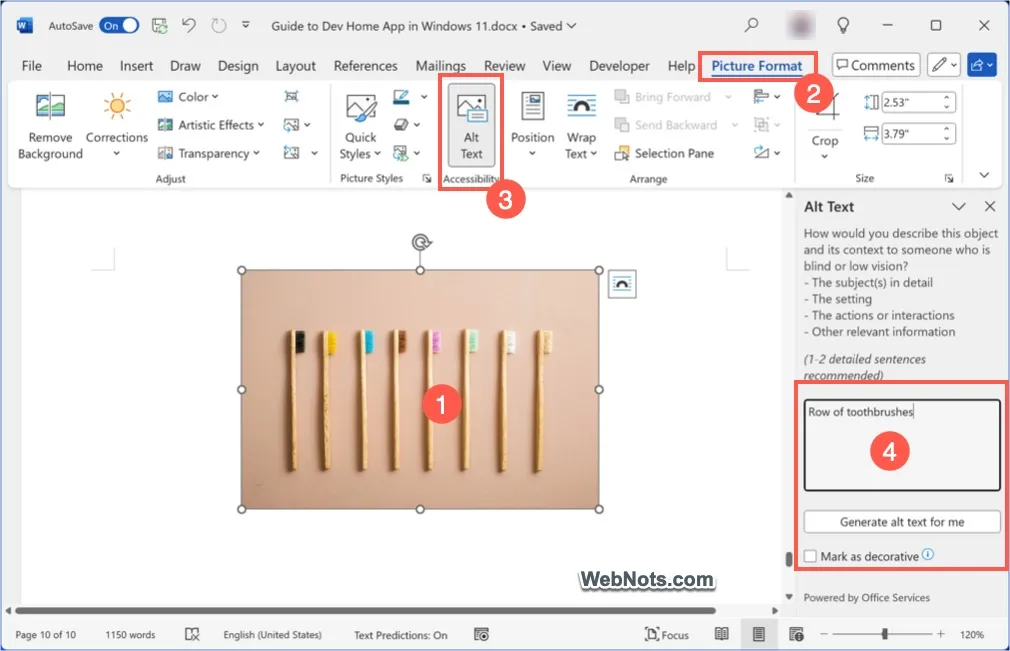
- Double-click on the inserted image or select the image and go to “Picture Format” tab.
- Click the “Alt Text” button in the ribbon under “Accessibility” group.
- You will see a sidebar opens on the right section titled as “Alt Text”.
- Simply type your description in the box. Alternatively, click the “Generate alt text for me” button and Word will automatically insert the text in the box.
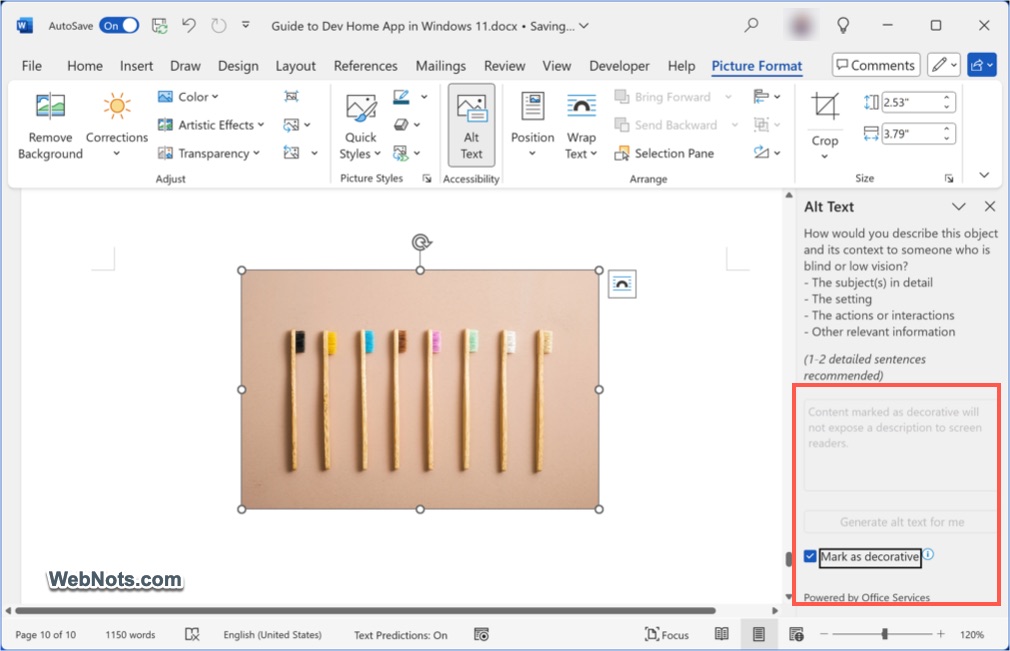
- As mentioned, check “Mark as decorative” option if the image is purely decorative. This will disable the alt text box and tells screen readers to ignore the image, preventing unnecessary interruptions.
- Once you have entered the description or marked the image as decorative, simply close the “Alt Text” pane. Your changes will be saved automatically.
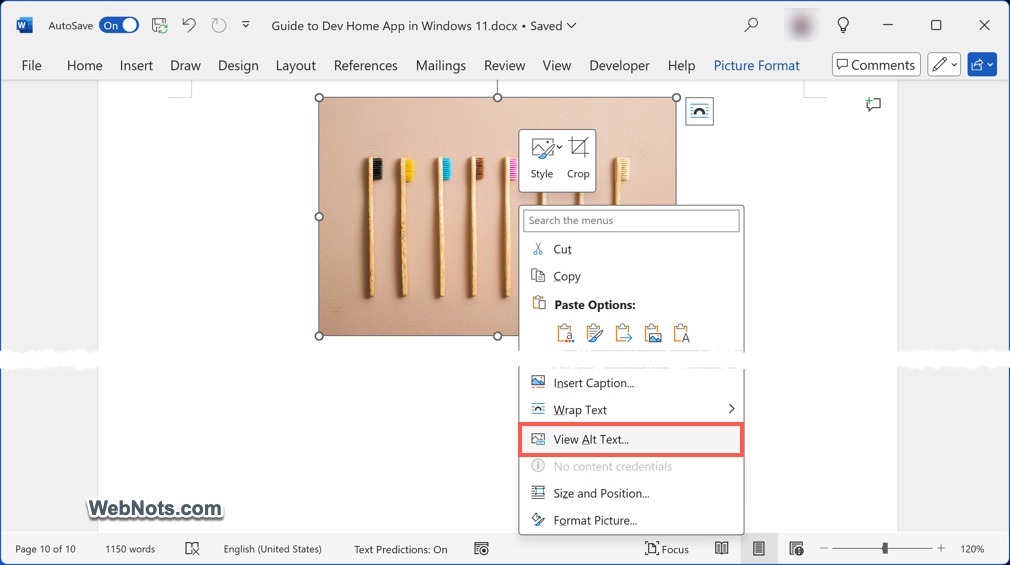
You can also right-click on the image and choose “View Alt Text” from the context menu to open the sidebar. The process works exactly on Word for Mac though the “Insert > Pictures” menu will show little different text and a “Photo Browser” option.
Adding Alt Text to Charts, Graphs and SmartArt
The steps for adding alt text to other visual elements, such as charts, graphs, and SmartArt are similar:
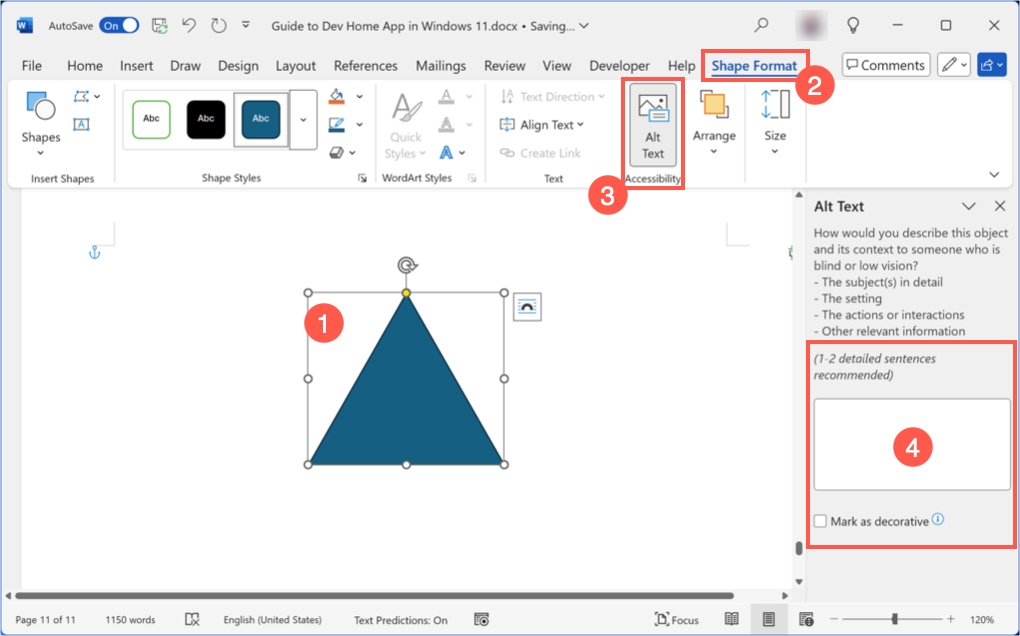
- After inserting, select the visual element. For example, go to “Insert > Shapes” and add a shape in your document.
- Now, right-click and choose “View Alt Text” or go to “Shape Format” tab and select “Alt Text” button in the ribbon.
- Provide a description that summarizes the visual’s key message or data in the alt text box that appears in the right sidebar.
- Select “Mark as decorative” for a decorative shapes.
For complex visuals, you may need to summarize the main trend or outcome and refer the reader to accompanying tables or text for detailed data.
Alt Text for Tables
While primarily used for images and visual elements, alt text can also be added to tables in Word.
- First, insert your table and click inside one of the cells.
- Go to “Table Layout” tab and click the “Properties” button under “Table” group. Otherwise, right-click on the table and select “Table Properties” option.
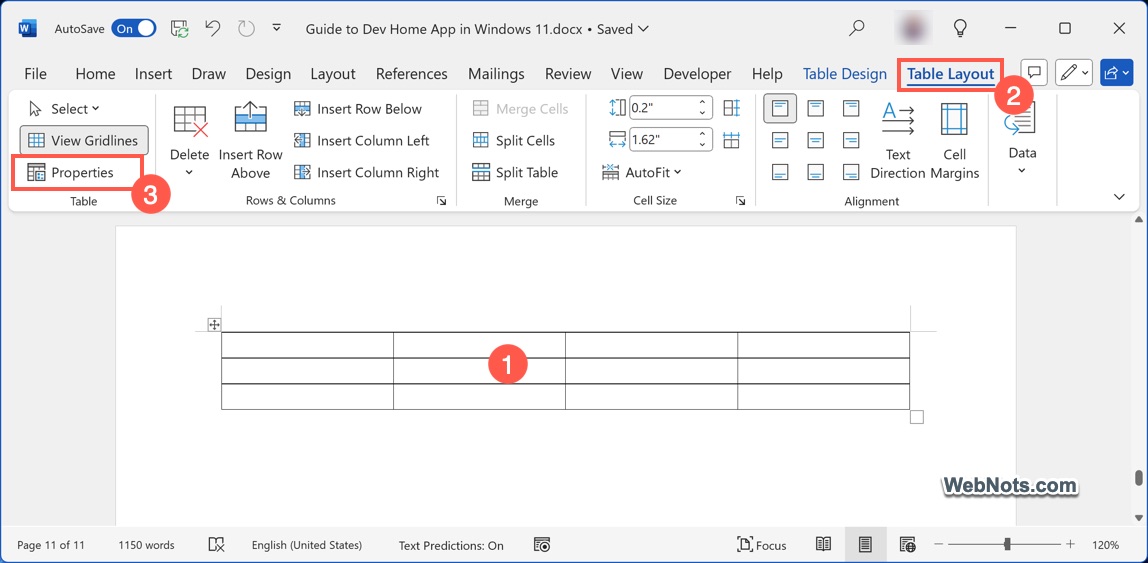
- Unlike images, this will open “Table Properties” dialog box and go to “Alt Text” tab.
- Type table’s title and description in the corresponding boxes and click “OK” button.
Enable Automatic Alt Text Insertion
In most cases, inserting stock images or from online will automatically add alt text to images. You can also customize Word to automatically insert alt text for visual elements.
- Go to “File > Options” menu.
- In the “Word Options” dialog, go to “Accessibility” tab.
- Check “Automatically generate alt text for me” option under “Automatic Alt Text” heading.

We don’t recommend using this option as Word may not correctly understand the context of multiple images in your document which is important for generating alt text.
Using the Accessibility Checker in Word
If you are using too many visual elements, shapes and table in your document, it is important to check whether your document is passing the accessibility check (especially for official and legal documents). Good thing is that Microsoft Word has a built-in Accessibility Checker that helps to identify potential issues, including missing alt text.
- By default, you will see the accessibility information on the status bar. Otherwise, right-click on the status bar and select “Accessibility Checker” option to add it in your status bar.
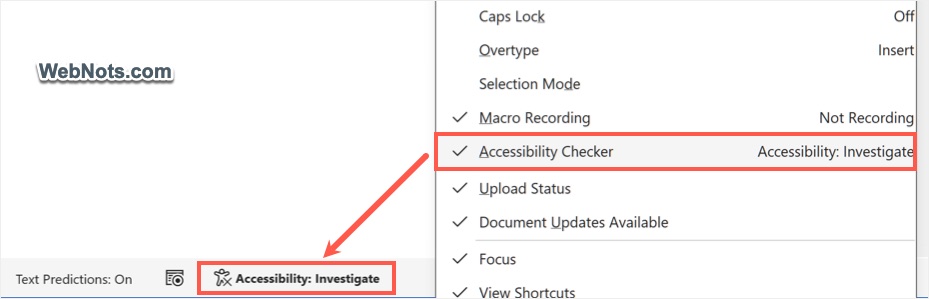
- Click the accessibility status showing on the status bar or go to “Review” tab, click “Check Accessibility” button and then select “Check Accessibility” option.
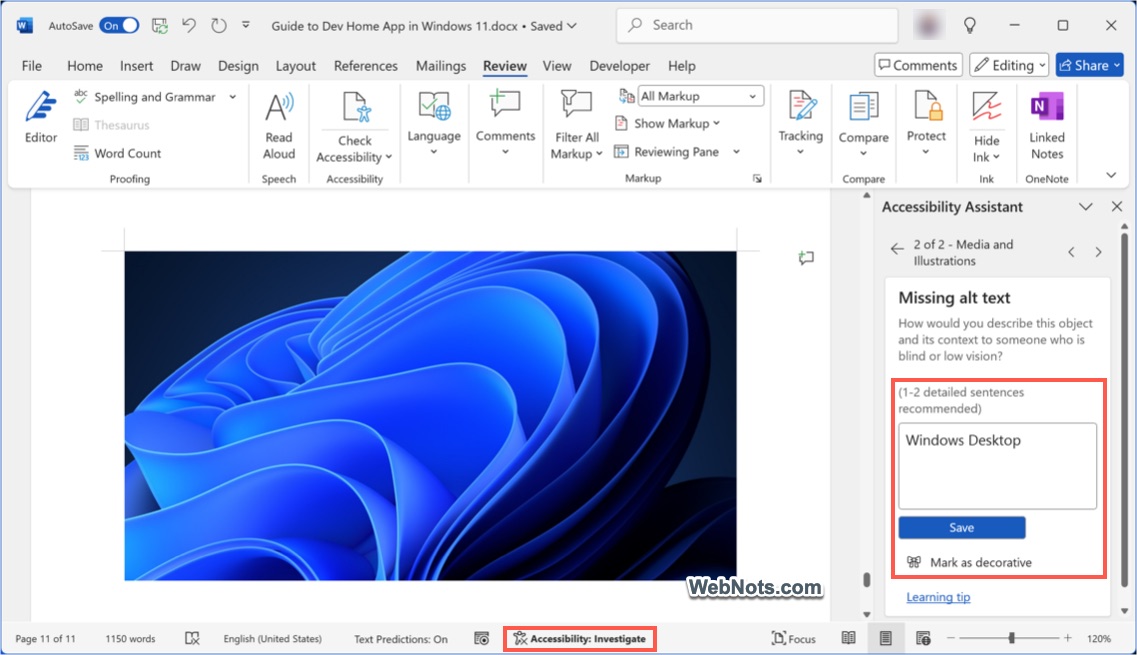
- This will open “Accessibility Assistant” sidebar showing the issues including missing alt text.
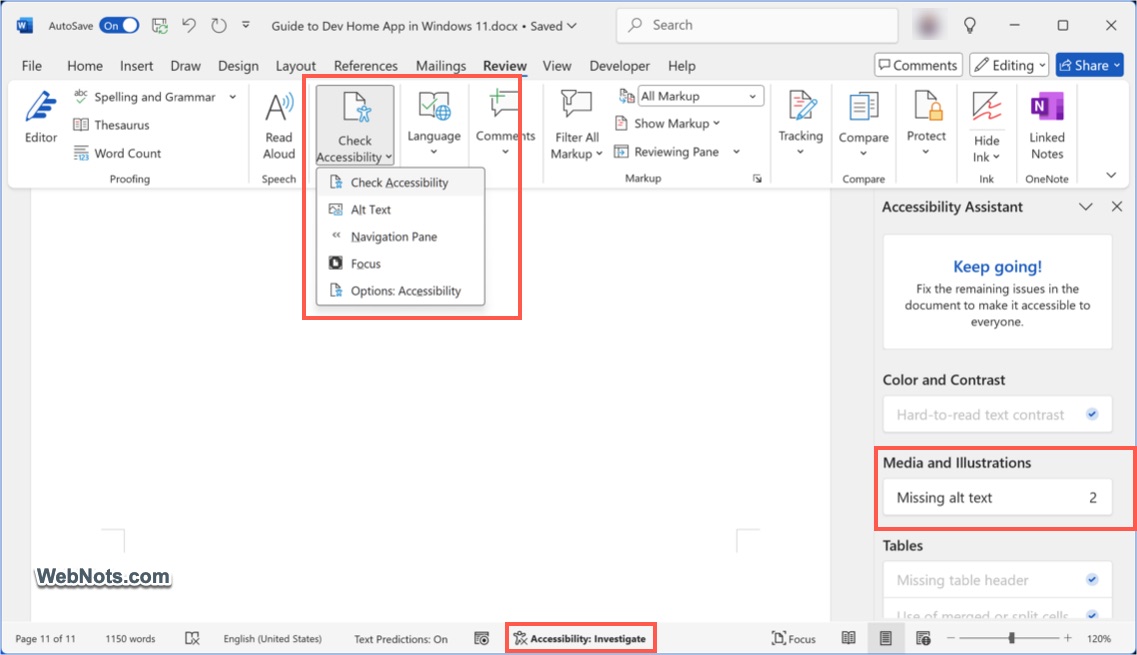
- Click the “Missing alt text” option to highlight the images or (visual elements) missing alternative texts.
- Add the text for each item and save your changes.
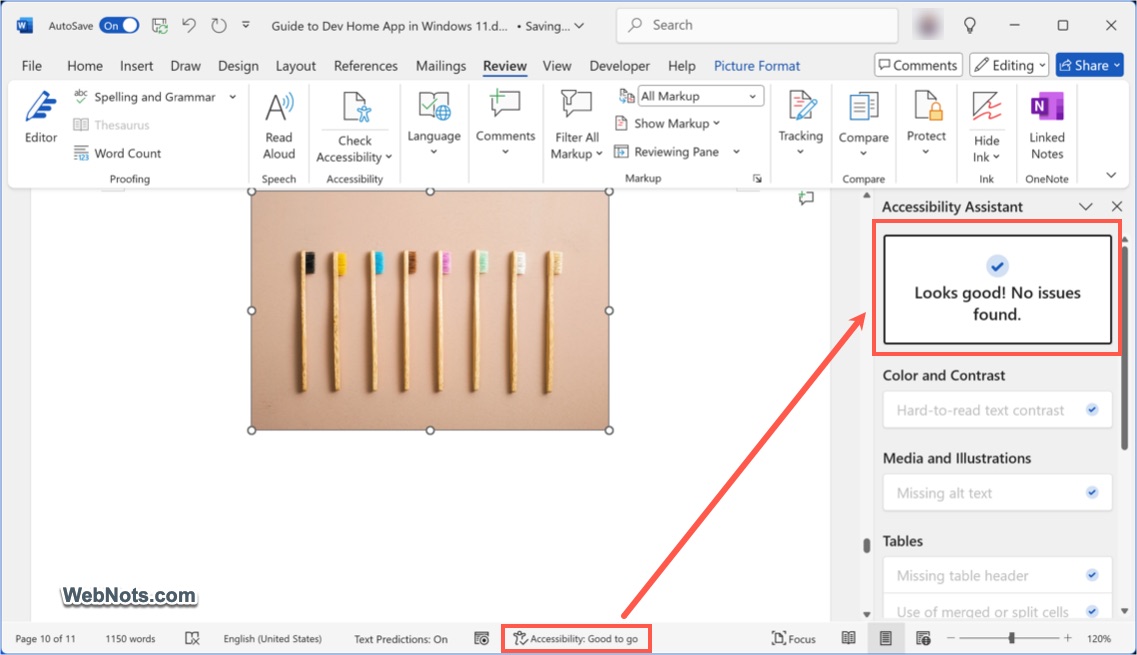
- This will fix the accessibility issues and the status bar should show “Good to go” indicating everything is fine.
Dos and Don’t with Alt Text
| Do | Don’t |
|---|---|
| Be Concise: Alt text should usually be one or two sentences – enough to convey the essential information, but not more. | Avoid Redundancy: Don’t repeat information already stated in the surrounding text unless it is necessary for clarity. |
| Be Specific: Mention key details that are relevant to the image’s purpose in the document. | Skip “Image of/Picture of”: Screen readers already announce that it’s an image, so you can go straight to the description. |
| Focus on Function: Describe the function if the image is interactive or has a practical purpose (like a button or link). | Too Vague: “Chart” is not helpful if the chart contains important data. Instead, explain what the chart shows. |
| Consider Context: Tailor the alt text to the context of the document. The same image might need a different description in a scientific report versus a marketing brochure. | Too Long: Avoid lengthy, overly detailed descriptions that can overwhelm the user. |
Conclusion
So, next time you insert an image in Word, remember that a few descriptive words can open a world of information for someone else. However, adding alt text is just a one step in making your document accessible. Make sure to use other things like clear headings, readable font size, appealing colors and styles with a logical document structure. Alt text is most effective when paired with these broader accessibility practices.


