WordPress admin dashboard is the place where you can manage all your activities starting from creating a simple post to managing multi-site network. Over the period of time the administrator interface of the self-hosted WordPress site has been improved a lot. When we wrote this article with WordPress 4.2 6.5 version, there are quite a lot of things you can do it in the front end with lot more ideas for improvements still can make users life easier.
Learn more on 5 Admin panel settings every WordPress beginner should know.
Basics of WordPress Admin Panel Interface
Once you installed WordPress on your domain successfully, you can access your site’s administrative area (something like a control panel) by appending “/wp-admin/” or “login” to your site URL as below:
http://yoursitename.com/wp-admin/
http://yoursitename.com/login/
Some people refer admin panel’s interface as Dashboard though there is a separate Dashboard section available within the admin panel. Below is how an admin panel will look like after you login to your WordPress site.

Admin interface consisting of below three sections.
- Top admin bar showing options to view the site and few icons as a quick launch.
- Menu items with the mouse over fly out sub-menus.
- Display area shows the content based on the chosen menu like post editor when creating a new post.
1. WordPress Admin Toolbar
WordPress admin interface contains a simple top bar called admin bar having few useful icons/links.
| Icon / Link | Sub-menu | Description |
|---|---|---|
| WordPress | – About WordPress – Get Involved – WordPress.org – Documentation – Learn WordPress – Support – Feedback | Check details of the installed WordPress version. Resource Links to WordPress.org site. |
| Home | Visit home page of your website. | |
| Updates | View available updates for WordPress version, themes and plugins. | |
| Comments | Shows comments waiting for moderation. | |
| + New | – Post – Media – Page – User | Add new post, media file, page or user. |
| Username | – Edit Profile – Log Out | View user profile and log out from the admin interface. |
2. Menus and Sub-menus
There are certain menus appear by default with your WordPress installation and there will be new menus added based on your theme’s and plugin’s settings. Below are the details of menus available in the WordPress admin interface and what you can do with them.
| Menu | Sub-menu | Description |
|---|---|---|
| Dashboard | – Home – Updates | Dashboard view showing quick links and available updates. |
| Posts | – All Posts – Add New Post – Categories – Tags | Create posts, categories and tags. |
| Media | – Library – Add New Media File | Upload and manage files like images, videos, audios, PDF, etc. |
| Pages | – All Pages – Add New Page | Create pages. |
| Comments | Manage comments like approve, reject or delete. | |
| Appearance | – Themes – Patterns – Customize – Widgets – Menus – Theme File Editor | Customizing themes, widgets, menus, patterns, etc. Editor allows you to edit core theme files. |
| Plugins | – Installed Plugins – Add New Plugin – Plugin File Editor | Install and customize plugins. Editor allows you to edit plugin core files. |
| Users | – All Users – Add New User – Your Profile | User management for multiple users. |
| Tools | – Available Tools – Import – Export – Site Health – Export Personal Data – Erase Personal Data | Check your site’s health status, and import / export options for site migration. |
| Settings | – General – Writing – Reading – Discussion – Media – Permalinks – Privacy | Overall site settings to control the behavior. |
| Collapse Menu | Expand or collapse the menus to make the display area wider. |
3. Content Area
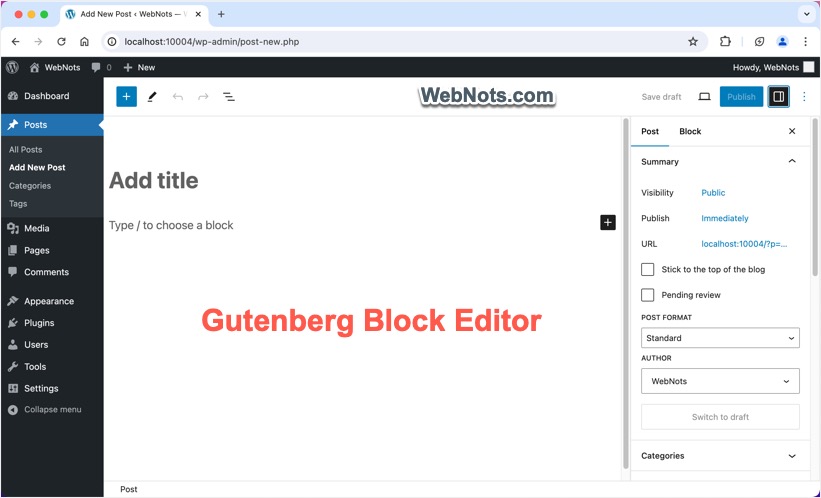
Content area displays the items relevant for the selected menu items. For example, going to “Posts > All Posts” menu will show the post Index page with all your posts previously created on the site. You can click on any post link and start modifying the content. Going to “Post > Add New Post” or “Pages > Add New Page” will open the Gutenberg editor where you can start creating a new post / page and publish.
Points to Note
- Above mentioned menus are only the default menus and additional menus will get added when you install new themes and plugins. Sometimes you will be lost with the vast options, especially if you are new to WordPress and need to spend lot of time in adjusting the simple display issue. Check out some tips to customize WordPress admin interface.
- This article explains with single site installation and you will find additional menus when you have installed multi-site setup.
- Clicking on the menu will take you to the first option in the fly out sub-menu by default.
- WordPress admin front end is responsive and get auto adjusted based on the browser’s viewport.
- WordPress also offers iOS and Android apps to administer your site on the go from mobile devices. However, you need WordPress.com or Jetpack account to use these mobile apps.
Learn more on WordPress admin panel Settings menu options.
Admin Panel Interface for Block Based Themes
The above explanation is with the classic themes like Astra, GeneratePress, etc. However, WordPress by default comes with a block-based theme like Twenty Twenty-Four instead of a classic theme. Since block-based themes support full site editing feature, the items under “Appearance” menu will be different if you have installed one of the block-based themes. You can find the “Appearance > Editor” section and all other options like widgets, customize, menus are removed. Also, the “Plugins > Plugin File Editor” menu will be removed from the admin inteface.