By default, Windows 11 shows Recycle Bin in Desktop and it is not shown in the File Explorer sidebar. This is bit of inconvenient as every time you need to toggle to desktop for cleaning or restoring content available in Recycle Bin. If you are interested in adding Recycle Bin to File Explorer sidebar, here are three options for you.
File Explorer View in Windows 11
Navigation pane or left sidebar has three sections in the latest Windows File Explorer app.
- Home, Gallery and OneDrive.
- Quick Access links to Desktop, Downloads, Documents, Pictures, Music and Videos folders.
- This PC (showing local and external drives) and network drives.

Let’s add the Recycle Bin in the sidebar navigation pane.
1. Add Recycle Bin Using Folder Options
- Press “Windows Logo + E” keys to open File Explorer app.
- Click the “See more” three dots icon in toolbar and select “Options” menu.

- This will open “Folder Options” dialog box and go to “View” tab.
- Scroll down to the bottom and check “Show all folders” option under “Navigation pane” section.

- Click “Apply” and “OK” buttons to close the dialog box.
- Now, check the File Explorer sidebar and you will see the “Recycle Bin” folder is added as a last item.

Though this is easy to do, File Explorer’s sidebar will show all the folders with this method.
2. Adding Recycle Bin to Quick Access
If you do not want to change the folder view, then you can add Recycle Bin as an additional item to File Explorer’s Quick Access view.
- Press “Windows Logo + D” keys to minimize all open windows and view your Desktop.
- Right-click on the Recycle Bin icon and select “Pin to Quick access” option.
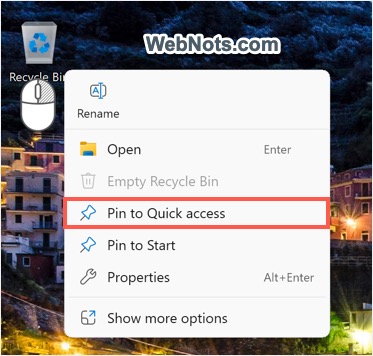
- Press “Windows Logo + E” to open File Explorer and you will find the Recycle Bin item in Quick Access section.

- Right-click on Recycle Bin and select “Unpin from Quick access” menu to remove it from File Explorer.

3. Add Recycle Bin in This PC
If you are always opening File Explorer with This PC as a default folder, then adding Recycle Bin to This PC will further increase the accessibility. However, there are no frontend settings available for this and you need to add an entry in Registry Editor.
- Type “registry” in Windows Search box in Taskbar.
- Find Windows Registry Editor app from the search list and open it.

- Press “Yes” on the “User Access Control” dialog box if prompted.

- Copy the following path, paste in the address bar of Registry Editor app and press enter.
Computer\HKEY_LOCAL_MACHINE\SOFTWARE\Microsoft\Windows\CurrentVersion\Explorer\MyComputer\NameSpace\
- Right-click on the “NameSpace” folder and select “New > Key” option.

- Change the new key name to the following, you can right-click on the newly created key and select “Rename” option.
{645FF040-5081-101B-9F08-00AA002F954E}
- Close the Registry Editor and go to “This PC” section of your File Explorer app.
- You should find the Recycle Bin is added along with the drives.

If you are not seeing the Recycle Bin, restart your computer and check again.
Final Words
Adding Recycle Bin to File Explorer Quick Access area is the most easy and recommended option as it will not change the folder view. Also, anytime you can remove it without searching for relevant settings. Though Registry Editor is a good option for adding Recycle Bin to This PC folder, you may not have necessary access when using organizational computer.