File Explorer is the gateway to your files, folders, and storage in Windows 11. While many users stick with the default settings, File Explorer is a versatile tool with a wealth of customization options. Whether you want to boost productivity, add visual flair, or streamline your workflow, tailoring File Explorer to your specific needs can make a world of difference. Here are 10 actionable tips to help you master the art of File Explorer customization in Windows 11.
File Explorer in Windows 11
The app has a sleek design with tabs and short right-click menu. By default, it is pinned to taskbar and you can click on that icon to launch the app. Otherwise, search for File Explorer and select “Pin to taskbar” option on the right column of results pane.

1. Pin Frequently Used Folders to Quick Access
By default, Windows shows frequently accessed folders like Desktop, Downloads, Documents, etc. in the Quick Access navigation pane (in the left sidebar). Good thing is that you can also keep your favorite folders in Quick Access section.
- Simply right-click a folder and choose “Pin to Quick Access” or select the option from “See more” menu to add the folder to sidebar.
- You will see a pin icon indicating the item is pinned in the sidebar.
- If you want to remove a folder from Quick Access, simply right-click on it and select “Unpin from Quick Access”.
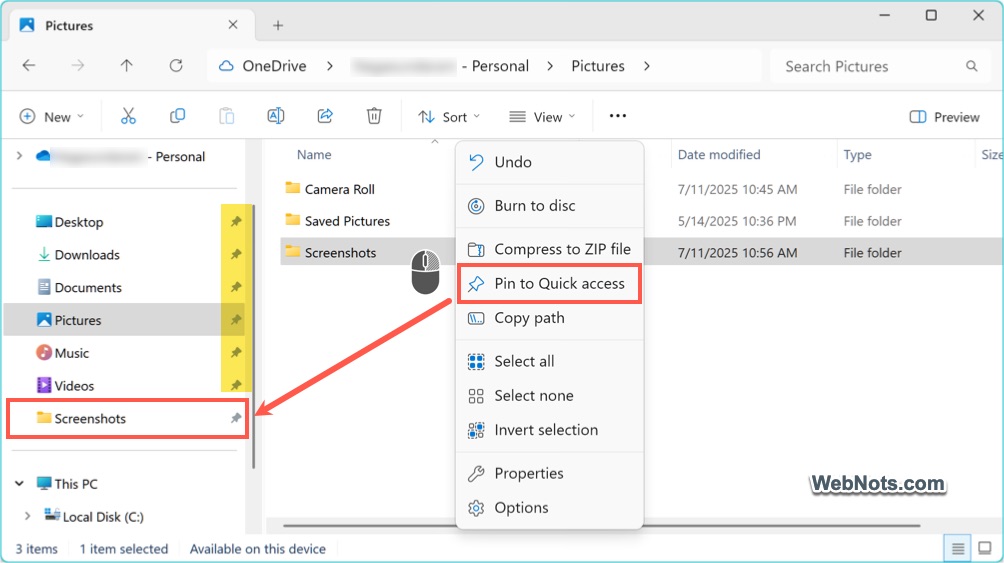
You can also find the pinned folders under “Home” tab in Windows 11.
2. Change Folder Views
Switch between views such as List, Details, Tiles, or Large Icons to find what works best for you. Use the “View” tab on the toolbar or right-click to select your preferred option. For even more control, use “Sort by” and “Group by” to organize files precisely.
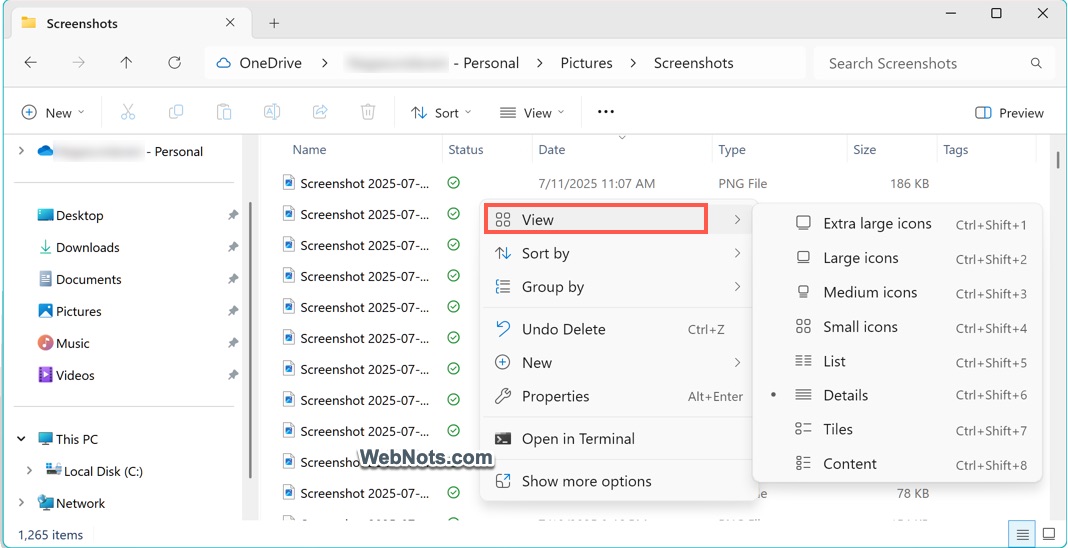
Tip: Press “Ctrl + Shift + 1” through “Ctrl + Shift + 8” to toggle views.
3. Customize Folder Templates
Windows 11 allows you to assign folder templates (such as Documents, Music, Pictures, Videos, or General Items) that optimize the folder layout and preview options.
- Right-click a folder and choose “Properties” menu or select a folder and press “Alt + Enter” keys.
- Go to the “Customize” tab in the properties dialog box.
- Select the most suitable folder template from the dropdown below “Optimize this folder for” option.

4. Show Hidden Files and Folders
By default, Windows hides certain system files and folders. To reveal them, click the “View” menu, choose “Show,” and then select “Hidden items.” This option is essential for advanced troubleshooting and customization.
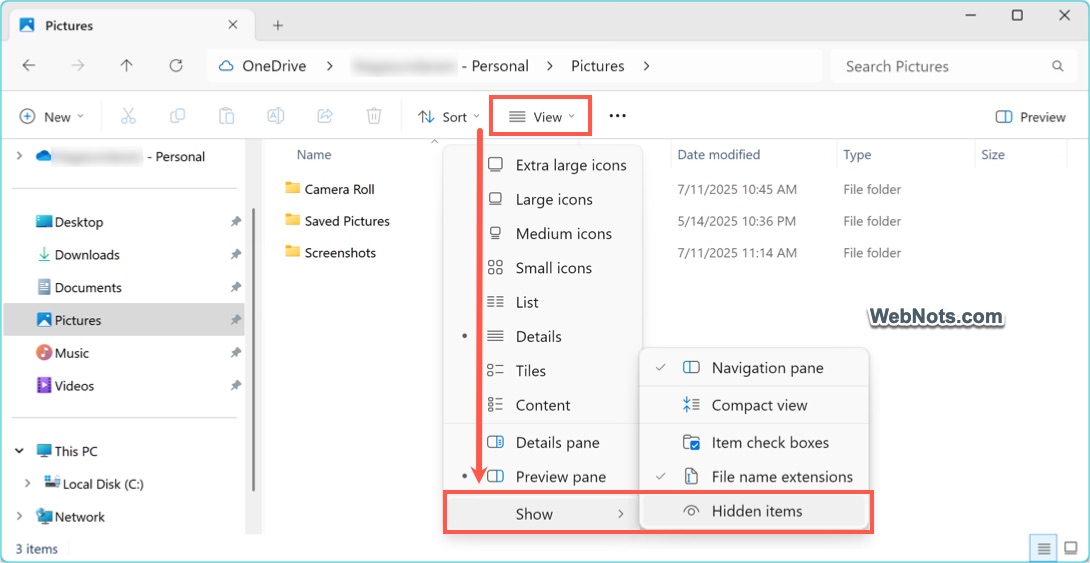
Note: Windows shows the file extension below the file name or under “Type” column in “Details” view. However, you can also force to see file extensions along with the file name (like myfile.txt) by selecting “File name extensions” option from “View > Show” menu.
5. Tweak the Navigation Pane
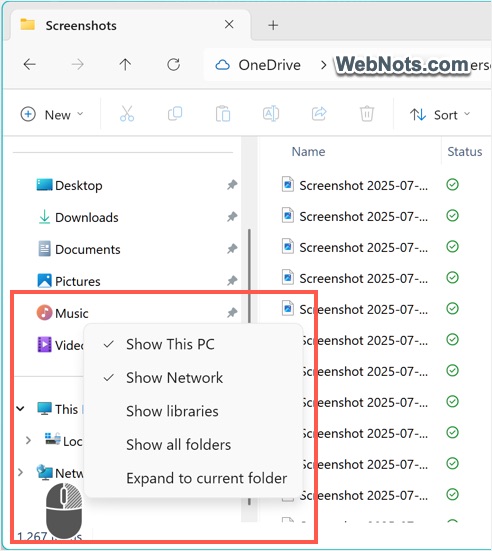
The Navigation Pane can get cluttered over time. Right-click in the pane’s empty area (like in bottom left corner) to show or hide sections like “Libraries”, “Network”, or “This PC”. It is also possible rearrange the folders by dragging them.
6. Use Custom Folder Icons
Give your folders a visual makeover with custom icons.
- Right-click on a folder and select “Properties”.
- Go to “Customize” tab and click “Change Icon…” button.
- Choose from the default icons or use your own .ico files for a personalized touch.
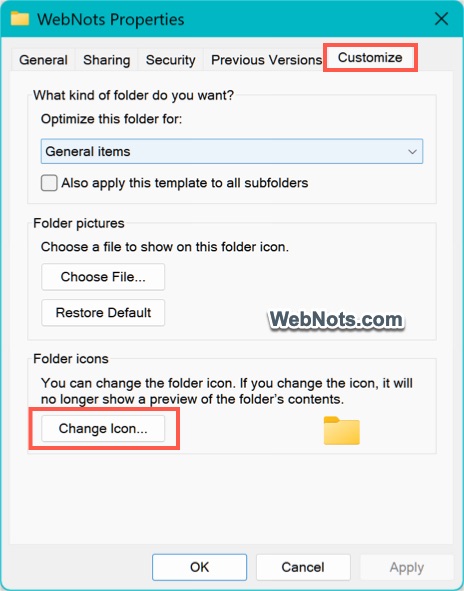
You can also add a custom picture to your folder icon to easily identify.
7. Adjust the File Explorer Start Location
By default, File Explorer opens to “Home” tab in Windows 11. If you want to set File Explorer to open at “This PC” by default, follow these steps:
- Open File Explorer and Click the three-dot menu that says, “See more”.
- Select “Options” from the dropdown.
- In the “Open File Explorer to” dropdown menu, choose “This PC”.
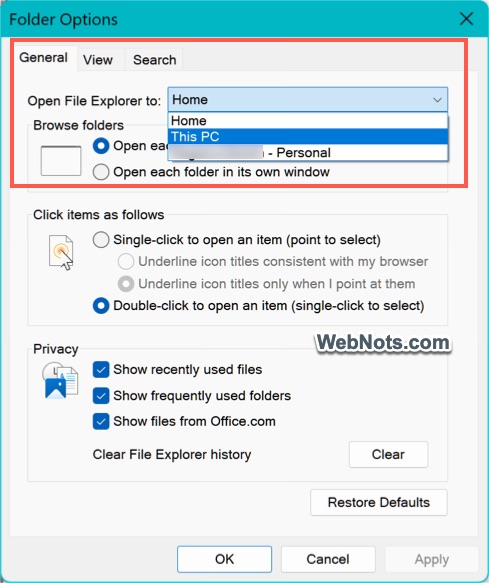
Note: Folder Options dialog has plenty of settings to customize the File Explorer. For example, you can remove the recent files under “General” tab and arrange navigate pane items under “View” tab. You can also change some options by navigating to “System > For developers” section in Windows Settings app.

8. Create Libraries for Efficient Organization
Libraries are collections of folders from different locations, grouped together for easy access. Enable Libraries by right-clicking the Navigation Pane (on the empty area like bottom left corner) and selecting “Show Libraries.” You can then add folders to each library for streamlined organization.
9. Revert to Expanded Context Menu
If you like to use the expanded context menu (like in Windows 10), use Windows Tools instead of File Explorer. This Windows Tools is a system app and offers an opportunity to use classic File Explorer with ribbon and long context menu.

10. Personalize File Explorer’s Accent Colors
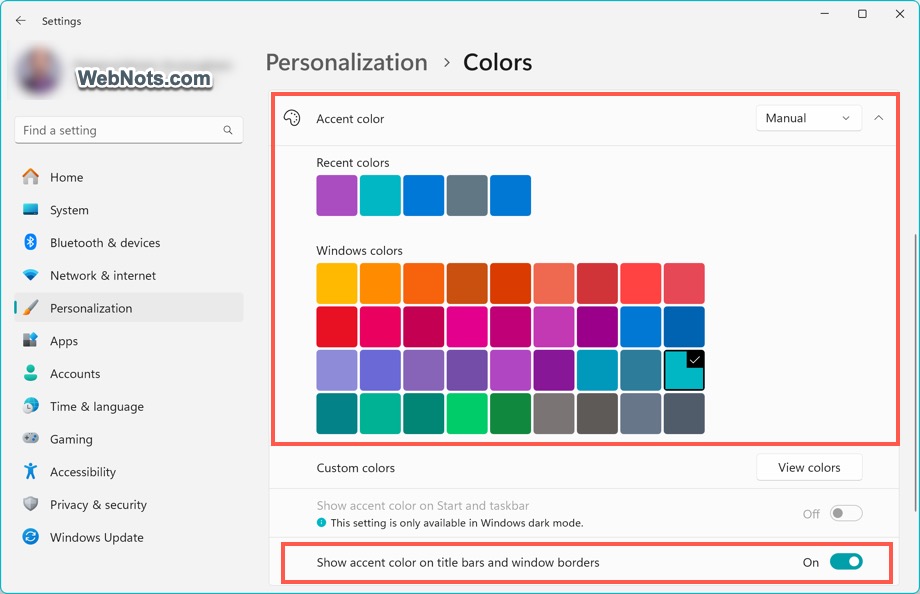
Go to “Settings > Personalization > Colors” and experiment with accent colors. Also, turn on “Show accent color on title bars and window borders” option showing on the same settings page. These changes will reflect in File Explorer’s highlight and selection effects, giving your Windows 11 environment a unique feel. Remember that the accent color will be applied to all applications and not only to File Explorer.
Conclusion
Personalizing File Explorer in Windows 11 not only makes your computing experience more enjoyable but also turbocharges your productivity. If the above tweaks are not sufficient, then you can go for extensions or third-party alternatives to completely replace your workflow.