The Finder app on Mac is the place where you browse files, launch apps, and manage your digital life. However, most macOS users use it at only a fraction of its real power. With a handful of tweaks and shortcuts, you can turn the Finder into a seriously efficient file-management machine. Here are ten tips worth learning.
A Few Finder Basics
Though Finder is functionally somewhat similar to File Explorer on Windows PC, it works a bit differently on Mac. Here are a few basic things you should know:
- The Finder and Desktop are connected.
- The top Finder menu is always available on Mac when you are on the Desktop or in the Finder app.
- Press Command + Comma or go to “Finder > Settings…” to open the Finder app’s settings section.
- You will always see the Finder app listed when using Command + Tab keys. You can’t quit the Finder app.
1. Customize Toolbar and Sidebar
Right‑click (or Control‑click) the Finder toolbar and choose “Customize Toolbar…” option. You will see a pop-up with icons, simply drag and rearrange the toolbar as you desire.
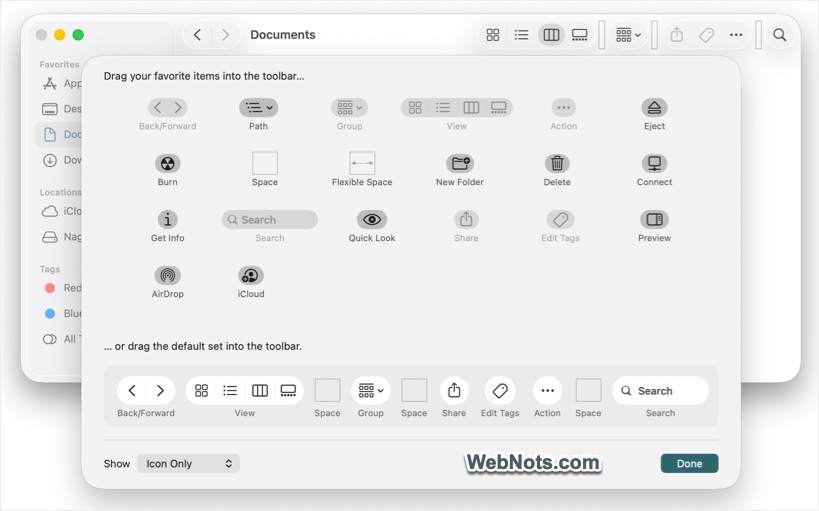
The same applies to the sidebar. Go to “Finder > Settings… > Sidebar” to add the items you want to show in the sidebar and remove unnecessary items.
2. Supercharge Previews with Quick Look
Select any file and press the Space bar. Instantly, you get a full-size preview without opening an app. But don’t stop there: while the preview is open, you can use Markup to annotate images and PDFs or click Rotate Left to fix a photo’s orientation.

Even better, if you select multiple files and hit Space, you can scroll through a gallery of them and use the on‑screen buttons to share or trim video right from the preview window.
3. Browse with Tabs, Not Windows
If your screen is buried under Finder windows, try tabs. Press Command + T (or File > Tab) to open a new tab inside the current window, just like a web browser. You can also merge all your open Finder windows into one tabbed window by choosing “Window > Merge All Windows”. Dragging a file onto a tab switches to that tab, making it easy to move files between locations without juggling windows. You can also drag a tab outside the Finder to open it as a new window.
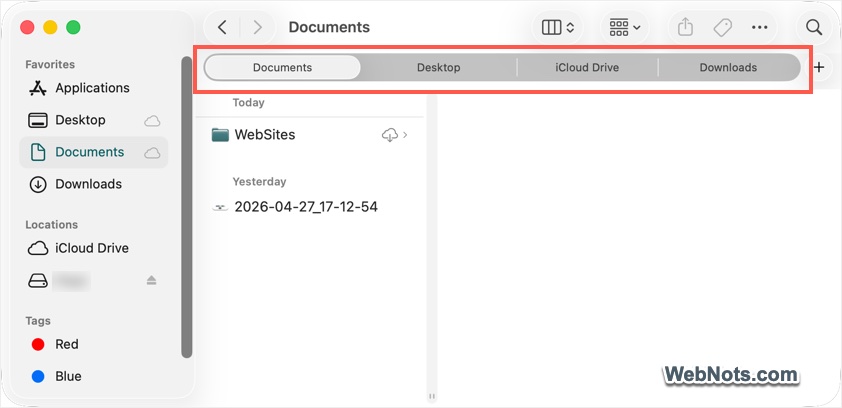
4. Merge Folders Instead of Replacing Them
If you drag a folder to a location that already contains a folder with the same name, macOS offers to replace the old one (which deletes everything inside it). That’s rarely what you want. The trick is start dragging the folder, hold down the Option key, then drop it. The pop-up that appears will now show an additional “Merge” option with the details. Merging combines the contents and only replaces files that have identical names, preserving everything else. This alone can save you from an accidental data disaster.
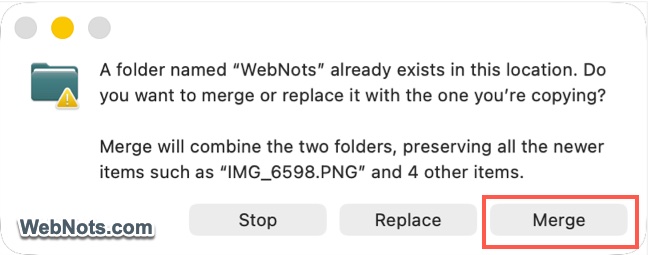
5. Use Path Bar to Always Know Where You Are
Go to “View > Show Path Bar” or press Command + Option + P keys to add a strip at the bottom of the Finder window that shows your current folder’s full path. Click any folder in the path to jump straight to it or drag a file onto a path component to move it there quickly.
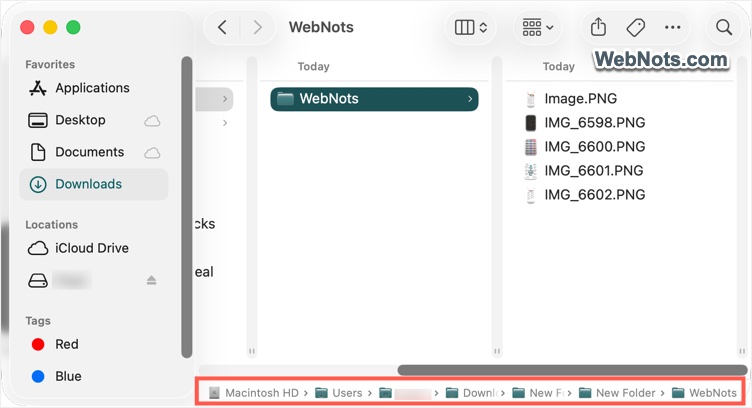
Note: While you are in the “View” menu, also enable “Show Status Bar” to see disk space and item counts at the bottom of Finder tabs.
6. Batch Rename Files in Seconds
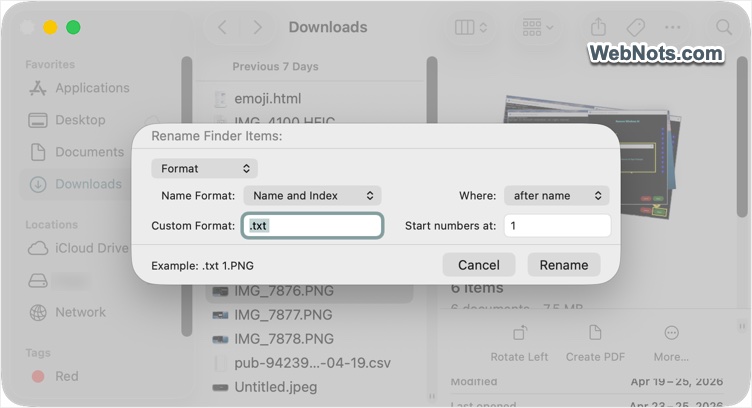
Renaming a dozen screenshots one by one is painful. Instead, select all the files, right‑click, and choose “Rename…” menu. In the dialog that appears, you can replace text, add a prefix or suffix, or use a custom file name with an index number (like “Project‑1”, “Project‑2”). The “Example” preview shows exactly how the names will look, so there are no surprises. It’s a powerful, built‑in time‑saver.
7. Build Smart Folders for Dynamic Collections
Smart Folders aren’t ordinary folders; they’re saved searches that update automatically. Go to “File > New Smart Folder”, click the + button, and set your criteria. For example, all PDFs opened in the last week, or all images created by a certain app. Once you save it, that Smart Folder will always show the matching files, even as you add or remove them from your disk.
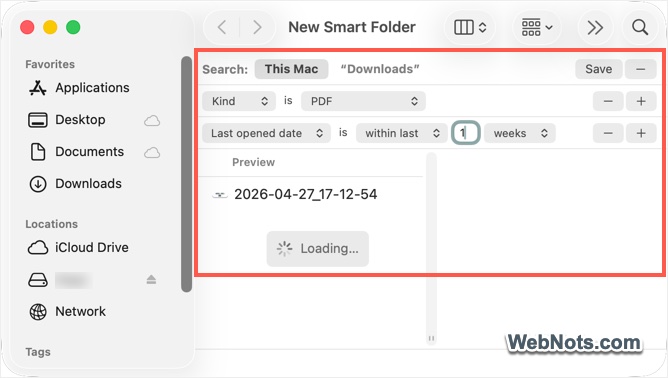
Note: Pin a Smart Folder to the sidebar for instant access to specific sets of files.
8. Organize Everything with Tags
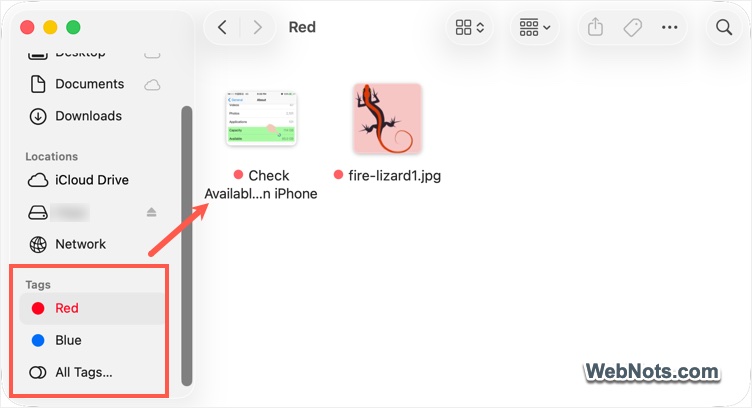
Tags are colored labels that you can assign to any file or folder. Use them to flag urgent documents, mark files for a project, or simply group things across different locations. To tag something, right‑click and pick a color, or drag the file onto a tag in the sidebar. Later, click that tag in the sidebar to see every tagged file in one view. You can even create custom tag names (like “Taxes” or “Client‑X”) and the Finder will treat them like a virtual folder.
9. Group and Sort Items
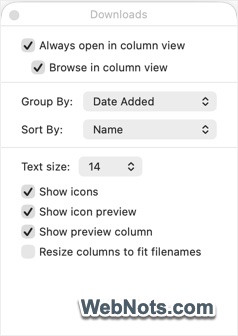
In any Finder window, open the “View” menu or click the three-dots icon in the toolbar and choose “Group By”. You can instantly cluster items by Kind, Date, Size, or Tags. Combined with Gallery or List view, this makes it easy to spot the newest documents or separate screenshots from PDFs.
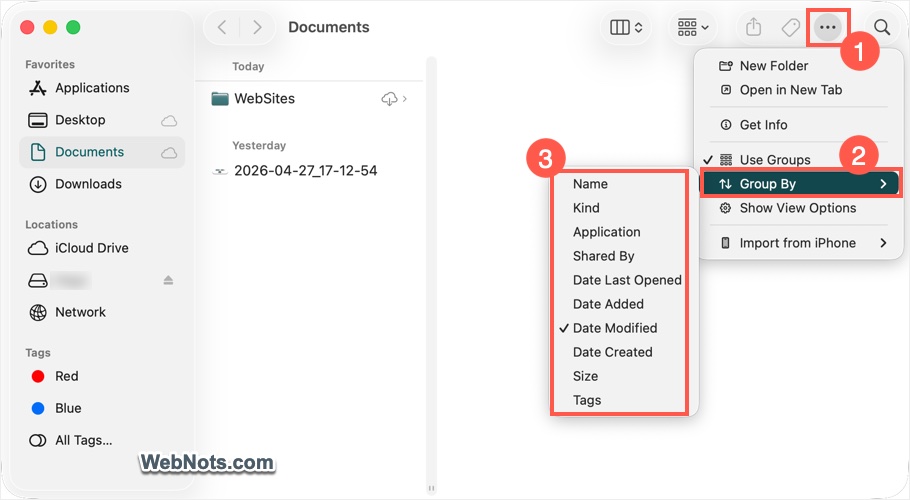
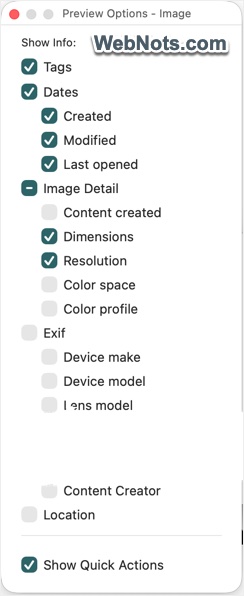
Go to “View > Show View Options” or press Command + J keys to customize the Group By, Sort By, Text size, and other layout parameters for a folder. Similarly, go to “View > Show Preview Options” to customize the items shown on the preview pane. For example, you can show or hide the EXIF data of an image and the Quick Actions items.
Note: For a cleaner desktop, right‑click an empty area on the desktop and choose “Use Stacks” to auto‑arrange messes into neat piles by file type.
10. Learn Keyboard Shortcuts that Save Minutes
A few keystrokes in Finder can replace a dozen mouse clicks:
- Command + Shift + G – Open the “Go to Folder” box and type any path.
- Command + Shift + Period – Show or hide invisible files.
- Command + Up Arrow – Go up one folder (to the parent).
- Command + [ and Command + ] – Move back and forward through your history.
- Control + Command + N – Create a new folder with the selected items inside it.
Check out the complete list of Finder keyboard shortcuts to navigate like a pro.
Final Words
The Finder app on your Mac is far more flexible than it first appears. So, mastering even a few of these tricks will cut down the time spent on searching, renaming, and reorganizing while allowing more time for the work that matters for you.