Keeping your Windows 11 PC running smoothly requires regular maintenance. Over time, temporary files, outdated software, and system clutter can slow down performance and even lead to security risks. To ensure your computer stays fast and secure, follow these 10 essential Windows 11 maintenance tasks regularly.
Manual Maintenance in Windows 11
Some PC maintenance tasks like Windows updates, virus scans, and storage optimization can be automated using the Automatic Maintenance feature. However, most tasks like uninstalling unused apps still require manual intervention. So, you need to schedule your time for doing these manual maintenance tasks as a routine.
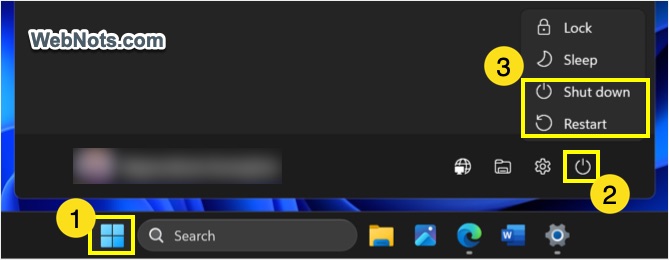
1. Shutdown and Restart Your PC Regularly
It’s a good idea to shut down your system when not in use, especially when you’re travelling. If you don’t want to shut it down for longer duration, a quick restart clears temporary files, resets processes, and often fixes minor glitches. Don’t just close the lid or leave it on for days – restart at least once a week.
How to do it:
- Click the Start Menu icon and then click on the power icon.
- Select “Restart” or “Shut down” option as you need.
2. Run Windows Updates
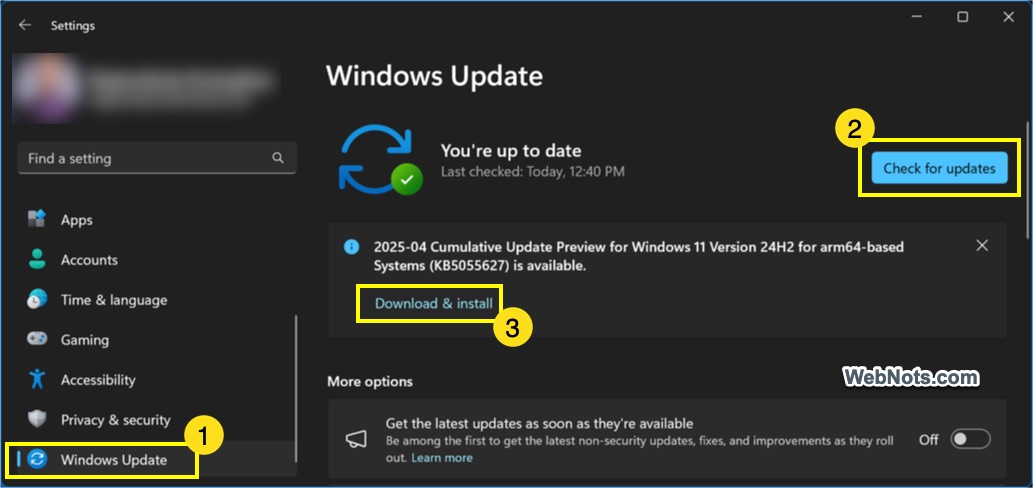
Microsoft releases patches and updates to fix bugs, improve stability, and protect against vulnerabilities. So, keeping your operating system up to date is important for security and performance. Though updates will be installed automatically, you can also manually check and install them.
How to do it:
- Press “Windows Logo + I” keys to open Settings app.
- Go to “Windows Update” section and click on the “Check for updates” button.
- Download / install all available updates and restart if needed.
3. Clean Up Disk Space
Over time, temporary files, cache, and unnecessary downloads accumulate, taking up valuable storage. Windows includes a built-in tool to clean these files.
How to do it:
- Search and open “Disk Cleanup” tool.
- If you have multiple drives, select C: drive.
- Check all boxes, especially Temporary files and Recycle Bin, under “Files to delete” section.
- Click “OK” to delete the selected items.
- Follow the same steps for all other drives on your system.

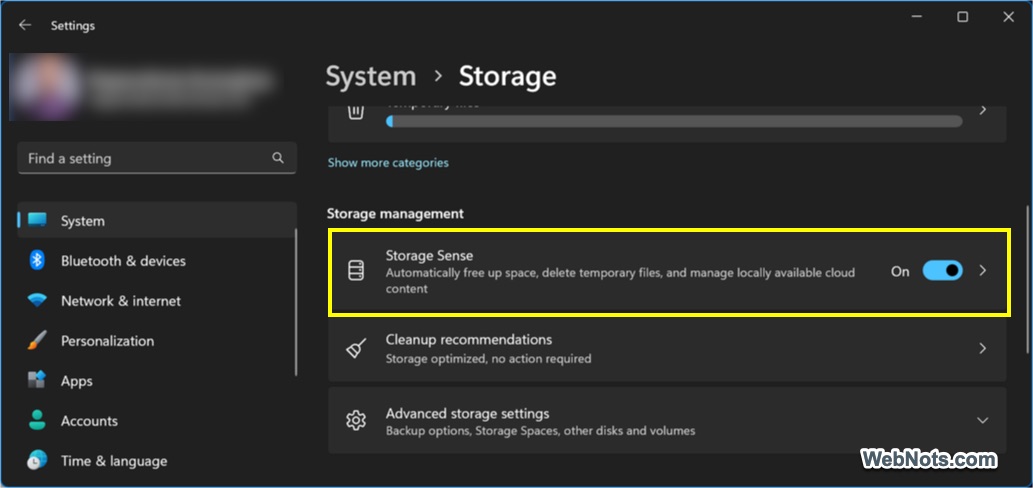
In addition, go to “System > Storage” section in Windows Settings app and turn on “Storage Sense” to allow Windows to automatically clean up the items.
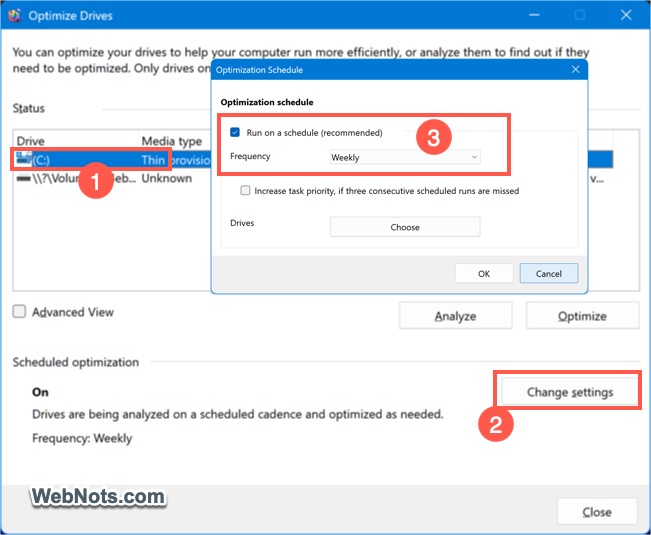
It is also possible to schedule drive optimization using Optimize Drives utility. Search and open the tool, select the drive and then click on “Change Settings” button. Check “Run on a schedule (recommended)” option and choose the frequency as Daily, Weekly or Monthly.
4. Scan for Malware and Viruses
Malware can slow down your PC or steal sensitive data. Regularly scanning with Microsoft Defender or a third-party antivirus is essential to protect your system. Real-time protection is always enabled using Defender antivirus as part of Windows Security app comes. However, it’s recommended to run the full system scan periodically to find and remove any suspicious files.
How to do it:
- Search and open Windows Security app.
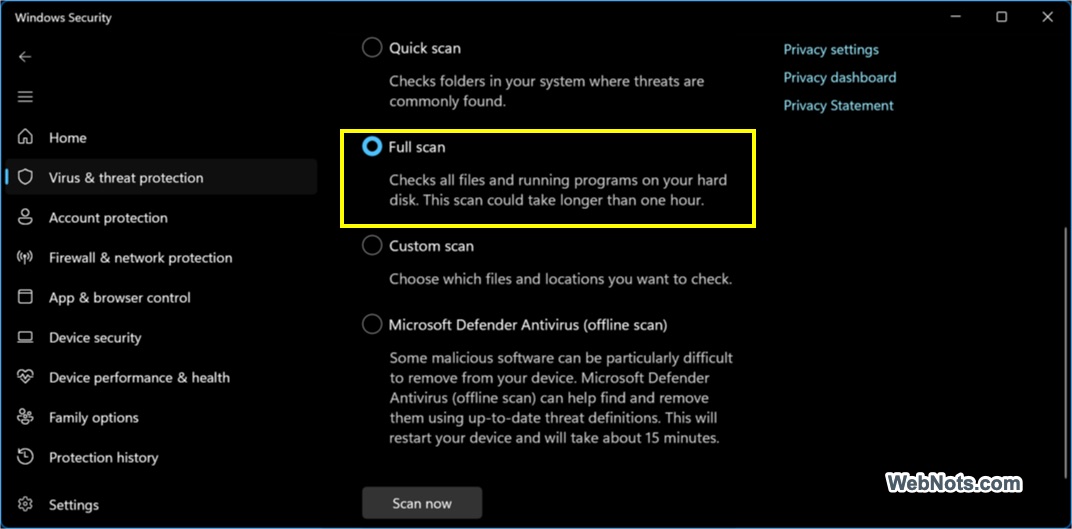
- Go to “Virus & threat protection” section and click the “Scan options” link.
- Select “Full scan” and click “Scan now” button.
Most third-party antivirus apps allow you to schedule the scanning to save your time.
5. Uninstall Unused Programs
Unnecessary software takes up space and may run background processes, slowing down your PC. Over period, unused apps will start accumulating and dragging down the overall performance.
How to do it:
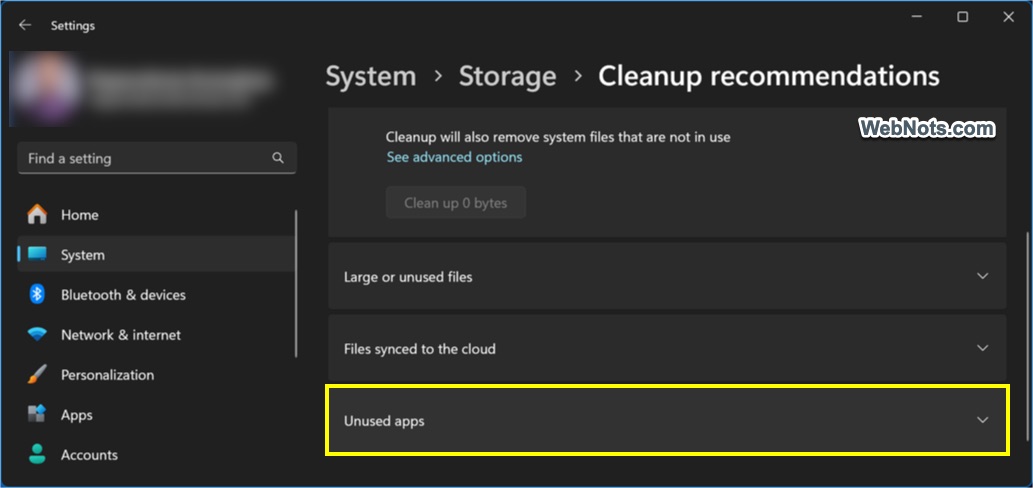
- Go to “System > Storage > Cleanup recommendations” section.
- Expand “Unused apps” section to find the recommended list of apps that you’re not using.
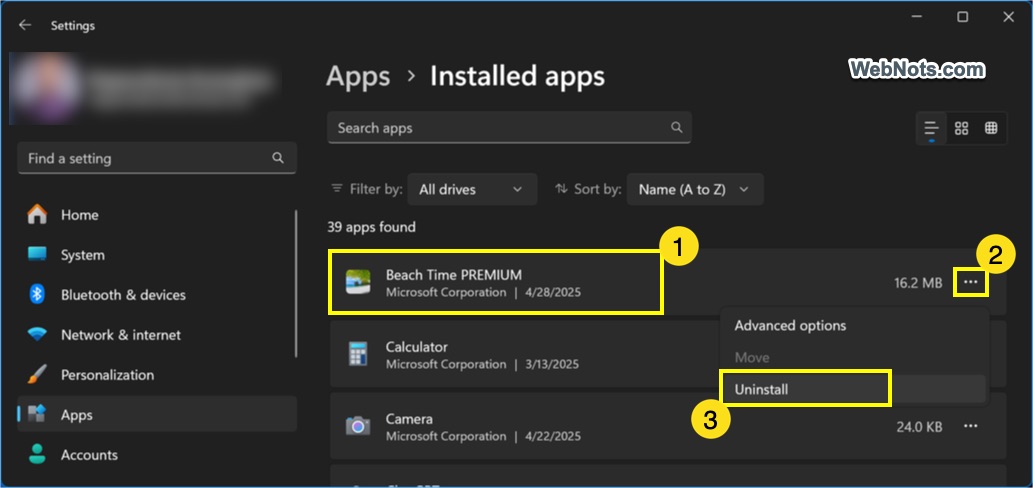
- If you don’t see any recommendations, go to “Apps > Installed Apps” section.
- Manually find an app and select “More options > Uninstall”.
6. Manage Startup Programs
Too many programs launching at startup can increase boot time. You can check and disable unnecessary ones.
How to do it:
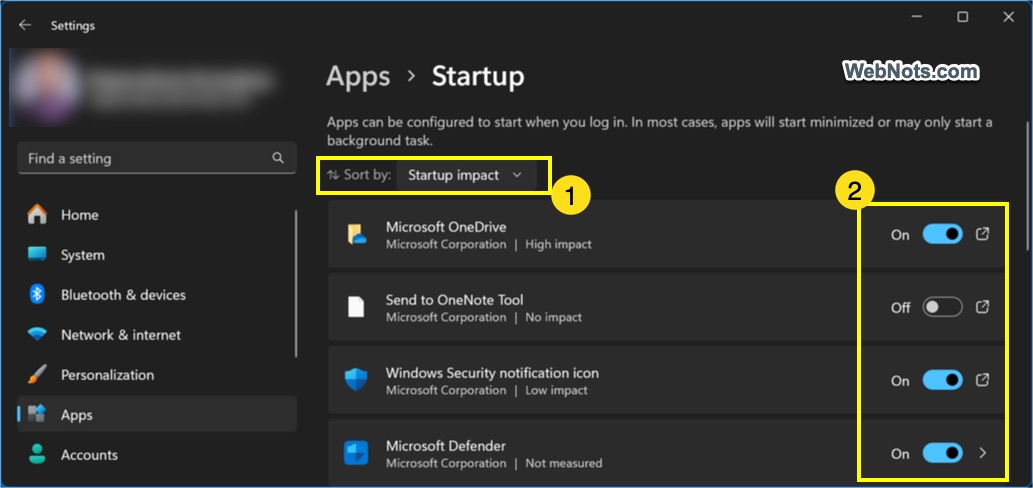
- Go to “Apps > Startup” section Settings app.
- Click the “sort by” dropdown and select “Startup impact” to find the high impact items.
- Simply turn off the button against the app to disable it.
7. Check for Driver Updates
Outdated drivers can cause hardware issues and crash the apps frequently. Keeping them updated ensures compatibility and performance.
How to do it:
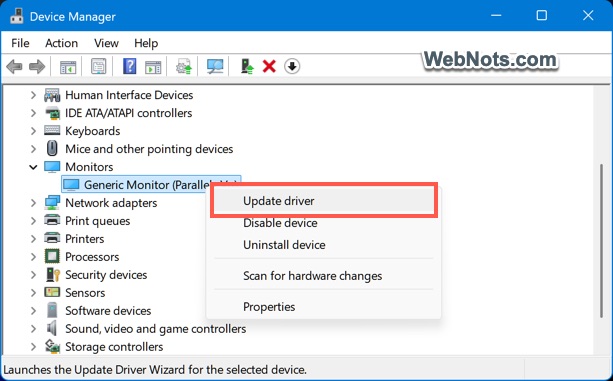
- Right-click on Start Menu icon and select “Device Manager”.
- Right-click on any device and select “Update driver” option.
- Select “Search automatically for drivers” to find and install the latest driver files for your device. Alternatively, you can manually update using the latest files downloaded from the device manufacturer’s website.
Note: Take a backup before updating drivers as explained in section 9 below.
8. Clean Your Browser Cache
Browsers store temporary files that can accumulate over period. This will not only occupy storage space but also cause loading issues. You need to delete them frequently to avoid keeping outdated data in cache.
How to do it:
- Press “Control + Shift + Delete” keys in Chrome, Edge and Firefox.
- Select “Time range as “All time”.
- Check relevant items like browsing / download histories, cookies, cached images and files, etc.
- Delete the selected items.
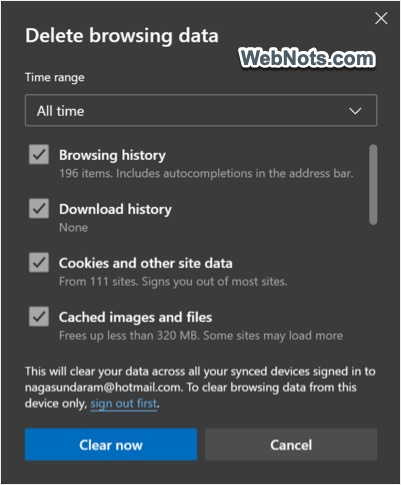
If you’re using other browser that doesn’t support the “Control + Shift + Delete” shortcut, use the appropriate menu to delete the history.
9. Backup Important Files
Taking regular backups protect your files during hardware failure or malware attacks and avoid data loss. It’s also recommended to backup the data before installing major Windows updates and driver updates.
How to do it:
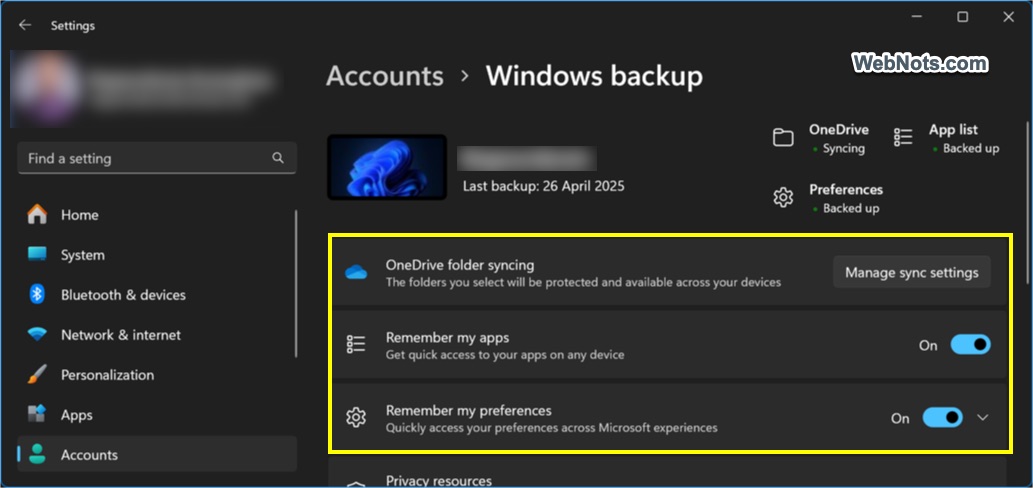
- For OneDrive backup, Go to “Settings > Accounts > Windows Backup” and sync all your content with OneDrive.
- Use the Recovery Drive tool to backup system files which you can use for reinstalling Windows.
- Manually create a system restore point or backup important files to third-party cloud services like Google Drive.
10. Check for System Errors
Over time, system files on your Windows PC can become corrupted due to sudden power outages, improper shutdowns, malware infections, failing storage drives, or even software conflicts. When critical system files are damaged, you may experience crashes, slow performance, or error messages. Windows includes built-in repair tools like System File Checker (SFC) and DISM (Deployment Image Servicing and Management) to scan and restore corrupted files. Running these commands ensures your operating system remains stable and prevents further issues.
How to do it:
- Open Command Prompt in admin mode and run
sfc /scannowcommand. - Wait for the scanning to finish and check the result. If SFC couldn’t fix the issue, then you can use the following DISM commands (run one by one) to check and restore the image.
DISM /Online /Cleanup-Image /CheckHealth
DISM /Online /Cleanup-Image /ScanHealth
DISM /Online /Cleanup-Image /RestoreHealth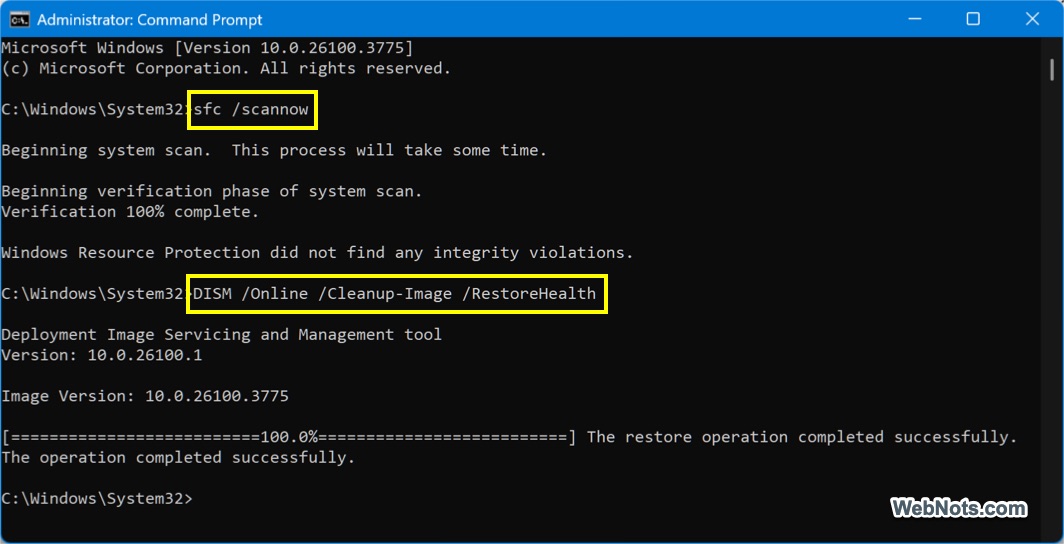
Regularly checking for file corruption helps maintain system health and prevents unexpected problems down the line.
Final Thoughts
Regularly performing these 10 essential Windows PC maintenance tasks will keep your system running smoothly, secure, and free from unnecessary slowdowns. Set a monthly reminder to check these items, and your PC will thank you with better performance and longevity.